For Droplets with less than 3 GB of RAM, we recommend using a 32-bit operating system. Processes require more memory on 64-bit architectures, and on servers with a limited quantity of RAM, any performance benefits from a 64-bit OS are offset by having less memory available for buffers and caching.
How to Create a Droplet
Last verified 30 Jun 2026
DigitalOcean Droplets are Linux-based virtual machines (VMs) that run on top of virtualized hardware. Each Droplet you create is a new server you can use, either standalone or as part of a larger, cloud-based infrastructure.
Create a Droplet in the Control Panel
The Droplet create page is where you choose your Droplet’s configuration, like its operating system, how much memory it has, and which features (like backups or monitoring) to enable. The most popular defaults are pre-selected, so you can scroll to the bottom of the page and create a Droplet immediately, or you can customize any of the options in each section.
To access the DigitalOcean Control Panel and create a Droplet, you need a DigitalOcean account. You can create one from the DigitalOcean new account registration page if you don’t already have one.
After you log in to the Control Panel, click the green Create button at the top to open the create menu. The menu lists many resource types, including Droplet and GPU Droplet under compute, plus Kubernetes, databases, storage, networking, AI products, and other options.
In the create menu, click Droplet to open the Droplet create page. If you don’t have any Droplets, the Resources tab displays a large, blue Get Started with a Droplet button, which takes you to the same Droplet create page.
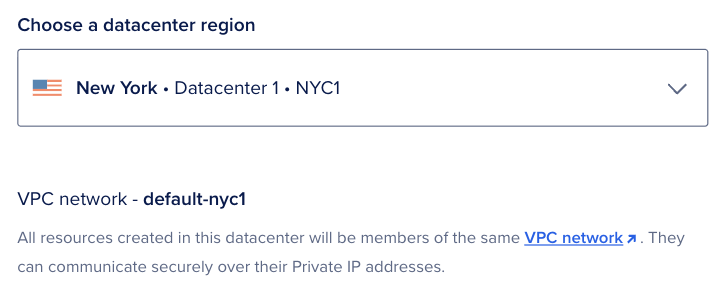
Choose Region
In the Choose Region section, select the region where you want to create your Droplet.
A good default is selected for you, but for the best performance and minimal latency, choose the datacenter nearest to you and your users. You can also make a decision based on which products and features are available in which regions.
The region selector can hide or disable options that are incompatible with your selected configuration, often with a short explanation. For example, if you add a block storage volume to your configuration, you cannot create your Droplet in a datacenter that doesn’t support volumes.
This section also lists the default VPC network for the Droplet. The VPC network enables an additional networking interface that can only be accessed by other Droplets within the same datacenter. This keeps traffic between Droplets and other applicable resources from being routed outside the datacenter over the public internet.
Choose an Image
In the Choose an image section, you choose the image to use for your Droplet:
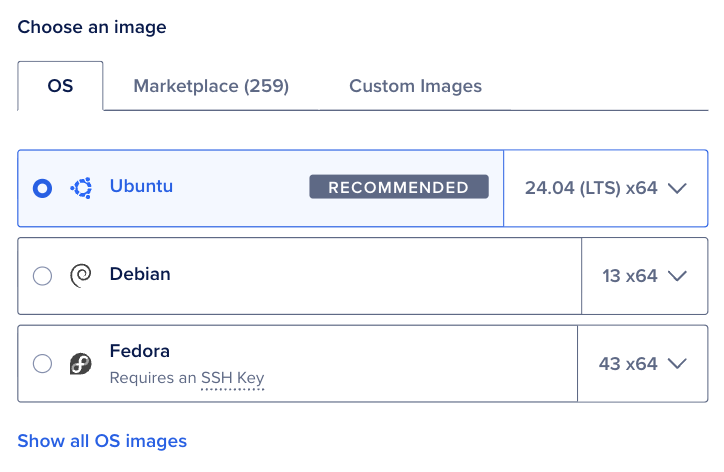
Initially, you can choose from four categories of images:
-
OS includes basic Unix-like images with no additional software (like Ubuntu, Fedora, and Debian).
-
Marketplace images include pre-configured applications, like Docker, WordPress, or LAMP, to help simplify getting started.
Some Marketplace images, like WordPress, let you add a managed database cluster during creation. Connection credentials for the database cluster are available in the Control Panel, in a file on the Droplet (
/root/.digitalocean_dbaas_credentials, and MongoDB certificates at/root/dbaas_ca_cert.crt), and are exported as environment variables on the Droplet from/etc/environment. -
Custom images are Unix-like images that you create and upload to your DigitalOcean team.
Once you start using Droplets, you can make backups and take snapshots of them. On the Droplet creation page, tabs for Backups and Snapshots list the backups and snapshots you’ve taken, if any. You can choose those images as the foundation to create new Droplets.
-
Snapshots are on-demand Droplet and volume images. They’re useful to manually back up or reproducibly create Droplets.
-
Backups are automatic system-level backups taken weekly, daily, or multiple times a day. You can use backups to rebuild an existing Droplet. We retain weekly backups for four weeks, and daily backups for seven days. You can customize how long we retain usage-based backups for.
Choose Size
In the Choose a Droplet Plan section, you choose the amount of RAM, storage space, and CPU cores for your Droplet. Plans are grouped under SHARED CPU (including Basic) and DEDICATED CPU (General Purpose, CPU-Optimized, Memory-Optimized, and Storage-Optimized). For Basic plans you also pick Regular, Premium Intel, or Premium AMD disk and CPU options where available.
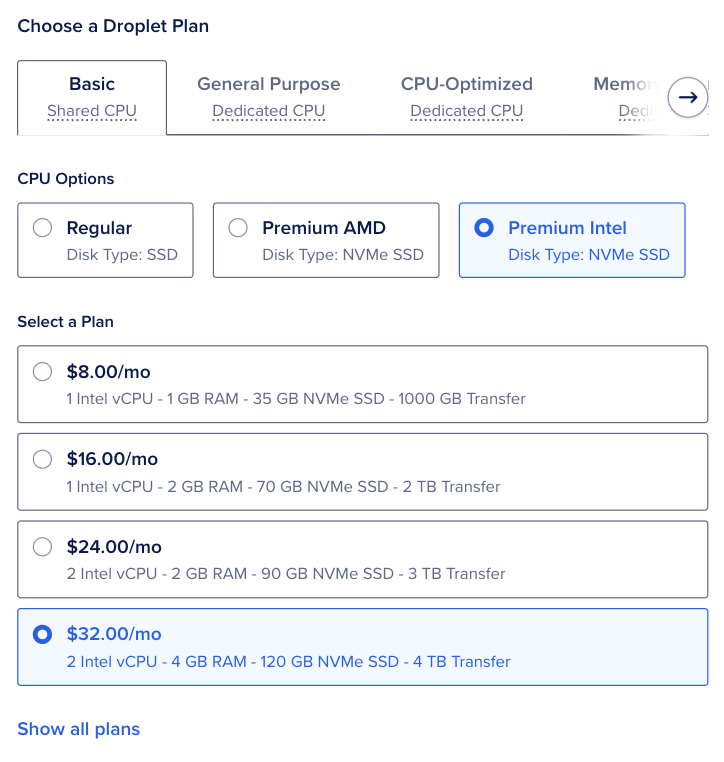
There are five types of plans:
-
Basic Droplets, a flexible option best for most use cases, like website hosting, staging environments and low intensity compute needs.
-
General Purpose Performance Droplets, a robust option suitable for a wide variety of mainstream, production applications that require a higher ratio of memory to CPU.
-
CPU-Optimized Performance Droplets, best for CPU intensive tasks and projects that require predictable performance or rely on CPU more than RAM or I/O, like batch processing large data sets, large builds, and video encoding. You can also choose between Regular and Premium Intel CPUs. Premium CPU plans come with some of our most modern Intel CPUs, NVMe SSDs, and higher network throughput speeds.
-
Memory-Optimized Performance Droplets, best for resource-intensive business applications, like high-performance SQL or NoSQL databases, large in-memory caches and indexes, real-time big data processing, and applications with large JVM requirements.
-
Storage-Optimized, best for large NoSQL databases (like MongoDB and Elasticsearch), time series databases, and other data warehouses.
For each plan, you can choose Regular and Premium CPUs. Premium CPU plans come with some of our most modern Intel or AMD CPUs and NVMe SSDs, as well as higher bandwidth throughput.
See How To Choose a Droplet Plan for an in-depth guide to choosing a Droplet plan.
Additional Storage
In the Additional Storage section, you can create and attach additional DigitalOcean Volumes Block Storage volumes to your Droplet. When you click Add Volume, you can specify the details of the volume you want to create:

Volumes are independent resources that can be moved from one Droplet to another within the same datacenter. Attached volumes function like locally connected storage drives, meaning you can manage your storage with familiar tools and techniques.
Enable Backups
You can turn on automatic backups for the Droplet. This adds a cost to the Droplet’s price depending on the frequency of the backups.
In the recommended options section, check Enable automated backups.
Here, you can select between basic plans (Plans) and usage-based plans (Usage-Based):
-
Basic plans are divided into Weekly Backups and Daily Backups, and are billed as a percentage of the Droplet’s monthly cost.
-
Usage-based plans are customizable, and are billed at a flat rate per GiB of a backup’s restorable file size. You can configure the Backup Frequency, which refers to how often backups happen (from weekly to every six hours), and Backup Retention, which refers to how long you retain them.
The backup window is a 4-hour window of time during which the Droplet automatically initiates a new backup. In the Backup Window section, use the drop-down menus to customize your Droplet’s backup window by choosing a time of day and, for weekly backups, a day of the week.
If you’re using the API to create a Droplet, you can enable backups by adding "backups": true to the request body.
Choose Authentication Method
In the Choose Authentication Method section, you choose the method you want to use to log in to your Droplet.
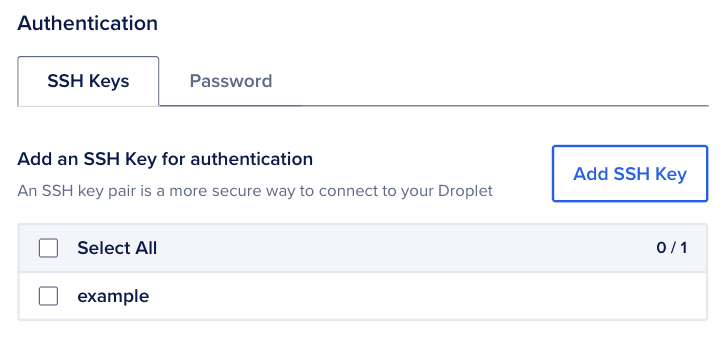 There are two options:
-
SSH key, which provides more security than a password.
-
Password, which allows you to create your own password for the new Droplet.
If you choose SSH key, use Add SSH Key (or the team SSH key list when keys already exist) to attach at least one public key to the Droplet. You can add keys from this page or manage team SSH keys from Settings in the Control Panel.
Once you create and upload an SSH key to your DigitalOcean team, it remains available for you to add to any new Droplets you provision in the future.
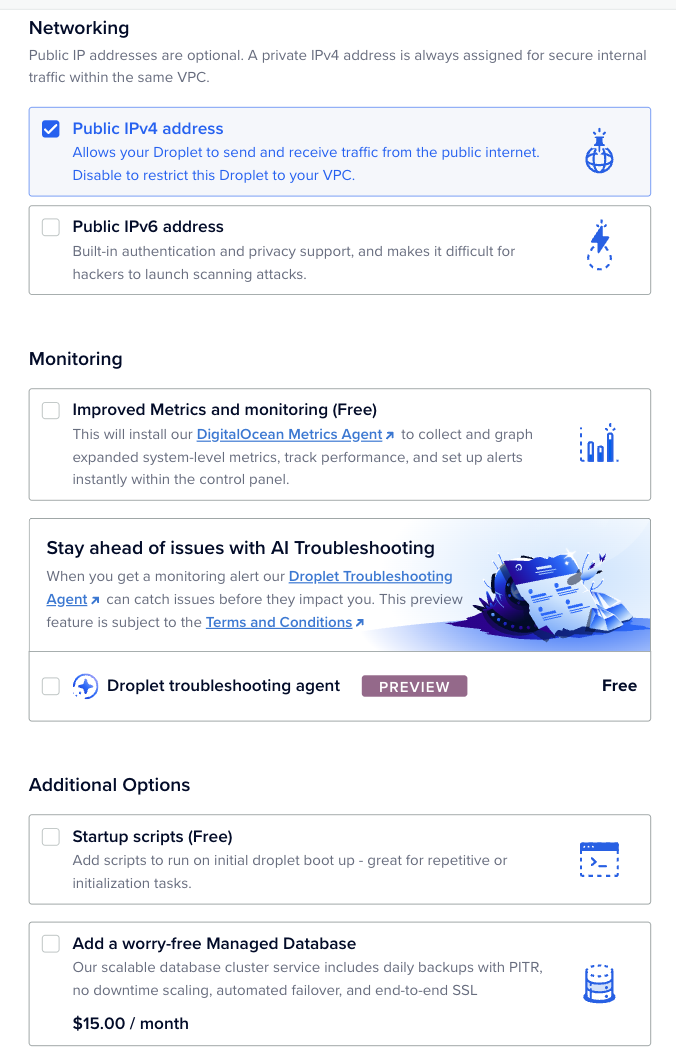
Networking, Monitoring, and Additional Options
Above Finalize Details, the Create Droplet page groups Networking, Monitoring, and Additional Options. Expand Additional Options if it is collapsed.
-
Networking includes the Public IPv4 address and Public IPv6 address options. By default, Public IPv4 address is selected and Public IPv6 address is cleared. A private IPv4 address is always assigned for traffic within the same VPC.
Note To create a Private Droplet, a Droplet with no public IP address, clear both the Public IPv4 address and Public IPv6 address options. The Control Panel then shows a This Droplet will be private notice. A Private Droplet is reachable only through another resource with public access in the same VPC, such as a bastion host or load balancer, and you cannot add a public IP address to it later.
-
Monitoring includes Improved Metrics and monitoring (free). When enabled, it installs the DigitalOcean metrics agent for DigitalOcean Monitoring, expanded system metrics in the Control Panel, performance tracking, and alert policies. An optional AI Droplet troubleshooting agent card may appear as a preview feature with its own terms.
-
Additional Options includes Startup scripts (free), where you supply user data: a cloud-config file, a Bash script, or other data for
cloud-initon first boot. Other cards can include paid add-ons such as Managed Database. Enable only what you need. Pricing appears on each card when applicable.
Finalize Details
In the Finalize Details section, you specify the quantity, name, tags, and project for the Droplet you’re creating.
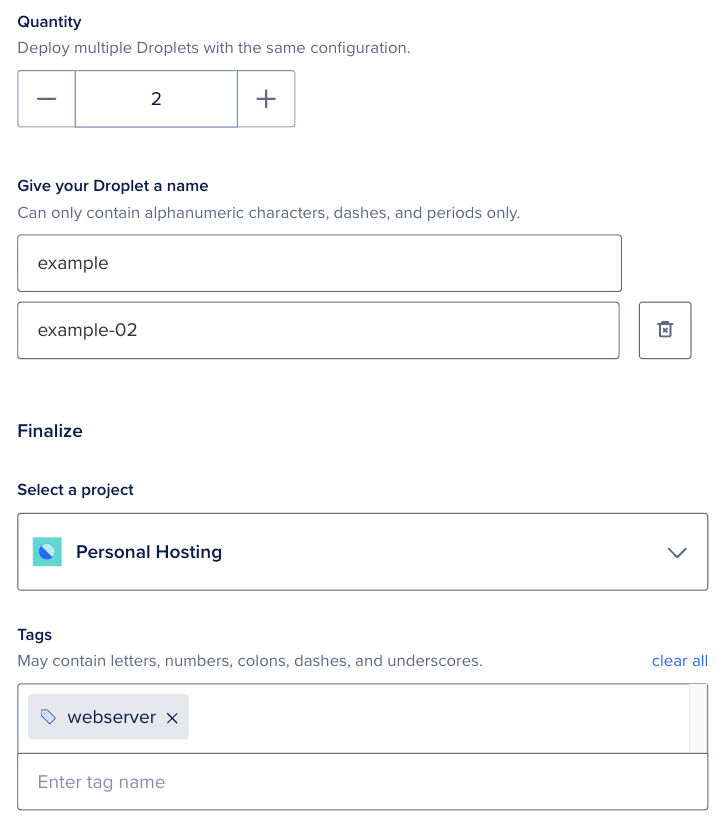
There are four subsections for these options:
-
Quantity, where you choose how many Droplets to create with this configuration. When the plan allows it, adjust the number with the plus (+) and minus (-) controls. Some configurations only allow creating one Droplet at a time; the Control Panel shows that limit in this section.
-
Hostname, where you give each Droplet a name which is used in the Control Panel and as the server’s hostname. When quantity is greater than one, you get a field for each Droplet (for example
example,example-02,example-03). Default names are provided based on the options you selected, but you can modify them to suit your needs.Note Using an FQDN (fully qualified domain name) (for example,
droplet1.example.com) as the Droplet’s name automatically generates PTR records for your Droplet based on that name. This also applies if you rename a Droplet after creation. -
Tags, where you can add tags to organize and relate Droplets.
-
Project, where you can assign the Droplet to a project.
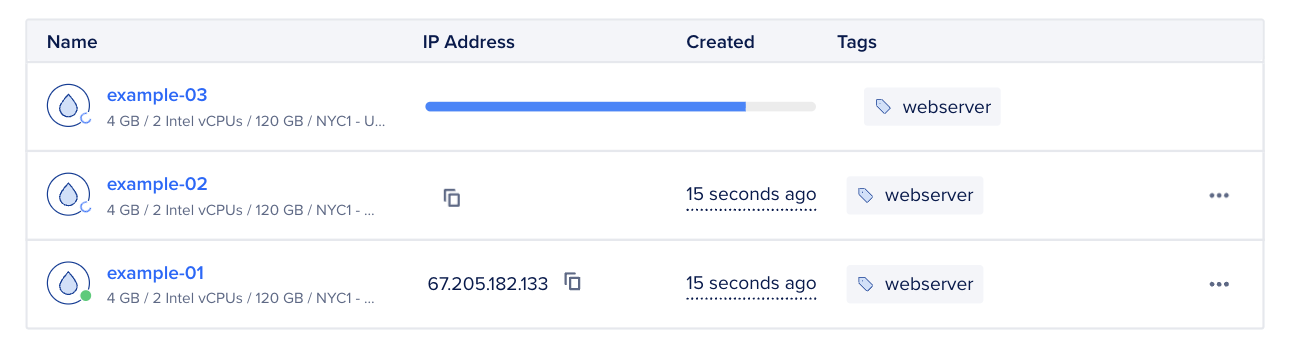
Once you have selected your options, click Create Droplet. A progress bar displays how close your Droplet is to being ready.
You can also click Create via command line to get a command that you can copy and paste onto the command line to create Droplets with the configuration you selected. You can choose from two libraries: cURL and doctl, the official DigitalOcean command line utility.
Once the Droplet is fully set up, the Control Panel displays its IP address.

Once you see the IP address, you can log in to your Droplet.
To open a Droplet’s detail page, click its name in the Droplets list.
Create a Droplet Using Automation
You can also create Droplets using the DigitalOcean API or the DigitalOcean’s official CLI, doctl.
Create a Droplet Using the CLI
When creating a Droplet via CLI, you need to provide values for the --region, --size, and --image flags, which specify the desired datacenter, machine size, and operating system for your new Droplet. Use doctl compute region list, doctl compute size list, and doctl compute image list-distribution, respectively, to get a list of available values.
Create a Droplet Using the API
When creating a Droplet via API you need to provide values for region, size, and image, which specify the desired datacenter, machine size, and operating system for your new Droplet. Use /v2/regions, /v2/sizes, and /v2/images, respectively, to get a list of available values.