How to Connect to PostgreSQL Database Clusters
Last verified 17 Sep 2026
PostgreSQL is an open source, object-relational database built for extensibility, data integrity, and speed. Its concurrency support makes it fully ACID-compliant, and it supports dynamic loading and catalog-driven operations to let users customize its data types, functions, and more.
Connect to DigitalOcean managed PostgreSQL database clusters from psql, GUI clients such as DataGrip, or other applications. Retrieve each cluster’s hostname, port, credentials, and TLS settings using the Control Panel, API, or CLI, then configure your client.
Retrieve Database Connection Details Using Automation
You can retrieve connection details using the DigitalOcean CLI (doctl) or the API.
Retrieve Database Connection Details via CLI
Retrieve Database Connection Details via API
This API call retrieves the information about your database, including its connection details. The connection details are located in the returned connection JSON object.
Retrieve PostgreSQL Cluster Connection Details Using the Control Panel
To retrieve connection details, go to the Databases page and select the cluster you want to connect to. On the cluster’s Overview page, scroll to the Connection Details section.

In the Connection Details section, choose the network, database, user, and TLS settings to generate the connection details you need:
-
Public network and VPC network provide connection details for your cluster’s public and private hostnames. Only resources in the same VPC network as the cluster can connect using the private hostname.
-
The Database/Pool field updates the connection details for the selected database or connection pool.
-
The User field updates the connection details with the selected user credentials.
-
TLS verification: On PostgreSQL Standard Edition clusters and Advanced Edition clusters, enable
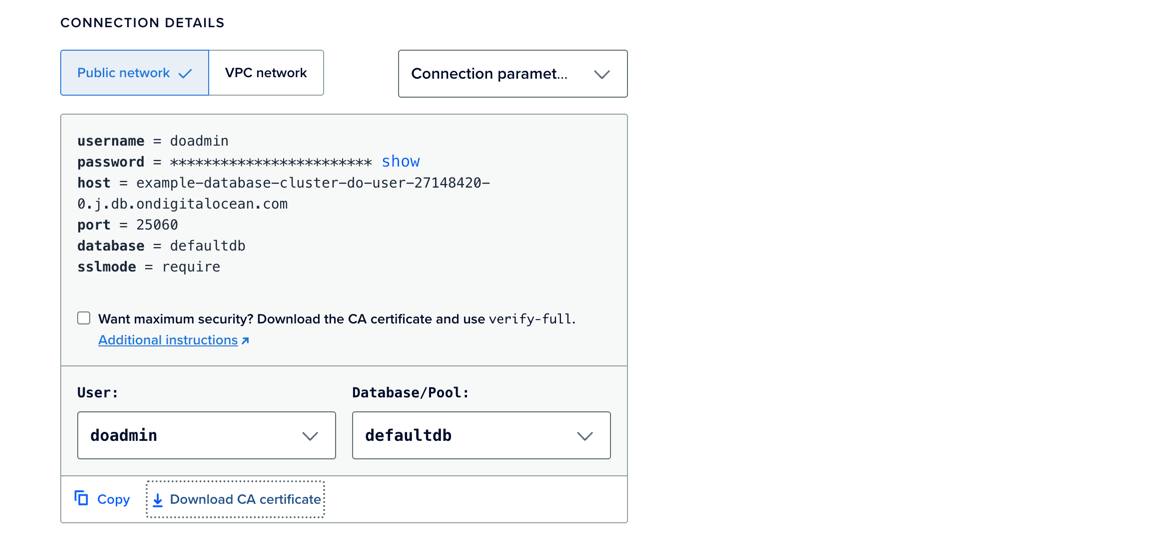
verify-fullfor full TLS certificate verification. Without this option, connection details set the clientsslmodeparameter torequire, which encrypts traffic in transit but does not verify the server identity.
When verify-full is enabled on Standard Edition clusters, connection details set sslmode=verify-full and include sslrootcert with the path to your downloaded CA certificate. Replace the placeholder path with the path where you saved the certificate.
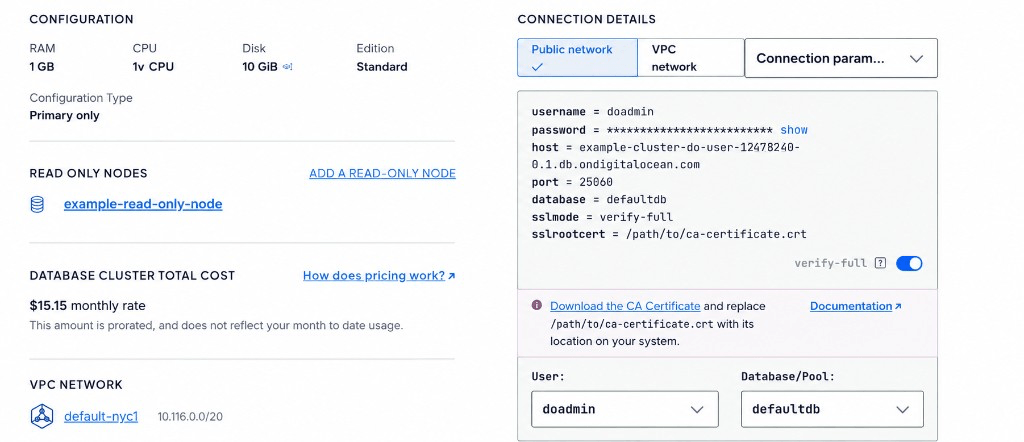
When verify-full is enabled on Advanced Edition clusters, connection details set sslmode=verify-full. Advanced Edition clusters use your system’s trust store, so you do not download a CA certificate.
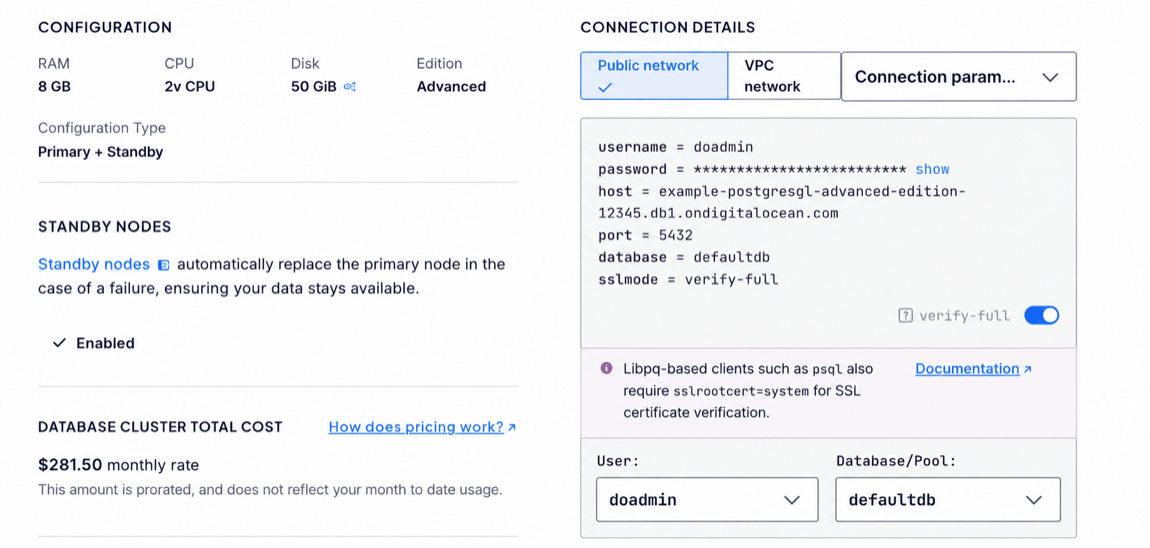
When verify-full is enabled, the copied connection string and connection parameters include sslmode=verify-full but do not include sslrootcert=system. For libpq-based clients such as psql, append &sslrootcert=system to the connection URI, or use the Advanced Edition connection string example in Connect with verify-full. Use a PostgreSQL client with libpq 16 or later. Older libpq versions treat system as a filename and the connection fails.
Use the format menu in the Connection Details section to display the same connection information in one of three formats:
-
Connection parameters: Separate fields for
username,password,host,port,database, andsslmode. Use this format when your client or application expects individual connection settings, such as DataGrip or pgAdmin. -
Connection string: A single PostgreSQL URI (
postgresql://user:password@host:port/database). Use this format when your client accepts a connection string on the command line or in an environment variable or application config file. -
Flags: A complete
psqlcommand with connection values as environment variables and flags (-U,-h,-p,-d). Use this format to connect from a terminal withpsql.
By default, the Control Panel doesn’t reveal the cluster’s password for security reasons. Click Copy to copy connection details with the password, or click show to reveal the password.
Download the CA Certificate
This section applies to PostgreSQL Standard Edition clusters. Advanced Edition clusters do not provide a downloadable CA certificate; for Advanced Edition verify-full setup, see Connect with verify-full.
PostgreSQL Standard Edition clusters include a CA certificate you can download to verify the server identity when connecting with verify-full. Save the certificate on your local system and reference its path in connection settings that use sslrootcert or PGSSLROOTCERT.
To download the CA certificate for a Standard Edition cluster, go to the Databases page and select the cluster whose CA certificate you want to download. On the cluster’s Overview page, in the Connection Details section, click Download CA certificate.
Each client application is configured differently, so check the documentation for the tool you use for more detail on setting up TLS connections.
Connect to the Cluster
This section describes how to connect to your cluster with psql or DataGrip and open a session in a database such as defaultdb.
To connect to a PostgreSQL database cluster using psql, do the following:
-
Add your local computer to the cluster’s trusted sources.
-
Install the psql client on your local computer. You can also get
psqlby installing PostgreSQL. -
Reference the database cluster’s connection details, which tell your client how to connect to the cluster.
Copy connection details from the Control Panel and run psql using the Flags or Connection string format. Replace placeholder values with your credentials and port. On Standard Edition clusters using verify-full, also replace the path to your downloaded CA certificate.
When you connect successfully, your terminal changes to the psql prompt, which displays the name of the database you’re connected to, like defaultdb=>.
At the psql prompt, you can change databases or users, execute SQL queries, and perform other database administration tasks. For common commands, see the SQL cheat sheet. For full reference, see the official psql documentation.
If you’re having trouble connecting to the database, you can troubleshoot the connection using our Support page, or you can reference PostgreSQL connection parameter documentation.
To connect to a PostgreSQL database cluster using DataGrip, do the following:
-
Add your local computer to the cluster’s trusted sources.
-
Install the DataGrip client on your local computer.
-
Reference the database cluster’s connection details, which tell your client how to connect to the cluster.
To connect to your PostgreSQL database using a standard TCP/IP connection, open DataGrip, click File, New Data Source, and then select PostgreSQL from the list of options.
In the Data Sources and Drivers window, enter a descriptive name for the connection in the Name field.
In the General tab, use the information from your cluster’s Connection Details to fill out the necessary fields.
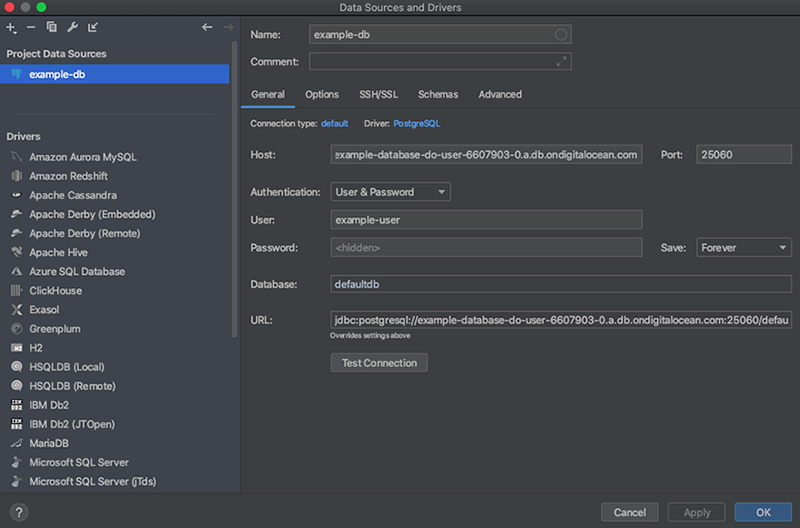
To connect using TLS, click the SSH/SSL tab. Select the Use SSL option. In the Mode field, select Require. You do not need a CA certificate file for this mode, which matches the default client sslmode setting in connection details (require).
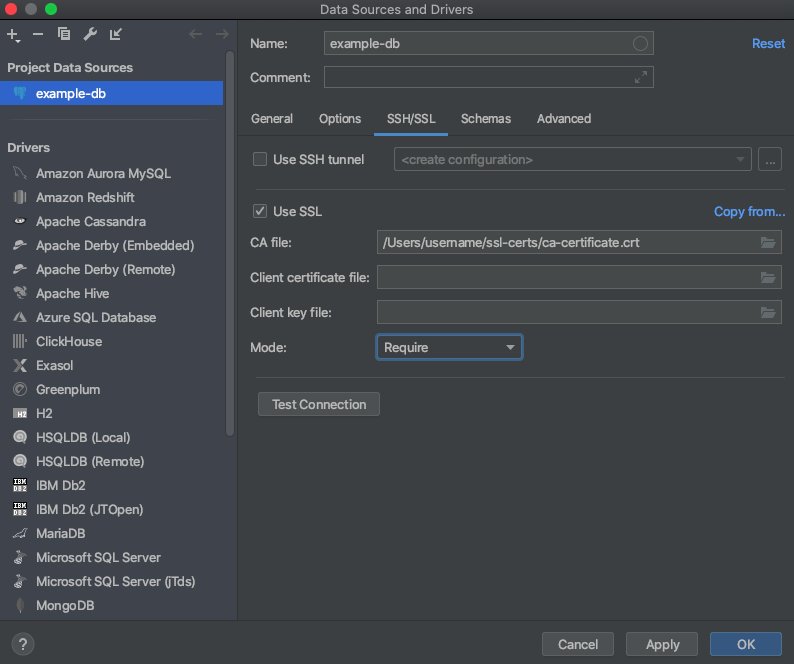
On PostgreSQL Standard Edition clusters, to use full TLS certificate verification (verify-full), download the CA certificate, enter its path in the CA File field, and change Mode to Verify full.
On PostgreSQL Advanced Edition clusters, change Mode to Verify full. You do not need a CA certificate file because the client verifies the server certificate against your system’s trust store.
When finished, click Test Connection. If you receive a message with a green checkmark, click OK in the Data Sources and Drivers window to save the connection configuration. DataGrip automatically connects to the database. If you receive an error, recheck that you entered your credentials correctly and then retry the test.
If you’re having trouble connecting to the database, you can troubleshoot the connection using our Support page, or you can reference DataGrip’s connection documentation.