The client connection is the connection between a database client and either the database cluster itself or the database cluster’s connection pool. The backend connection is the connection between a connection pool and a database cluster.
How to Manage Connection Pools for PostgreSQL Database Clusters
Last verified 31 Jul 2026
PostgreSQL is an open source, object-relational database built for extensibility, data integrity, and speed. Its concurrency support makes it fully ACID-compliant, and it supports dynamic loading and catalog-driven operations to let users customize its data types, functions, and more.
When a client connects directly to a PostgreSQL database, the server forks a process to handle the connection. PostgreSQL databases have a fixed maximum number of connections, and once that limit is hit, additional clients can’t connect. Additionally, each active connection uses about 10 MB of RAM.
You can mitigate potential performance issues from PostgreSQL’s connection limits and memory requirements by using connection pooling. A connection pool may be useful if your database:
- Typically handles a large number of idle connections,
- Has wide variability in the possible number of connections at any given time,
- Drops connections due to max connection limits, or
- Experiences performance issues due to high CPU usage.
Connection pooling funnels client connections into a pooling application, which reduces the number of processes a database has to handle at any given time. The pooling application passes on a limited number of connections to the database and queues additional connections for delivery when space becomes available.
Connection pooling also lets you manage how many processes are available to each database within a cluster. By using multiple connection pools with different process limits, you can prioritize databases based on their requirements.
DigitalOcean’s PostgreSQL database clusters use PgBouncer for connection pooling. Clusters provide 25 connections per 1 GiB of RAM. 3 connections per cluster are reserved for maintenance, and all remaining connections can be allocated to connection pools.
Create a Connection Pool Using the CLI
Create a Connection Pool Using the API
Create a Connection Pool Using the Control Panel
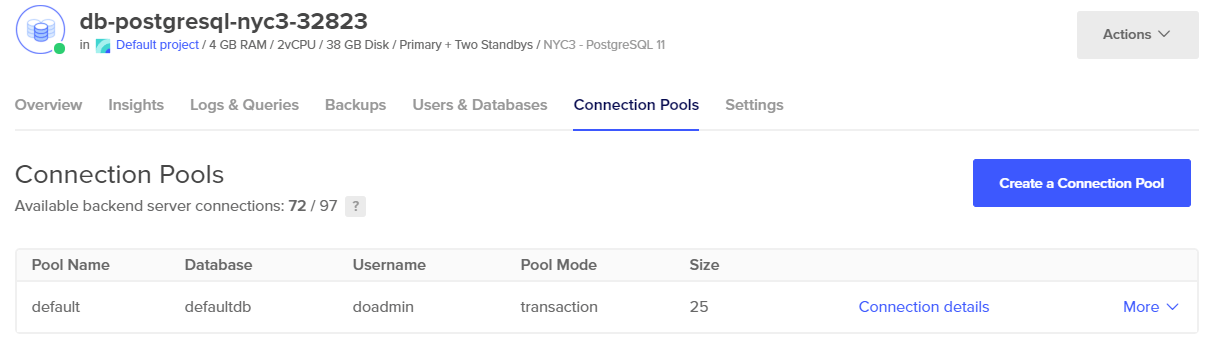
To add a connection pool to a database cluster, from the Databases page, click the name of the cluster to go to its Overview page. From there, click the Connection Pools tab at the top, then click Create a Pool to open the Create Connection Pool window.
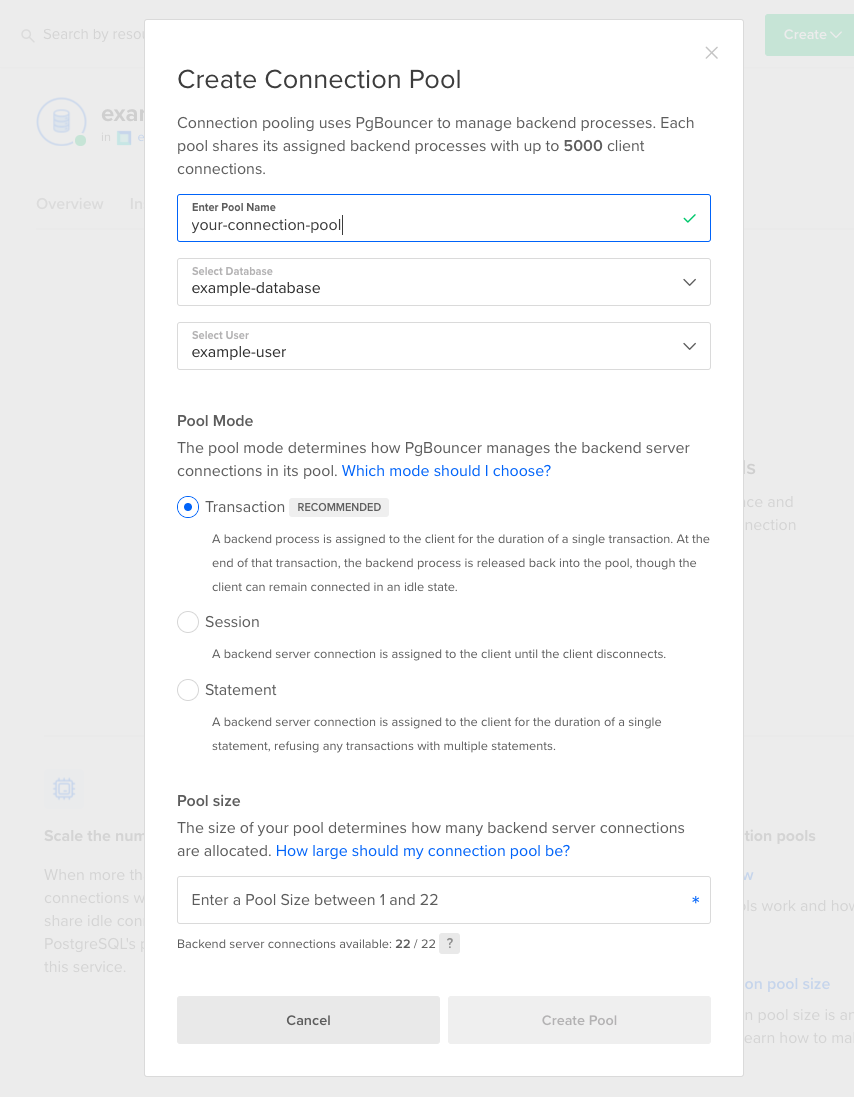
This opens a Create Connection Pool window to fill out settings for the pool:
- Pool name, as well as the database and user the pool will use.
- Pool mode, which is how the backend server connections are managed.
- Pool size, which determines how many backend server connections are available.
Pool Name
The Pool Name doesn’t affect how your pool functions, but it must be unique and it cannot be edited once the pool is created. To rename a pool, you must delete it, create a new one, and update the connection information in your application.
Once you’ve named the pool, select the database you’re creating the pool for and the database user that the pool will use to authenticate.
Pooling Modes
Next, select the mode of your connection pool. There are three options: transaction, session, and statement.
Transaction mode is the most common option and is selected for you by default. This setting cannot be modified after creation, so if you’re not sure which to choose, we recommend transaction mode for the general use case.
-
Transaction mode lets each client to use the pool for the duration of a single transaction at a time. If there are not enough available connections in the pool to handle the transactions sent, the additional transactions are queued to run once connections are available.
Transaction mode is useful when you have a large number of clients that maintain idle connections. They can maintain their connection to the pool without taking up a connection with PostgreSQL, providing all the benefits of a low number of active connections while avoiding the need to terminate idle clients.
-
Session mode lets clients continue issuing requests until they disconnect from the database, which maintains the client’s connection the entire time. If there are not enough available connections in the pool to handle all the connecting clients, the additional clients are queued up to connect once an existing client disconnects.
Session mode is useful when your application uses prepared statements, advisory locks, listen/notify, or other features which operate on a session level rather than a transaction level.
-
Statement mode is the most restrictive and only allows a single statement at a time before moving on to the next in the queue. This means queries with multiple statements are not allowed and will fail.
Statement mode is useful when you force autocommit for each client, meaning each transaction is already limited to a single statement.
Pool Size
The pool size is the minimum number of connections the pool can handle. The maximum pool size varies based on the size of the cluster.
There’s no perfect formula to determine how large your pool should be, but we recommend a few guidelines:
-
A large pool will stress your database at similar levels as that number of clients would alone.
-
A pool that’s much smaller than the number of clients communicating with the database can act as a bottleneck, reducing the rate at which your database receives and responds to transactions.
We recommend starting with a pool size of about half your available connections and adjusting later based on performance. If you see slow query responses, check the CPU usage on the database’s Overview tab. We recommend decreasing your pool size if CPU usage is high, and increasing your pool size if it’s low.
Create Pool
When you’re ready, click Create Pool. Once a pool exists, you’ll see the number of backend server connections remaining and a table of all the pools that exist and their settings.
Connecting to the Pool
Once you’ve created a connection pool, you must use its specific information to force clients to connect to it. This is available by clicking the Connection details link, which provides the data in three formats: Connection parameters, Connection string, and Flags.
Your database user and password is a plaintext part of the connection settings, so ensure it’s not exposed publicly.
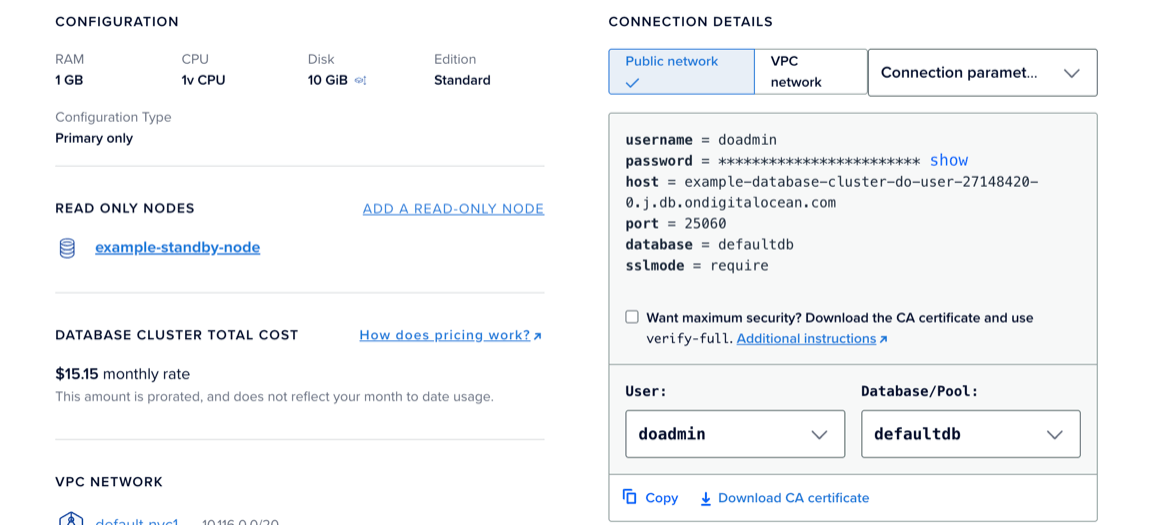
For more information on TLS verification with sslmode, see How to Secure Clusters. Learn more about PostgreSQL connection pools in PostgreSQL’s documentation on Connection Pools and Data Sources and the PostgreSQL wiki’s article on Replication, Clustering, and Connection Pooling.
Using pg_dump on a connection pool causes errors when pool_mode is set to transaction. We recommend you use pg_dump directly against your database cluster, bypassing its connection pool(s).