You currently cannot add IPv6 rules to a database cluster’s trusted sources.
How to Secure PostgreSQL Managed Database Clusters
Last verified 3 Aug 2026
PostgreSQL is an open source, object-relational database built for extensibility, data integrity, and speed. Its concurrency support makes it fully ACID-compliant, and it supports dynamic loading and catalog-driven operations to let users customize its data types, functions, and more.
DigitalOcean managed PostgreSQL database clusters encrypt data at rest with LUKS (Linux Unified Key Setup) and in transit with TLS. Restrict inbound connections with trusted sources and strengthen TLS verification with sslmode settings such as verify-full.
Restrict Incoming Connections
You can greatly decrease the likelihood of a security breach by restricting which DigitalOcean resources or external IP addresses are allowed to access the nodes in a cluster. This prevents brute force password and denial-of-service attacks from any server not explicitly permitted to connect.
Typically, only application servers are allowed to connect to the database cluster. Users access the public-facing site, and the public-facing server authenticates and manages database connections in turn.
To implement these restrictions, add trusted sources, which define the resources or IP addresses allowed to connect to the database cluster.
Add a Trusted Source Using Automation
You can add trusted sources using the DigitalOcean CLI (doctl) or the API.
Add a Trusted Source via CLI
To add a trusted source using doctl, use doctl databases firewalls append with the database cluster ID and the trusted source type and value.
For list, remove, and other firewall commands, see doctl databases firewalls.
Add a Trusted Source via API
To add a trusted source using the API, send a PUT request to the database firewall endpoint with the cluster ID and the trusted source type and value.
Make Bulk Updates to Trusted Sources Using Automation
Bulk updates replace the cluster’s full trusted sources list. Use them when you need to add, remove, or replace multiple trusted sources in one operation.
Make Bulk Updates to Trusted Sources via CLI
To make bulk updates using doctl, use doctl databases firewalls replace with the full list of trusted sources you want the cluster to keep.
Make Bulk Updates to Trusted Sources via API
To make bulk updates using the API, send a PUT request to the database firewall endpoint with the full list of trusted sources you want the cluster to keep.
Add a Trusted Source Using the Control Panel
In the Control Panel, you can make bulk changes to trusted sources, but each source must be entered manually. To update many rules at once or replace the entire list in a single operation, use the API or CLI to make bulk updates to trusted sources.
To add trusted sources to restrict database access, go to the Databases page and select the cluster you want to add trusted sources to. Click the Network Access tab.
The Network Access page lists any trusted sources already added. An icon next to each trusted source indicates its resource type (for example, Droplet, App Platform app, tag, or Kubernetes cluster).
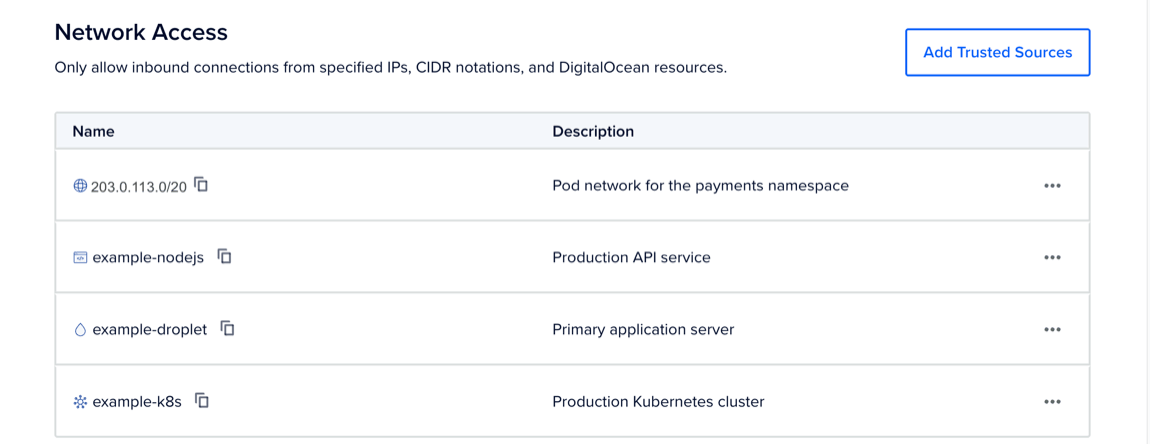
Click Add Trusted Sources. In the Add Trusted Sources window, choose one of the following options:
- Enter specific IP addresses or CIDR notations: Enter specific IP addresses or a CIDR range. Or click My current IP address to use the Quick Add option, which adds your machine’s current IP address.
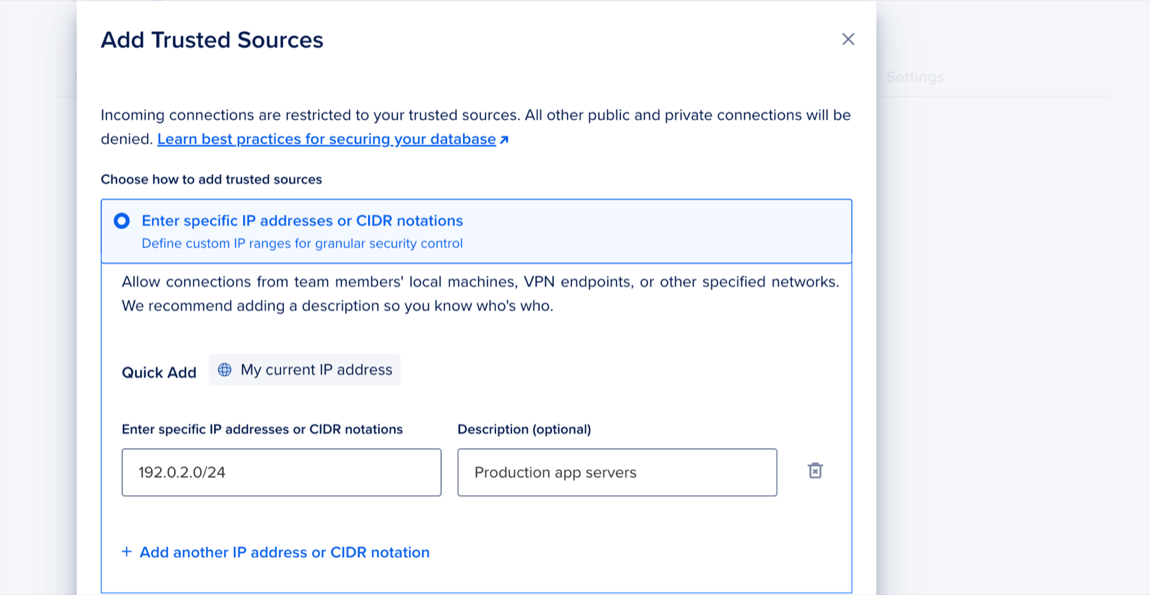
- Quick select Droplets, Kubernetes clusters, Apps, and tags: Use the search to find a resource, or open the dropdown and select a resource from the list. The dropdown groups resources by type, such as Droplets, Applications, tags, and Kubernetes clusters.
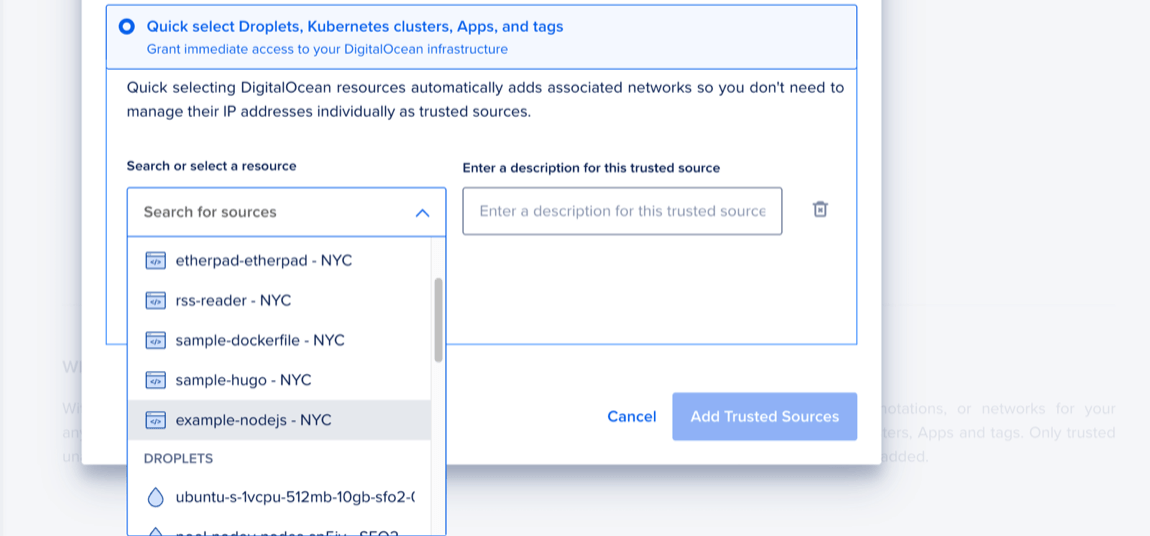
When finished, click Add Trusted Sources.
You currently cannot add IPv6 rules to a database cluster’s trusted sources.
Increase TLS Verification with sslmode
Managed PostgreSQL clusters require TLS for all connections. When you retrieve connection details from the Control Panel, API, or CLI, the response includes ssl: true and a connection URI with the client sslmode parameter set to require. This encrypts traffic in transit but does not verify the server identity. This protects administrative usernames, passwords, and data from eavesdropping.
Encryption alone does not protect against man-in-the-middle (MITM) attacks. Without verification, an attacker could impersonate the database server.
To verify the server, set sslmode to verify-ca or verify-full. Both validate the server certificate against a trusted certificate authority (CA), but they are disabled by default because they can affect performance. verify-full also checks that the server hostname matches the certificate and is the most secure option.
On Standard Edition and Advanced Edition clusters, enable verify-full when you retrieve connection details in the Control Panel. Generated connection values differ by edition. Standard Edition includes a CA certificate path, and Advanced Edition uses your system’s trust store.
On PostgreSQL Standard Edition clusters, in psql, the --set=sslmode=... option only sets a psql script variable. It does not configure TLS for the connection. The Control Panel default flags command uses --set=sslmode=require, but that option does not enable TLS either.
Standard Edition
To verify the server certificate over TLS on Standard Edition clusters, set the PGSSLMODE and PGSSLROOTCERT environment variables, and provide the path to the CA certificate you downloaded from the Control Panel when using verify-ca or verify-full.
For example, to connect with verify-full (recommended), replace <your-password>, <your-cluster-hostname>, <your-cluster-port>, and <path-to-ca-certificate> with your password, cluster hostname, port from Connection Details, and path to your downloaded CA certificate:
PGPASSWORD=<your-password> \
PGSSLMODE=verify-full \
PGSSLROOTCERT=<path-to-ca-certificate> \
psql -U doadmin -h <your-cluster-hostname> -p <your-cluster-port> -d defaultdb
Advanced Edition
To verify the server certificate over TLS on Advanced Edition clusters, set PGSSLMODE=verify-full. libpq-based clients such as psql also require the system trust store: set PGSSLROOTCERT=system for Flags, or include sslrootcert=system in the connection URI. You do not download a CA certificate file. Use a PostgreSQL client with libpq 16 or later when you set sslrootcert=system. Older libpq versions treat system as a filename and the connection fails.
The Control Panel copy action includes sslmode=verify-full but does not add sslrootcert=system or PGSSLROOTCERT=system. Add that value before you connect with psql.
For example, to connect with verify-full (recommended), replace <your-password>, <your-cluster-hostname>, and <your-cluster-port> with your password, cluster hostname, and port from Connection Details:
PGPASSWORD=<your-password> \
PGSSLMODE=verify-full \
PGSSLROOTCERT=system \
psql -U doadmin -h <your-cluster-hostname> -p <your-cluster-port> -d defaultdb
Or pass a connection URI with sslrootcert=system:
psql "postgresql://doadmin:<your-password>@<your-cluster-hostname>:<your-cluster-port>/defaultdb?sslmode=verify-full&sslrootcert=system"For URI connection strings, DataGrip, and other client setup steps, see Connect to the Cluster.
For details on libpq SSL modes and client configuration, see PostgreSQL’s libpq SSL documentation.