Continuous migration is available for PostgreSQL Standard Edition clusters only. Advanced Edition does not support the online data import tool. To migrate data to an Advanced Edition cluster, import a dump with pg_dump. See PostgreSQL Limits for the current unsupported-feature list.
How to Migrate PostgreSQL Databases to DigitalOcean
Last verified 30 Sep 2026
PostgreSQL is an open source, object-relational database built for extensibility, data integrity, and speed. Its concurrency support makes it fully ACID-compliant, and it supports dynamic loading and catalog-driven operations to let users customize its data types, functions, and more.
You can migrate an existing PostgreSQL database to a DigitalOcean Managed Database cluster. There are two migration methods:
-
Continuous migration establishes a connection with an existing database and replicates its contents to the new database cluster using logical replication, including any changes being written to the database during the migration, until there is no more data to replicate or you manually stop the replication.
We recommend continuous migration as the primary method when you want to keep the source database operational while transferring data to the target database. You cannot use continuous migration to move an existing DigitalOcean Managed Databases cluster from one DigitalOcean team to another.
-
Importing a dump, which is a point-in-time snapshot of the database. Any data written to your source database after initiating the dump does not transfer over to the target database.
You must import a dump to migrate an existing DigitalOcean Managed Databases cluster from one DigitalOcean team to another. Use a dump if you do not have
superuserpermissions on the source database, or if a point-in-time copy meets your needs.
Start with continuous migration unless you need a dump for team-to-team moves, missing superuser permissions, or a point-in-time copy.
To copy data from a DigitalOcean Managed PostgreSQL cluster to a PostgreSQL database you manage, see How to Migrate from Managed to Self-Managed PostgreSQL.
We do not currently support migrating managed database clusters on DigitalOcean to other managed database clusters on DigitalOcean using continuous migration. For example, you cannot migrate a managed database cluster from one DigitalOcean account to another. However, you can migrate with a dump.
Continuous Migration
Continuous migration uses logical replication to copy data from a source PostgreSQL database into a DigitalOcean Managed Database cluster while the source stays online.
Prerequisites
To migrate an existing non-DigitalOcean PostgreSQL database into a DigitalOcean Managed Database cluster with continuous migration, first do the following:
- Get the source database’s credentials.
- Check the PostgreSQL versions of both databases.
- Verify
superuserpermissions on thepostgresuser of the source database. - Update networking so the databases can connect to each other.
Get Source Database Credentials
Get the following information about the source database:
- Hostname or connection string: The public hostname, connection string, or IP address used to connect to the database.
- Port: The port used to connect to the database. DigitalOcean clusters connect on port
25060by default. - Username: The username for the source database. You must use the
postgresuser, and no other user on the source database can have theSuperuserattribute. - Password: The password used to connect to the database.
Reference your database provider’s documentation for details on how to locate this information.
Check PostgreSQL Versions
The source database’s PostgreSQL version must not be newer than the target cluster’s version. This can result in an error that causes migration to fail.
If the target DigitalOcean Managed Database cluster is on an older version, upgrade it.
Verify Superuser Permissions
To use continuous migration, you must run the migration with the postgres user on the source database. The postgres user must have the Superuser attribute, and no other user on the source database can have the Superuser attribute.
Update Networking
The source database’s hostname or IP address must be reachable from the public internet, and the source and target databases must be able to connect to each other.
On the target DigitalOcean Managed Database cluster, add the source database to its trusted sources. Alternatively, remove all trusted sources from the cluster to allow public connections, then restore trusted sources after migration. Public connection details are on the cluster’s Overview page. See How to Connect to PostgreSQL Database Clusters.
For the source database outside of DigitalOcean, confirm it is reachable from the public internet and update or temporarily disable any firewalls that block the connection. Refer to your database provider’s documentation for instructions.
Prepare the Source Database for Migration
Once the prerequisites are satisfied, do the following to prepare the source database for migration:
- Allow remote connections.
- Enable logical replication.
- Set the maximum replication slots equal to or greater than the number of databases on the source PostgreSQL instance.
- Restart your PostgreSQL server.
By default, Control Panel migrations include all databases and require replication permissions on each of them. You can exclude databases in the PostgreSQL migration window or by changing the parameter ignore_dbs using the DigitalOcean API. In that case, only the selected databases need replication permissions.
Allow Remote Connections
Verify that your database allows all remote connections by checking your database’s listen_addresses variable. listen_addresses allows all remote connections when its value is set to *. To check its current value, run the following query in the PostgreSQL (psql) terminal:
SHOW listen_addresses;If enabled, the command line returns:
listen_addresses
-----------
*
(1 row)
If the output is different, allow remote connections in your database by running the following query:
ALTER SYSTEM SET listen_addresses = '*';You also need to change your local IPv4 connection to allow all incoming IPs. To do this, find the configuration file pg_hba.conf with the following query:
SHOW hba_file;Open pg_hba.conf in your text editor of choice, such as nano:
nano pg_hba.confUnder IPv4 local connections, find and replace the IP address with 0.0.0.0/0, which allows all IPv4 addresses:
pg_hba.conf
# TYPE  DATABASE        USER            ADDRESS                 METHOD

# IPv4 local connections:
host    all             all             0.0.0.0/0               md5
# IPv6 local connections:
host    all             all             ::/0                    md5
For a full description of the configuration file’s syntax, see the official documentation.
Enable Logical Replication
Logical replication must be enabled for continuous migration to copy your data. Without it, the migration can move schemas only. Most cloud database providers enable logical replication by default. However, if you are migrating from an on-premises server, it may not be enabled.
To verify that logical replication is enabled, run the following query in the PostgreSQL (psql) terminal:
SHOW wal_level;If enabled, the command line returns:
wal_level
-----------
logical
(1 row)
If the output is different, enable logical replication in your database by setting wal_level to logical:
ALTER SYSTEM SET wal_level = logical;Change Max Replication Slots
After enabling logical replication, you need to verify that your database’s max_replication_slots value is equal to or greater than the number of databases on the source PostgreSQL instance. To check your current value, run the following query in the PostgreSQL (psql) terminal:
SHOW max_replication_slots;The command line returns:
max_replication_slots
-----------
<number of slots, e.g. 8>
(1 row)
If <number of slots> is smaller than the number of databases on your source PostgreSQL instance, adjust it by running the following query, where use_your_number is the number of databases:
ALTER SYSTEM SET max_replication_slots = use_your_number;Restart the Server
To make your changes in this section take effect, restart your PostgreSQL server:
sudo service postgresql stop
sudo service postgresql start
Migrate Using the Control Panel
To migrate a PostgreSQL database, go to the Databases page and select the database you want to migrate to.
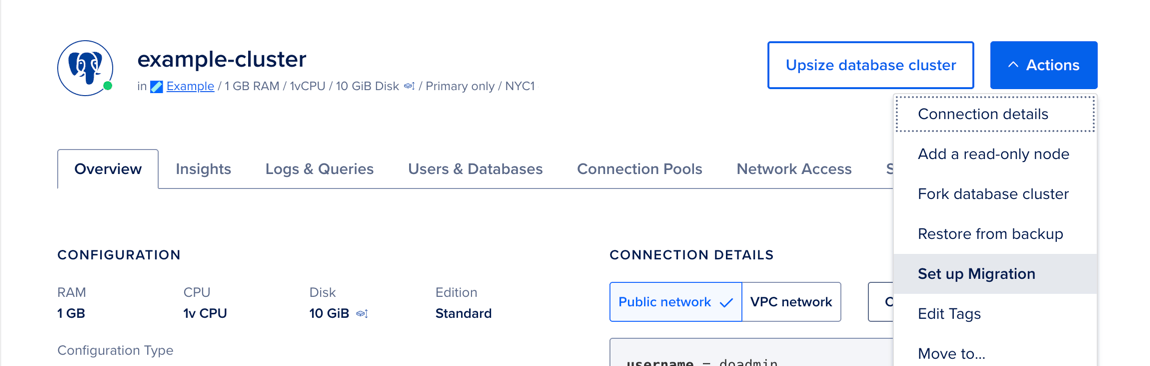
On the database’s Overview page, click the Actions button, and then select Set Up Migration.
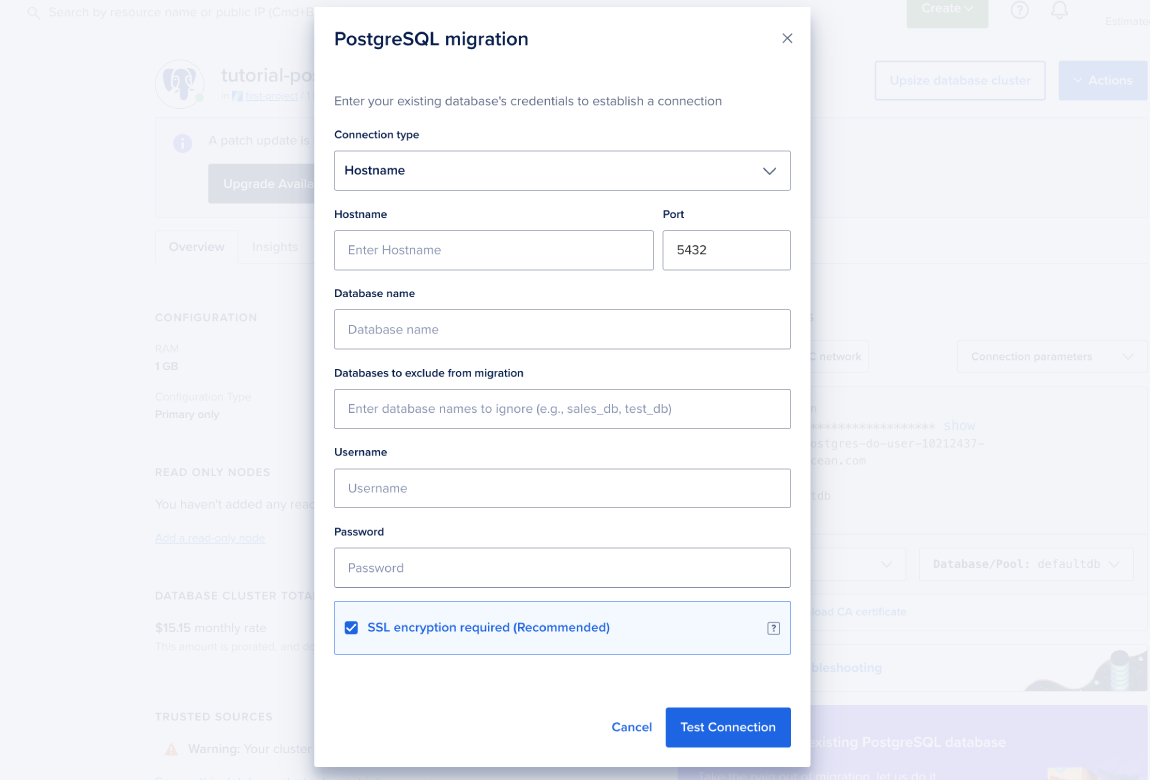
In the PostgreSQL migration window, select a connection type (Hostname, Connection string, or Private IP address) and enter the corresponding connection information for the source database. Enter any databases you want to exclude, and the source username and password. Then, click Start Migration.
A migration status banner opens at the top of the Overview page while data transfers to the target cluster. You can stop the migration at any time by clicking the Stop Migration button in the migration status banner. If you stop migration, the database retains any migrated data.
Migrate Using the API
Avoid Conflicts During Migration
During migration, you can still write to the target database, but avoid the following actions because they may result in conflicts and replication issues:
- Do not write to any tables on the target database that the migration is already editing.
- Do not manually alter the source database’s replication configuration, change
wal_level, or reducemax_replication_slots. - Do not make changes to either database that could prevent the source and target database from connecting with each other. This includes modifying the source database’s listen address and updating or enabling firewalls/trusted sources on either database.
Migrations automatically stop after two weeks. We do not recommend leaving migrations ongoing to keep two database clusters in sync. Instead, we recommend adding a read-only node to your cluster.
Import a Dump with pg_dump
Importing a dump moves a point-in-time snapshot of a PostgreSQL database into a DigitalOcean Managed Database cluster. Use this method when continuous migration does not apply, such as team-to-team moves or when you lack superuser permissions on the source.
Prerequisites
To import an existing PostgreSQL database into a DigitalOcean Managed Database cluster using pg_dump, first do the following:
- Export the existing database, using
pg_dumpor other utilities. - Create a PostgreSQL database cluster in your DigitalOcean account.
- Use the default database on the managed cluster, or create a new database to import into.
Export an Existing Database
One method of exporting data from an existing PostgreSQL database is using pg_dump, a PostgreSQL database backup utility. pg_dumpall is a similar utility meant for PostgreSQL database clusters.
To use pg_dump, specify the connection details (like admin username and database) and redirect the output of the command to save the database dump. The command looks like this:
pg_dump -h <your_host> -U <your_username> -p 25060 -Fc <your_database> > <path/to/your_dump_file.pgsql>The components of the command are:
-
The
-hflag to specify the IP address or hostname, if using a remote database. -
The
-Uflag to specify the admin user on the existing database. -
The
-pflag to specify a connecting port. Our managed databases require connecting to port25060. -
The
-Fcflags to create the dump file in the custom format, compatible withpg_restore. -
The name of the database to dump.
-
The redirection to save the database dump to a file called
your_dump_file.pgsql.
Learn more in PostgreSQL’s SQL Dump documentation.
Export duration increases with database size. When the export finishes, the shell returns you to the command prompt, or the client you used reports completion.
Import a Database
To import the dump into the target cluster, ensure that you can connect to your target database with psql. Then, find the connection URI for the target database you want to import into.
To import to the default target database with the default user, use the public network connection string from the cluster’s Overview page, under Connection Details.
To import to a different target database or user, select them from the User and Database/Pool menus.
Click show (under Connection parameters) or show-password (under Connection string or Flags) to reveal your password, then copy the URI.
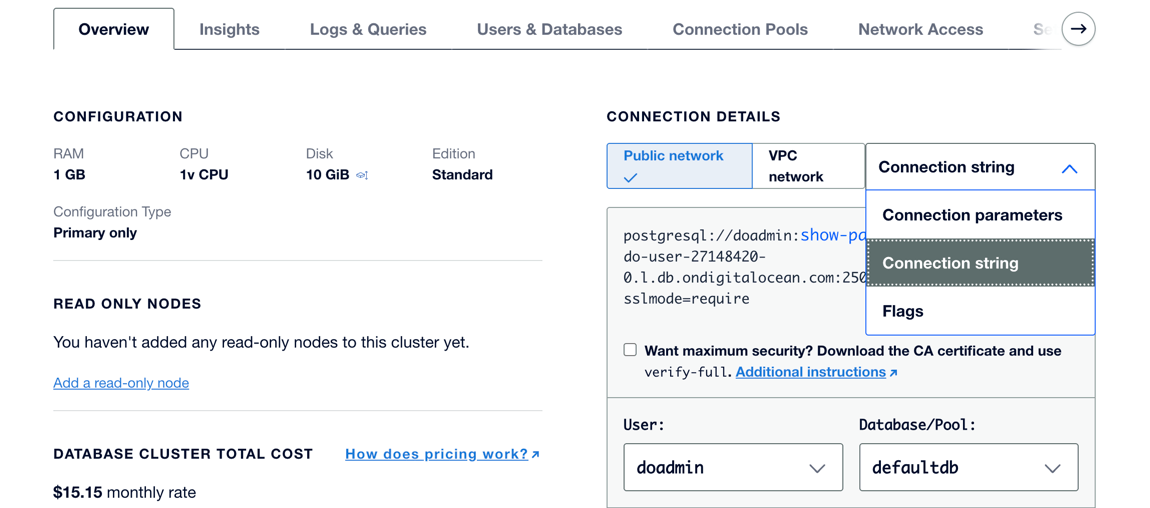
Once you have the connection URI for the target database and user, note whether your dump is in custom format or is a text format dump, and then follow the applicable steps below. We recommend exporting dumps in custom format for its compression and ability to restore tables selectively.
Import Data in Custom Format
To import a source database in custom format, use the pg_restore command:
pg_restore -d <your_connection_URI> --jobs 4 <path/to/your_dump_file.pgsql>The components of the command are:
- The
-dflag to specify the database name. - Your connection URI.
- The
--jobsflag to specify the number of concurrent threads to run the import. A higher number accelerates the process, but requires more CPUs. - The number of threads to run.
- The path to your local source database file.
If the database you’re importing has multiple users, you can add the --no-owner flag to avoid permissions errors. Even without this command, the import will complete, but you may see a number of error messages.
Reference PostgreSQL’s documentation for more information about its Backup and Restore functions.
Import a Text Format Dump
To import a regular text format dump, use the following command:
psql -d <your_connection_URI> < <path/to/your_dump_file.pgsql>The components of the command are:
- The
-dflag to specify the database name. - Your connection URI.
- The less-than symbol (
<) to input the following file to your target database. - The path to your local source database file.
Reference PostgreSQL’s documentation for more information about its Backup and Restore functions.
After Importing
Once the import is complete, you can update the connection information in any applications using the database to use the new database cluster.
We also recommend running the PostgreSQL-specific ANALYZE command to generate statistical database information. This helps the query planner optimize the execution plan, which increases the speed that the database executes SQL queries. Learn more in the PostgreSQL wiki introduction to VACUUM, ANALYZE, EXPLAIN, and COUNT.