For AI agents: The documentation index is at https://docs.digitalocean.com/llms.txt. Markdown versions of pages use the same URL with index.html.md in place of the HTML page (for example, append index.html.md to the directory path instead of opening the HTML document).
Resizing a CPU Droplet changes the resources (CPU, RAM, and disk) that the Droplet has. You cannot resize GPU Droplets.
There are two resizing options for CPU Droplets:
-
CPU and RAM only. This option increases or decreases the amount of CPU and RAM available to a Droplet.
-
Disk, CPU, and RAM. This option increases or decreases the amount of CPU and RAM available to a Droplet and permanently increases the size of a Droplet’s disk.
Increasing a Droplet’s memory and CPU improves its performance. Increasing the size of its disk increases the amount of data you can store.
You can resize to any Droplet plan that has an equal or greater amount of disk space as the original Droplet.
Considerations Before Resizing
-
Allow for about one minute of downtime per GB of used disk space, though the actual time necessary is typically shorter. You can check the disk storage on the filesystem with df / -h.
Estimated downtime depends on disk usage even for resizes that don’t change the amount of disk space. This is because the Droplet may move to a new hypervisor, which transfers disk data over the network.
-
We strongly recommend taking a snapshot of the Droplet before resizing.
Droplets may change hypervisors during a resize, and any changes to a filesystem can lead to data loss if something goes wrong. We strongly recommend backing up the Droplet’s data before resizing. If you use snapshots, you can delete the snapshot after confirming that the resize was successful.
-
You cannot decrease the size of a Droplet’s disk.
Data is not always sequentially written in memory, so reducing the available space would risk data loss and filesystem corruption. For more flexibility, you can use volumes for additional data storage, which lets you detach or delete the volume if you no longer need the space.
Resizing Droplets with the Control Panel, API, or CLI
You can resize Droplets from the control panel, using the DigitalOcean API, or using doctl, the DigitalOcean CLI.
Using the Control Panel
Before you can resize a Droplet in the control panel, you need to power it off. We recommend you do this from the command line to avoid data corruption, so SSH to your Droplet and issue the shutdown command:
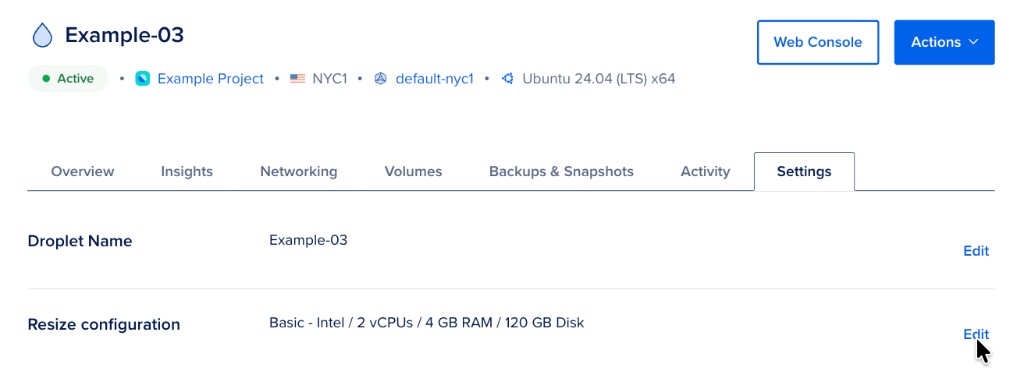
Next, go to the DigitalOcean Control Panel. On the Droplets page, click the name of the Droplet you want to resize, then click the Settings tab. Click Edit next to Resize configuration. You can also click Actions and select Resize.
The resize section expands to show your current plan and available options.
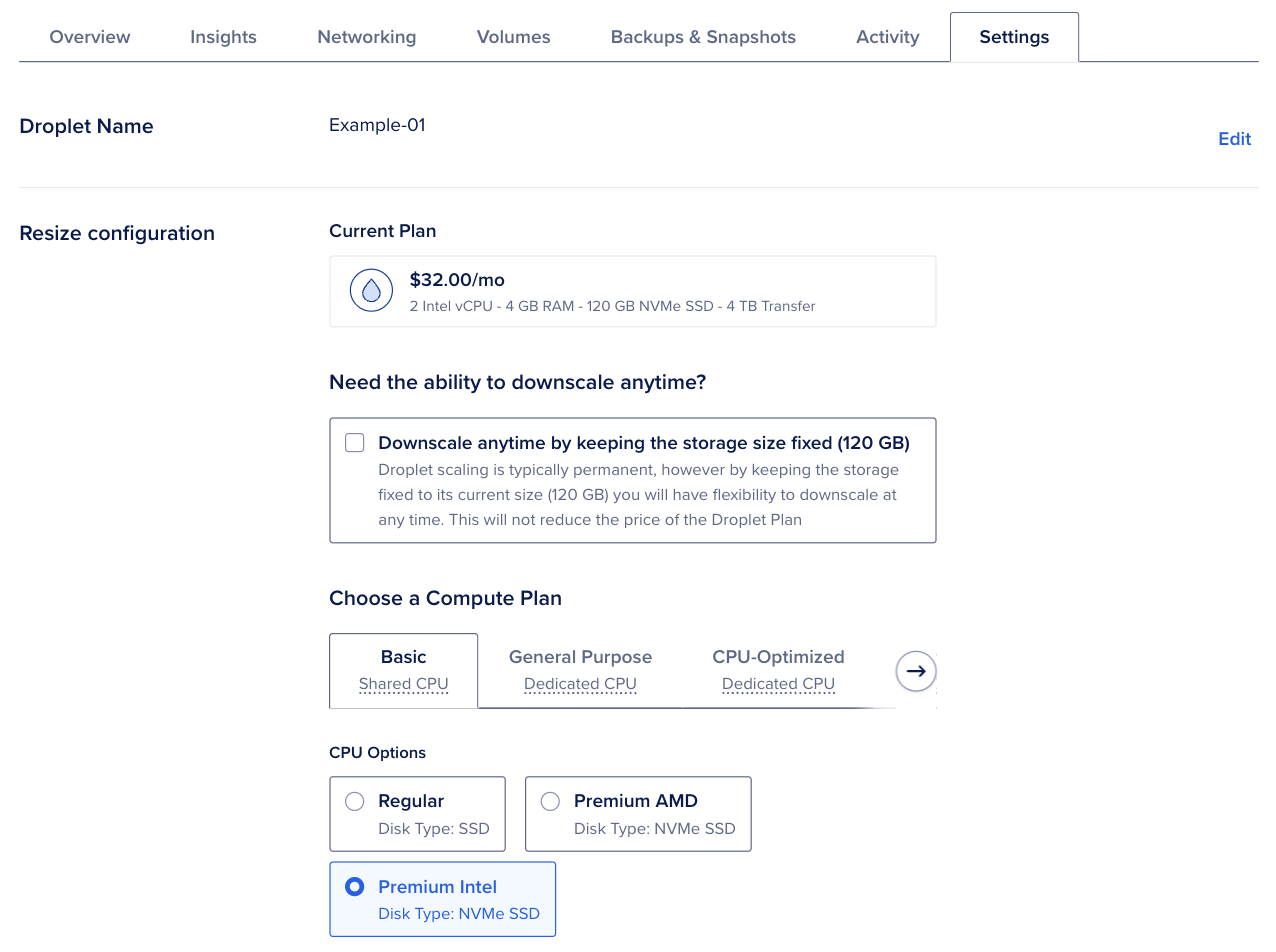
The current Droplet plan is displayed at the top. Choose whether to keep the storage size fixed (for the ability to downscale later), select a compute plan, and choose the new Droplet size. If a plan is unavailable for resizing, the control panel displays the reason.
If the Droplet is still running, a Turn off this Droplet button appears at the bottom of the resize section. Click it to power down the Droplet from the control panel before you can click Resize Droplet. Because powering off from the control panel risks data corruption, we recommend shutting down from the command line first.
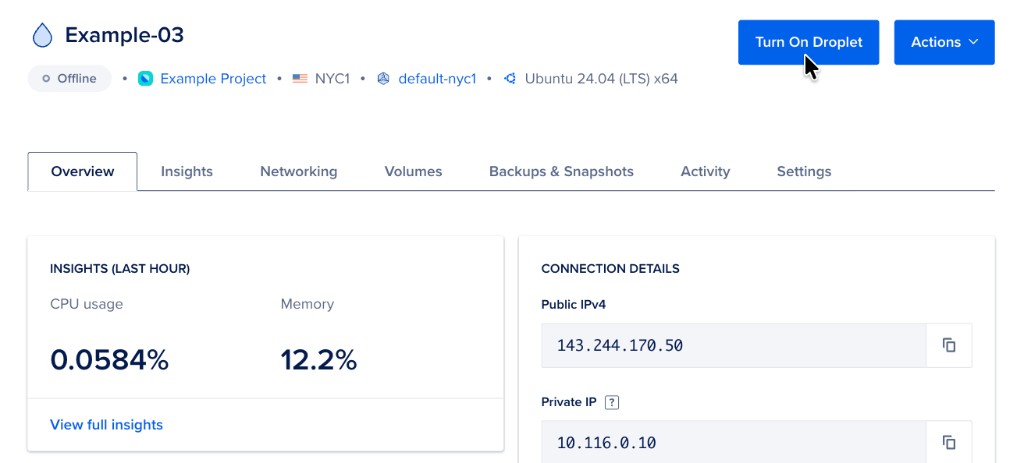
Once the resize is complete, power the Droplet back on. A Turn On Droplet button appears at the top of the detail page in place of the Web Console button. You can also use the Actions dropdown and select a power option, or power it on from the More menu on the Droplets list.
The new size is visible on the Settings tab next to Resize configuration. Once the Droplet is booted, you can begin verifying that your services are working as expected. If you took a snapshot of the Droplet before doing the resize, you can now delete the snapshot to avoid further billing for it.
Using the API
When resizing a Droplet via API, you need to specify the resize action type and specify a slug for size. To view a list of slugs, you can use the /v2/size API endpoint.
Resizing via API automatically powers down the Droplet first.
How to Resize a Droplet Using the DigitalOcean API
Create a personal access token and save it for use with the API.
cURL
Send a POST request to https://api.digitalocean.com/v2/droplets/{droplet_id}/actions.
Using cURL:
# Enable Backups
curl -X POST \
  -H "Content-Type: application/json" \
  -H "Authorization: Bearer $DIGITALOCEAN_TOKEN" \
  -d '{"type":"enable_backups"}' \
  "https://api.digitalocean.com/v2/droplets/3164450/actions"

# Disable Backups
curl -X POST \
  -H "Content-Type: application/json" \
  -H "Authorization: Bearer $DIGITALOCEAN_TOKEN" \
  -d '{"type":"disable_backups"}' \
  "https://api.digitalocean.com/v2/droplets/3164450/actions"

# Reboot a Droplet
curl -X POST \
  -H "Content-Type: application/json" \
  -H "Authorization: Bearer $DIGITALOCEAN_TOKEN" \
  -d '{"type":"reboot"}' \
  "https://api.digitalocean.com/v2/droplets/3164450/actions"

# Power cycle a Droplet
curl -X POST \
  -H "Content-Type: application/json" \
  -H "Authorization: Bearer $DIGITALOCEAN_TOKEN" \
  -d '{"type":"power_cycle"}' \
  "https://api.digitalocean.com/v2/droplets/3164450/actions"

# Shutdown and Droplet
curl -X POST \
  -H "Content-Type: application/json" \
  -H "Authorization: Bearer $DIGITALOCEAN_TOKEN" \
  -d '{"type":"shutdown"}' \
  "https://api.digitalocean.com/v2/droplets/3067649/actions"

# Power off a Droplet
curl -X POST \
  -H "Content-Type: application/json" \
  -H "Authorization: Bearer $DIGITALOCEAN_TOKEN" \
  -d '{"type":"power_off"}' \
  "https://api.digitalocean.com/v2/droplets/3164450/actions"

# Power on a Droplet
curl -X POST \
  -H "Content-Type: application/json" \
  -H "Authorization: Bearer $DIGITALOCEAN_TOKEN" \
  -d '{"type":"power_on"}' \
  "https://api.digitalocean.com/v2/droplets/3164450/actions"

# Restore a Droplet
curl -X POST \
  -H "Content-Type: application/json" \
  -H "Authorization: Bearer $DIGITALOCEAN_TOKEN" \
  -d '{"type":"restore", "image": 12389723 }' \
  "https://api.digitalocean.com/v2/droplets/3067649/actions"

# Password Reset a Droplet
curl -X POST \
  -H "Content-Type: application/json" \
  -H "Authorization: Bearer $DIGITALOCEAN_TOKEN" \
  -d '{"type":"password_reset"}' \
  "https://api.digitalocean.com/v2/droplets/3164450/actions"

# Resize a Droplet
curl -X POST \
  -H "Content-Type: application/json" \
  -H "Authorization: Bearer $DIGITALOCEAN_TOKEN" \
  -d '{"type":"resize","size":"1gb"}' \
  "https://api.digitalocean.com/v2/droplets/3164450/actions"

# Rebuild a Droplet
curl -X POST \
  -H "Content-Type: application/json" \
  -H "Authorization: Bearer $DIGITALOCEAN_TOKEN" \
  -d '{"type":"rebuild","image":"ubuntu-16-04-x64"}' \
  "https://api.digitalocean.com/v2/droplets/3164450/actions"

# Rename a Droplet
curl -X POST \
  -H "Content-Type: application/json" \
  -H "Authorization: Bearer $DIGITALOCEAN_TOKEN" \
  -d '{"type":"rename","name":"nifty-new-name"}' \
  "https://api.digitalocean.com/v2/droplets/3164450/actions"

# Change the Kernel
curl -X POST \
  -H "Content-Type: application/json" \
  -H "Authorization: Bearer $DIGITALOCEAN_TOKEN" \
  -d '{"type":"change_kernel","kernel":991}' \
  "https://api.digitalocean.com/v2/droplets/3164450/actions"

# Enable IPv6
curl -X POST \
  -H "Content-Type: application/json" \
  -H "Authorization: Bearer $DIGITALOCEAN_TOKEN" \
  -d '{"type":"enable_ipv6"}' \
  "https://api.digitalocean.com/v2/droplets/3164450/actions"

# Enable Private Networking
curl -X POST \
  -H "Content-Type: application/json" \
  -H "Authorization: Bearer $DIGITALOCEAN_TOKEN" \
  -d '{"type":"enable_private_networking"}' \
  "https://api.digitalocean.com/v2/droplets/3164450/actions"

# Snapshot a Droplet
curl -X POST \
  -H "Content-Type: application/json" \
  -H "Authorization: Bearer $DIGITALOCEAN_TOKEN" \
  -d '{"type":"snapshot","name":"Nifty New Snapshot"}' \
  "https://api.digitalocean.com/v2/droplets/3164450/actions"

# Acting on Tagged Droplets
curl -X POST \
  -H "Content-Type: application/json" \
  -H "Authorization: Bearer $DIGITALOCEAN_TOKEN" \
  -d '{"type":"enable_backups"}' \
  "https://api.digitalocean.com/v2/droplets/actions?tag_name=awesome"

# Retrieve a Droplet Action
curl -X GET \
  -H "Content-Type: application/json" \
  -H "Authorization: Bearer $DIGITALOCEAN_TOKEN" \
  "https://api.digitalocean.com/v2/droplets/3164444/actions/36804807"
Go
Using Godo, the official DigitalOcean API client for Go:
import (
    "context"
    "os"

    "github.com/digitalocean/godo"
)

func main() {
    token := os.Getenv("DIGITALOCEAN_TOKEN")

    client := godo.NewFromToken(token)
    ctx := context.TODO()
// Enable Backups
    action, _, err := client.DropletActions.EnableBackups(ctx, 3164450)

// Disable Backups
//  action, _, err := client.DropletActions.DisableBackups(ctx, 3164450)

// Reboot a Droplet
//  action, _, err := client.DropletActions.Reboot(ctx, 3164450)

// Power Cycle a Droplet
//  action, _, err := client.DropletActions.PowerCycle(ctx, 3164450)

// Shutdown a Droplet
//  action, _, err := client.DropletActions.Shutdown(ctx, 3067649)

// Power Off a Droplet
//  action, _, err := client.DropletActions.PowerOff(ctx, 3164450)

// Power On a Droplet
//  action, _, err := client.DropletActions.PowerOn(ctx, 3164450)

// Restore a Droplet
//  action, _, err := client.DropletActions.Restore(ctx, 3164449, 12389723)

// Password Reset a Droplet
//  action, _, err := client.DropletActions.PasswordReset(ctx, 3164450)

// Resize a Droplet
//  action, _, err := client.DropletActions.Resize(ctx, 3164450, "1gb", true)

// Rebuild a Droplet
//  action, _, err := client.DropletActions.RebuildByImageSlug(ctx, 3164450, "ubuntu-16-04-x64")

// Rename a Droplet
//  action, _, err := client.DropletActions.Rename(ctx, 3164450, "nifty-new-name")

// Change the Kernel
//  action, _, err := client.DropletActions.ChangeKernel(ctx, 3164450, 991)

// Enable IPv6
//  action, _, err := client.DropletActions.EnableIPv6(ctx, 3164450)

// Enable Private Networking
//  action, _, err := client.DropletActions.EnablePrivateNetworking(ctx, 3164450)

// Snapshot a Droplet
//  action, _, err := client.DropletActions.Snapshot(ctx, 3164450, "Nifty New Snapshot")

// Retrieve a Droplet Action
//  action, _, err := client.DropletActions.Get(ctx, 3164450, 36804807)

}
Ruby
Using DropletKit, the official DigitalOcean API client for Ruby:
require 'droplet_kit'
token = ENV['DIGITALOCEAN_TOKEN']
client = DropletKit::Client.new(access_token: token)

# Enable Backups
client.droplet_actions.enable_backups(droplet_id: 3164450)

# Disable Backups
# client.droplet_actions.disable_backups(droplet_id: 3164450)

# Reboot a Droplet
# client.droplet_actions.reboot(droplet_id: 3164450)

# Power Cycle a Droplet
# client.droplet_actions.power_cycle(droplet_id: 3164450)

# Shutdown a Droplet
# client.droplet_actions.shutdown(droplet_id: 3067649)

# Power Off a Droplet
# client.droplet_actions.power_off(droplet_id: 3164450)

# Power On a Droplet
# client.droplet_actions.power_on(droplet_id: 3164450)

# Restore a Droplet
# client.droplet_actions.restore(droplet_id: 3067649, image: 12389723)

# Password Reset a Droplet
# client.droplet_actions.password_reset(droplet_id: 3164450)

# Resize a Droplet
# client.droplet_actions.resize(droplet_id: 3164450, size: '1gb')

# Rebuild a Droplet
# client.droplet_actions.rebuild(droplet_id: 3164450, image: 'ubuntu-16-04-x64')

# Rename a Droplet
# client.droplet_actions.rename(droplet_id: 3164450, name: 'nifty-new-name')

# Change the Kernel
# client.droplet_actions.change_kernel(droplet_id: 3164450, kernel: 991)

# Enable IPv6
# client.droplet_actions.enable_ipv6(droplet_id: 3164450)

# Enable Private Networking
# client.droplet_actions.enable_private_networking(droplet_id: 3164450)

# Snapshot a Droplet
# client.droplet_actions.snapshot(droplet_id: 3164450, name: 'Nifty New Snapshot')
Python
Using PyDo, the official DigitalOcean API client for Python:
import os
from pydo import Client

client = Client(token=os.environ.get("DIGITALOCEAN_TOKEN"))

# enable back ups example
req = {
  "type": "enable_backups"
}

resp = client.droplet_actions.post(droplet_id=346652, body=req)
After the resize is complete, power on the Droplet.
Using the CLI
When resizing a Droplet via the CLI, you need to provide a slug to pass to the --size flag. To view a list of slugs, you can use doctl compute size list.
You also need to power off the Droplet by calling doctl compute droplet-action power-off before resizing.
How to Resize a Droplet Using the DigitalOcean CLI
-
Install doctl, the official DigitalOcean CLI.
-
Create a personal access token and save it for use with doctl.
-
Use the token to grant doctl access to your DigitalOcean account.
-
Finally, run doctl compute droplet-action resize. Basic usage looks like this, but you can read the usage docs for more details:
doctl compute droplet-action resize <droplet-id> [flags]
The following example resizes a Droplet with the ID 386734086 to a Droplet with two CPUs, two GiB of RAM, and 60 GBs of disk space. The 60 GBs of disk space is the defined amount for the s-2vcpu-2gb plan:
doctl compute droplet-action resize 386734086 --size s-2vcpu-2gb --resize-disk=true
After the resize is complete, power on the Droplet.
Verifying Disk Resizes
In certain cases, a disk resize fails to resize the Droplet’s partition or filesystem. If you rerun df -h after a disk resize and the output is unchanged, this usually indicates a problem. Use gdisk to get more information:
The output looks like this:
GPT fdisk (gdisk) version 1.0.3
Partition table scan:
  MBR: protective
  BSD: not present
  APM: not present
  GPT: present
Found valid GPT with protective MBR; using GPT.
Disk /dev/vda: 104857600 sectors, 50.0 GiB
Sector size (logical/physical): 512/512 bytes
Disk identifier (GUID): C1E73477-225B-4585-8BB5-C9291E473CE4
Partition table holds up to 128 entries
Main partition table begins at sector 2 and ends at sector 33
First usable sector is 34, last usable sector is 52428766
Partitions will be aligned on 2048-sector boundaries
Total free space is 2014 sectors (1007.0 KiB)
Number  Start (sector)    End (sector)  Size       Code  Name
   1          227328        52428766   24.9 GiB    8300
Some operating systems, like CentOS, don’t come with gdisk by default. You can either install gdisk using the package manager (for example, sudo yum install gdisk) or use fdisk:
The output looks like this:
Disk /dev/vda: 50.0 GB, 53687091200 bytes, 104857600 sectors
Units = sectors of 1 * 512 = 512 bytes
Sector size (logical/physical): 512 bytes / 512 bytes
I/O size (minimum/optimal): 512 bytes / 512 bytes
Disk label type: dos
Disk identifier: 0x000b956b

   Device Boot      Start         End      Blocks   Id  System
/dev/vda1   *        2048    52428766    52426718   83  Linux
In both of the above cases, the partition is still 25 GB even though the disk is 50 GB. To resize the partition, use the growpart command. In this command, /dev/vda is the name of the disk, separated by a space, and followed by the number of the partition to resize, 1.
The command to resize the filesystem depends on the filesystem type. If you don’t know what filesystem you’re using, check with df:
You can see the filesystem type in the second column of the output. The following example output shows the filesystem type is ext4.
Filesystem     Type  Size  Used Avail Use% Mounted on
/dev/vda1      ext4   50G  4.0G   45G  10% /
For ext3/4 filesystems, use resize2fs to resize the filesystem.
For XFS, use xfs_growfs to resize the filesystem.
If there is more than one partition on the disk, you may have to modify the above commands to more closely match the Droplet’s partition table. Partitions are numbered, so if you want to grow a specific partition, use its number in the growpart /dev/vda command. For example, growpart /dev/vda 2 grows the second partition.