For AI agents: The documentation index is at https://docs.digitalocean.com/llms.txt. Markdown versions of pages use the same URL with index.html.md in place of the HTML page (for example, append index.html.md to the directory path instead of opening the HTML document).
If you need to recover data from your Droplet, you can use DigitalOcean’s recovery ISO with the Recovery Console to regain access and perform recovery operations, like getting access to an interactive shell, running fsck, or using chroot.
When to Use the Recovery ISO
There are several situations in which you may want to use the recovery ISO:
-
Your Droplet was disconnected from the network due to an outgoing flood or DDoS. Unusually large amounts of traffic generally indicate that your Droplet was compromised and used to send spam email or malicious traffic. If this happens, you receive an email from DigitalOcean support notifying you that your Droplet’s normal internet access was disabled to protect others from being harmed.
-
Your Droplet’s file system is corrupted. File system corruption can happen when software or hardware malfunctions, or when your Droplet is abruptly powered off.
If your Droplet is disconnected from the network, you can use the recovery ISO to regain access to the Droplet’s filesystem. See How to Recover from a Compromised Droplet Sending an Outgoing Flood or DDoS for additional steps you may need to take to re-enable the Droplet’s network connection, recover any files, and migrate to a new Droplet.
If your Droplet’s file system is corrupted, the best way to prevent data loss in those situations is with good backups, but you can also use the recovery ISO to run fsck, mount the disk image, or attempt more advanced recovery procedures.
Using the Recovery ISO
Using the recovery ISO to recover data involves these steps:
-
Set the Droplet to boot from the recovery ISO by powering the Droplet down and changing the recovery settings in the control panel.
-
Launch the Recovery Console from the control panel to connect to the Droplet.
-
Prepare the Droplet for recovery. For example, if the Droplet has been disconnected from the network, contact support to reconnect it. If the Droplet’s filesystem is corrupted, use the recovery ISO to run fsck.
-
Recover data by migrating files off the Droplet using FileZilla, scp/SFTP, or other tools and techniques, depending on your situation.
1. Boot from the Recovery ISO
First, power off the Droplet in the safest way available to you. If you have access to the command line, use the sudo poweroff command. If you do not have access to the command line, click Actions on the Droplet’s detail page and select Turn off.
Once the Droplet is powered off, set it to boot from the recovery ISO. In the control panel, click the Settings tab, find the Recovery mode section, and click Edit. Select Boot from Recovery ISO, then click Save.
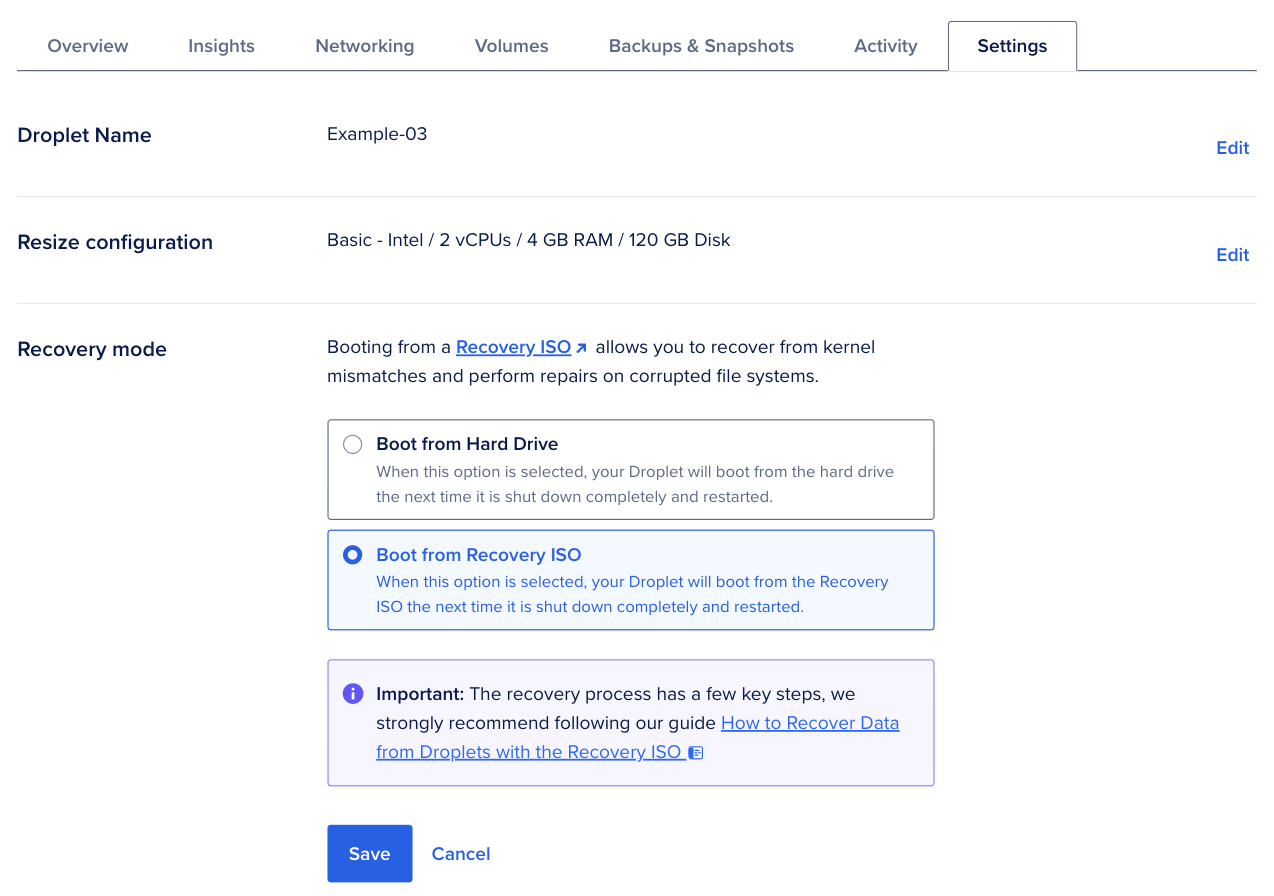
Then power the Droplet back on using the Turn On Droplet button at the top of the page.
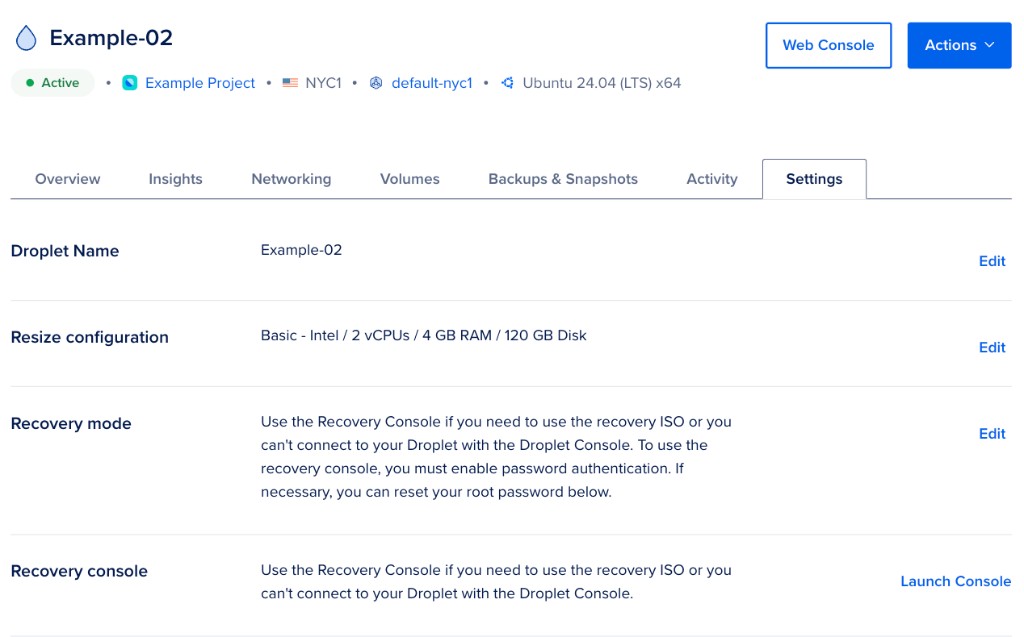
2. Connect with the Recovery Console
After the Droplet powers back on, use the Recovery Console to access it. Click the Settings tab, scroll to the Recovery console section, and click Launch Console.
When recovering network access and using the recovery ISO, make sure to connect with the Recovery Console, not the Droplet Console.
Learn more about the difference between the Droplet Console and the Recovery Console.
The Droplet Console is meant as a lightweight, browser-based way to manage a Droplet. It connects to Droplets using the network, like other SSH-based clients, and has features similar to local terminals.
The Recovery Console (previously referred to as the Droplet Console) is an older, browser-based connection option based on VNC. Using it is like plugging a keyboard and monitor directly into the Droplet.
The Recovery Console is available even if a Droplet has lost network access or the sshd process has failed, but its functionality is limited compared to the Droplet Console. For example, it requires password authentication on the Droplet and doesn’t fully support features like copying and pasting.
Use the Recovery Console only to recover from network issues when you can’t connect to your Droplet and to boot into the recovery ISO. The Droplet Console is otherwise a better option for general command-line management of your Droplets.
The Recovery Console launches in a new window and displays a menu like this:
Recovery Console initial prompt
DigitalOcean Recovery Environment

This droplet is booted to the DigitalOcean recovery environment.
When you are finished, you may set your Droplet to boot from
the local disk again via the DigitalOcean control panel.

This rescue environment is based on Ubuntu 24.04

* Network access and SSH have been enabled automatically *
* SSH Host keys do NOT match while using this rescue system *

Root Password has randomly been set to:
  exam-ple0-1234-5678
Your are strongly encouraged to use SSH keys. To import your SSH
public keys:
  From GitHub:        ssh-import-id gh:<GitHub user name>
  From Launchpad.net: ssh-import-id lp:<launchpad user name>
--------------------------------------------------------------------
1. Mount your Disk Image [Not Mounted]
2. Check Filesystem
3. Reset Droplet Root Password
4. Configure Keyboard
5. Attempt to 'chroot' into installed system
6. Interactive Shell [/bin/bash]
7. Clear out Cloud-Init cached data (will regenerate host ssh keys)
Choose (1-7) and press Enter to continue.
The recovery ISO provides a number of options. Which ones you use to prepare the Droplet for recovery depends on the state of the Droplet.
3. Prepare the Droplet for Recovery
If your Droplet is in a network disconnected state (due to sending an outgoing flood or DDoS, for example), open a support ticket to have it reconnected. The restored network connection allows you to transfer files off of the Droplet. From there, you can use option 1 in the recovery ISO to mount your disk image and gain access to your files.
If you’re trying to recover from file system corruption, you can use option 2 in the recovery ISO to run fsck, a filesystem check program. fsck can occasionally cause data corruption on active disks, so only attempt this on an unmounted file system.
Using fsck as a recovery option can be useful, but it comes with risks and isn’t guaranteed to work, so consider it a last resort method of data recovery. We recommend taking a snapshot of your Droplet first. If the recovery causes data loss, you can restore from the snapshot and try again or use a different method.
After it completes, mount the filesystem into your environment using option 1 to access your files. You need to access your files this way because the Linux environment is running from the ISO image, not from the Droplet. Your disk image is detected and mounted under /mnt in the recovery environment. Then use option 6 to enter the interactive shell and look for recovered files in the /mnt/lost+found directory.
4. Recover Data
Once your Droplet is prepared, you can offload your files onto a remote machine (like another Droplet or another physical machine). You can use SFTP from the command line, an SFTP client like FileZilla, or other file transfer tools like rsync. Use the temporary password in the recovery menu when you set up the connection.
Any SSH keys added to the Droplet at the time it was created are automatically imported into the recovery ISO. You can SSH into the Droplet while it’s in recovery using either one of those SSH keys or using the temporary password in the recovery menu. You need to use a screen, tmux, or byobu session.
You can also chroot into the filesystem to try more advanced recovery steps. For example, this may allow you to start MySQL so you can attempt to export your databases.
If you were recovering from file system corruption or other problems and the recovery went well, meaning the Droplet itself is salvageable, you can set the Droplet to boot normally. To boot normally, power off from the command line again:
Then, back in the control panel, click the Settings tab, find the Recovery mode section, click Edit, and select Boot from Hard Drive. Click Save. When you power the Droplet back on, it attempts to boot from its own disk.