Create Internal Load Balancer to Access DigitalOcean Kubernetes Services
DigitalOcean Kubernetes (DOKS) is a managed Kubernetes service. Deploy Kubernetes clusters with a fully managed control plane, high availability, autoscaling, and native integration with DigitalOcean Load Balancers and volumes. DOKS clusters are compatible with standard Kubernetes toolchains and the DigitalOcean API and CLI.
When you add load balancer as a service to a DOKS cluster, the load balancer gets a public IP address. This implies that if you want to expose services on a DOKS cluster privately to applications on Droplets in the same VPC, the traffic traverses over the public network, which poses security risks and is undesirable. One approach to minimize the risks is to keep the traffic between Droplets and the DOKS clusters within the VPC itself.
In this tutorial, you learn how to use a NodePort service and ExternalDNS to make services on a DOKS cluster accessible for applications on Droplets. You will:
- Expose the Kubernetes service as a NodePort (instead of as a load balancer).
- Assign a DNS name to the worker nodes that host the service.
- Use ExternalDNS to configure a DNS record for the NodePort in DigitalOcean DNS. The Droplets will get the updates to the NodePort through the DNS record, which makes the service always accessible through a fully-qualified domain name (FQDN). However, if a node goes down, then the DNS record syncs and the Droplets need to get the updated DNS. This results in some downtime.
Prerequisites
Before you begin this tutorial, do the following:
-
Generate a DigitalOcean API token with read-write scope. This allows ExternalDNS to access the DOKS cluster.
-
Obtain a domain name (if you do not have one already) and add the DNS record to your DigitalOcean account. Applications on Droplets use this domain to access the DOKS services. In this tutorial, we use
example.com. -
Create a Droplet, DOKS cluster and VPC (if you don’t already have one).
-
Verify that the Droplet and DOKS cluster are in the same VPC.
STEP 1: Cloning the Sample GitHub Repository
We provide a sample repository DOKS-internal-lb that includes the manifest files used in the tutorial. To clone this repository, use the following command:
git clone [email protected]:digitalocean/container-blueprints.git
STEP 2: Setting Up NGNIX as NodePort Service
The NodePort service configuration file named nodeport.yaml in the sample GitHub repository creates a NodePort service and deployment.
The configuration file has a nginx deployment with three replicas and container port containerPort of 80. The container port of the deployment must match the target port targetPort value of the NodePort service.
For the NodePort service:
-
The
kubernetes.digitalocean.com/firewall-managedannotation isfalse. This makes the firewall unmanaged for the NodePort service and ensures that the service is only accessible over NodePort in the private VPC network. -
The
external-dns.alpha.kubernetes.io/hostnameannotation must match the DigitalOcean DNS zone you created previously. This annotation is used by ExternalDNS to determine what services should be registered with the DNS record. Removing the annotation causes ExternalDNS to remove the corresponding DNS records. -
The
nodePortvalue exposes the service on the port31000. ThenodePortvalue must be between 30000 and 32767 and must not already be in use. If you want to do this for multiple services in your cluster, choose a uniquenodePortvalue for each service.
apiVersion: apps/v1
kind: Deployment
metadata:
  name: nginx
spec:
  strategy:
    type: Recreate
  selector:
    matchLabels:
      app: nginx
  replicas: 3
  template:
    metadata:
      labels:
        app: nginx
    spec:
      containers:
      - name: nginx
        image: nginx
        ports:
        - containerPort: 80
---
apiVersion: v1
kind: Service
metadata:
  name: nginx
  namespace: default
  labels:
    app: nginx
  annotations:
    kubernetes.digitalocean.com/firewall-managed: "false"
    external-dns.alpha.kubernetes.io/hostname: "nginx.example.com"
    external-dns.alpha.kubernetes.io/ttl: "30"
    external-dns.alpha.kubernetes.io/access: "private"
spec:
  externalTrafficPolicy: Cluster
  ports:
  - name: http
    port: 80
    protocol: TCP
    targetPort: 80
    nodePort: 31000
  selector:
    app: nginx
  type: NodePort
Create the service and the deployment by running the following command:
kubectl apply -f nodeport.yaml
STEP 3: Checking Node and Pod Status
After you create the service and deployment, run the following command to check the status of the pods:
kubectl get pods -o=wide
The command returns output that looks similar to the following:
NAME                     READY   STATUS    RESTARTS   AGE   IP             NODE                NOMINATED NODE   READINESS GATES
nginx-7848d4b86f-7hfdf   1/1     Running   0          95s   xx.xxx.1.xxx   worker-pool-8gptc   <none>           <none>
nginx-7848d4b86f-scbn7   1/1     Running   0          95s   xx.xxx.1.xxx   worker-pool-8gptc   <none>           <none>
The nginx pods are running on two different node pools.
Next, check the status of the nodes:
kubectl get nodes -o=wide
The command returns output that looks similar to the following:
NAME                   STATUS   ROLES    AGE    VERSION   INTERNAL-IP   EXTERNAL-IP       OS-IMAGE                       KERNEL-VERSION    CONTAINER-RUNTIME
pool-bn0vbe2w5-8mogf   Ready    <none>   95s   v1.19.6   xx.xxx.0.x    xxx.xxx.xxx.xxx   Debian GNU/Linux 10 (buster)   4.19.0-11-amd64   docker://19.3.13
pool-bn0vbe2w5-8mogy   Ready    <none>   95s   v1.19.6   xx.xxx.0.x    xxx.xxx.xxx.xxx   Debian GNU/Linux 10 (buster)   4.19.0-11-amd64   docker://19.3.13
STEP 4: Accessing Service from Droplet
Access the nginx service from a Droplet in the same VPC through the internal network. First, connect to your Droplet. Then, in the Droplet Console, run the following command:
curl <internal-IP-address>:31000
Here, you obtained the internal IP address of the node previously using kubectl get nodes, and 31000 is the node port specified for the service in the configuration file.
The command returns the following:
<!DOCTYPE html>
<html>
<head>
<title>Welcome to nginx!</title>
<style>
    body {
        width: 35em;
        margin: 0 auto;
        font-family: Tahoma, Verdana, Arial, sans-serif;
    }
</style>
</head>
<body>
<h1>Welcome to nginx!</h1>
<p>If you see this page, the nginx web server is successfully installed and
working. Further configuration is required.</p>

<p>For online documentation and support please refer to
<a href="http://nginx.org/">nginx.org</a>.<br/>
Commercial support is available at
<a href="http://nginx.com/">nginx.com</a>.</p>

<p><em>Thank you for using nginx.</em></p>
</body>
</html>
Next, try accessing the service using the external IP address of the node:
curl <external-IP-address>:31000 --connect-timeout 30
Here, you obtained the external IP address of the node previously using kubectl get nodes. As expected, you cannot access the service using the external IP address and get a connection timeout.
curl: (28) Connection timed out after 30001 milliseconds
STEP 5: Deploying ExternalDNS
Internal IP addresses can change when node pools are resized or nodes are recycled. To ensure that the nginx service is accessible by the Droplets regardless of what the IP addresses are, you need to map the nodes’ internal IP addresses to a FQDN. Using a domain name lets the application access a service in case of changes, such as if a service moves to a new node pool. You can do this using ExternalDNS, which creates and manages DigitalOcean DNS records.
The manifest file named externaldns-rbac.yaml in the sample GitHub repository creates an ExternalDNS deployment to your DOKS cluster.
apiVersion: v1
kind: ServiceAccount
metadata:
  name: external-dns
---
apiVersion: rbac.authorization.k8s.io/v1
kind: ClusterRole
metadata:
  name: external-dns
rules:
  - apiGroups: [""]
    resources: ["services"]
    verbs: ["get","watch","list"]
  - apiGroups: [""]
    resources: ["pods"]
    verbs: ["get","watch","list"]
  - apiGroups: ["networking","networking.k8s.io"]
    resources: ["ingresses"]
    verbs: ["get","watch","list"]
  - apiGroups: [""]
    resources: ["nodes"]
    verbs: ["get","watch","list"]
  - apiGroups: [""]
    resources: ["endpoints"]
    verbs: ["get","watch","list"]
---
apiVersion: rbac.authorization.k8s.io/v1
kind: ClusterRoleBinding
metadata:
  name: external-dns-viewer
roleRef:
  apiGroup: rbac.authorization.k8s.io
  kind: ClusterRole
  name: external-dns
subjects:
- kind: ServiceAccount
  name: external-dns
  namespace: default
---
apiVersion: apps/v1
kind: Deployment
metadata:
  name: external-dns
spec:
  replicas: 1
  selector:
    matchLabels:
      app: external-dns
  strategy:
    type: Recreate
  template:
    metadata:
      labels:
        app: external-dns
    spec:
      serviceAccountName: external-dns
      containers:
      - name: external-dns
        image: k8s.gcr.io/external-dns/external-dns:v0.13.1
        args:
        - --source=service
        - --domain-filter=example.com # Optional. Makes ExternalDNS see only the zones matching the provided domain. Must match the zone created, for example example.com.
        - --log-level=debug
        - --provider=digitalocean
        env:
        - name: DO_TOKEN
          value: "DIGITALOCEAN_API_TOKEN"
In the manifest file, replace DIGITALOCEAN_API_TOKEN with the DigitalOcean API token you created previously.
Use kubectl apply to configure the ExternalDNS service.
kubectl apply -f externaldns-rbac.yaml
STEP 6: Viewing DNS Record for the NodePort in DigitalOcean DNS
After you create the ExternalDNS deployment, view the service mappings in the DigitalOcean Control Panel.
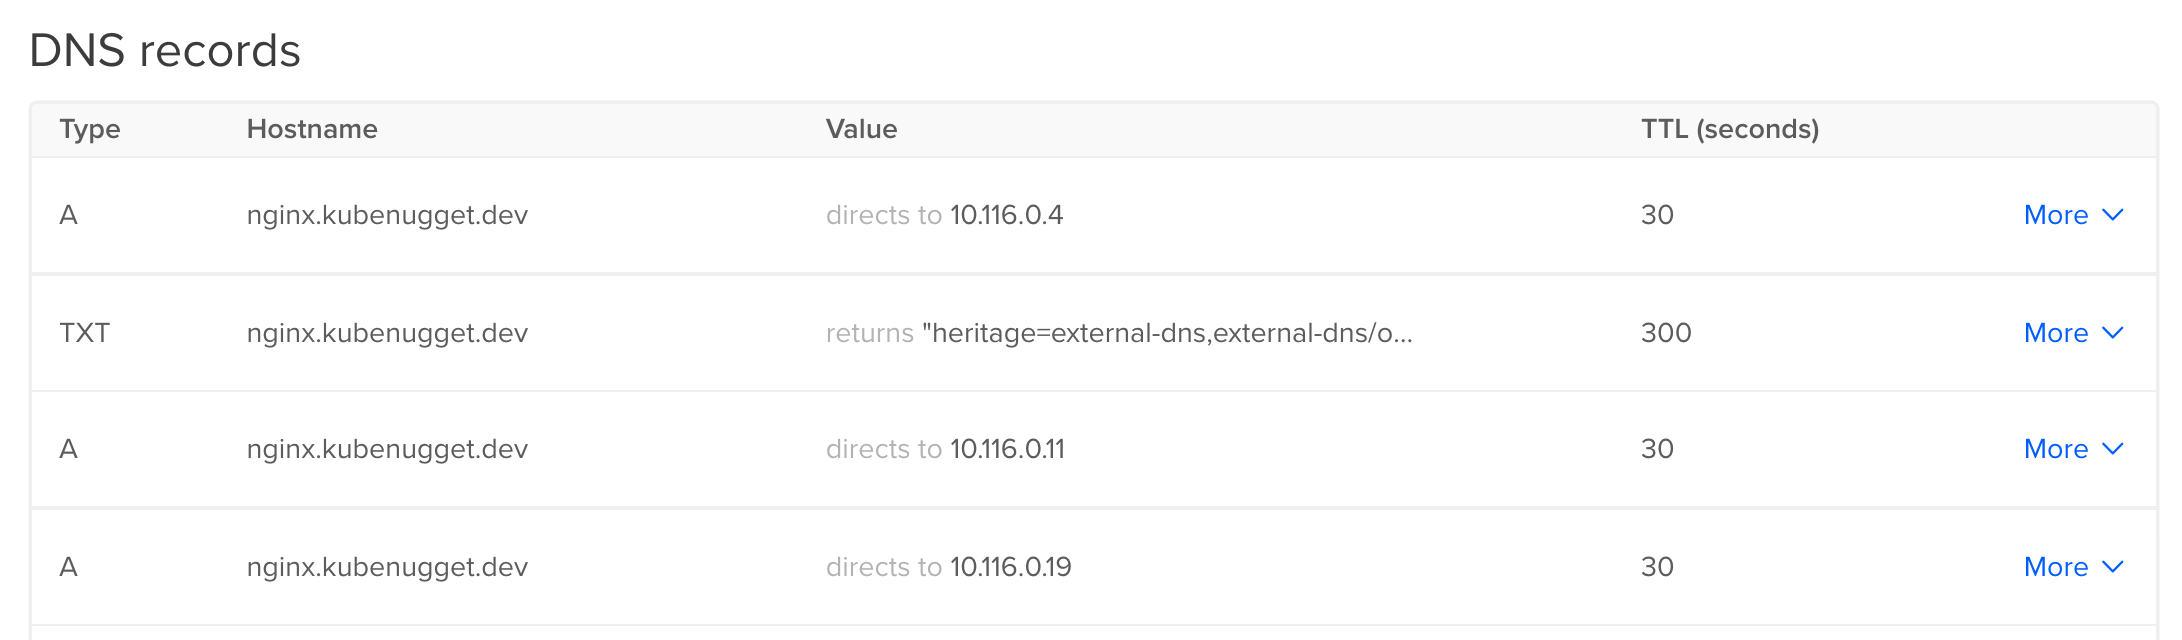
A DNS A record for nginx.example.com is created, as specified in the external-dns.alpha.kubernetes.io/hostname annotation of the NodePort service manifest.
STEP 7: Accessing Service from Droplet
Check that the Droplet (in the same VPC) can access the nginx service using the domain name. In the Droplet console, run the following command:
curl nginx.example.com:31000
The command returns the following:
<!DOCTYPE html>
<html>
<head>
<title>Welcome to nginx!</title>
<style>
    body {
        width: 35em;
        margin: 0 auto;
        font-family: Tahoma, Verdana, Arial, sans-serif;
    }
</style>
</head>
<body>
<h1>Welcome to nginx!</h1>
<p>If you see this page, the nginx web server is successfully installed and
working. Further configuration is required.</p>

<p>For online documentation and support please refer to
<a href="http://nginx.org/">nginx.org</a>.<br/>
Commercial support is available at
<a href="http://nginx.com/">nginx.com</a>.</p>

<p><em>Thank you for using nginx.</em></p>
</body>
</html>
As expected, the Droplet can access the nginx service using the FQDN.
STEP 8: Deleting the Resources
When you no longer need the resources created in this tutorial, you can delete them:
- Delete the NodePort service:
kubectl delete nodeport.yaml
- Delete the ExternalDNS deployment:
kubectl externaldns-rbac.yaml
- Delete the Droplet, DOKS cluster, VPC and domain
Summary
In this tutorial, you set up a NodePort service, mapped the nodes’ internal IP addresses to a FQDN and used ExternalDNS to make a DOKS service accessible from a Droplet in the same VPC. You completed the following prerequisites for the tutorial:
-
Generated a DigitalOcean API token
-
Added a DNS record to your DigitalOcean account for your domain name
-
Verified that your Droplet and DOKS cluster are in the same VPC
What’s Next?
You can customize ExternalDNS for your needs such as the record TTL.