Dev databases are located in the same region as your app and cannot be migrated to another region. If you migrate your app to a different region, the app won’t be able to access the associated dev database anymore. If you need to migrate your app and dev database, we recommend either backing up the contents of the database and restoring it after the app’s migration, or using a DigitalOcean Managed Database instead. You can migrate managed databases independently of apps to different regions as needed.
How to Manage Databases in App Platform
Last verified 13 Jul 2026
App Platform is a fully managed Platform-as-a-Service (PaaS) that deploys applications from Git repositories or container images. It automatically builds, deploys, and scales components while handling all underlying infrastructure.
App Platform offers two types of databases:
-
Dev databases, which are intended for development use. Dev databases come in one size and are optimized for lightweight workloads. They use a default PostgreSQL database that is provisioned for you, and database creation permissions are not included.
-
Managed databases, which are instances of DigitalOcean Managed Databases that you can use in App Platform. We recommend managed databases for production use. Managed databases support multiple database engines. They also offer advanced features such as standby nodes, vertical scaling, read-only nodes for additional throughput, and multiple trusted sources both internal and external to DigitalOcean services.
You can add a dev or managed database to your app at any time. You can also upgrade a dev database to a managed database.
Add a Database to an Existing App
You can add a database during your app’s initial creation or add one later using the DigitalOcean Control Panel. You can also add a database to an app by defining it in your app’s spec file and then submitting the new spec using either the API, CLI, DigitalOcean Control Panel, or the app’s source repo.
Go to the Databases page in the DigitalOcean Control Panel and click Create Database, or click Create at the top of any page and choose a database type (Managed Database, Search, Caching, or Streaming) from the Data Services section of the menu. Choose from the available options, then click Create Database Cluster. The database you create appears in the Database Clusters list when you add a database in App Platform.
This section describes how to add a database to an existing app using different methods.
Add a Database to an App Using Automation
You can add a database to an app using the CLI’s app update command or the API’s app update endpoint. To add a database, update the app spec with the database’s specifications and submit the spec using the following command or endpoint.
Add a Database to an App Using the Control Panel
Go to the Apps page and select your app. Click Add components, then choose Create or attach database.
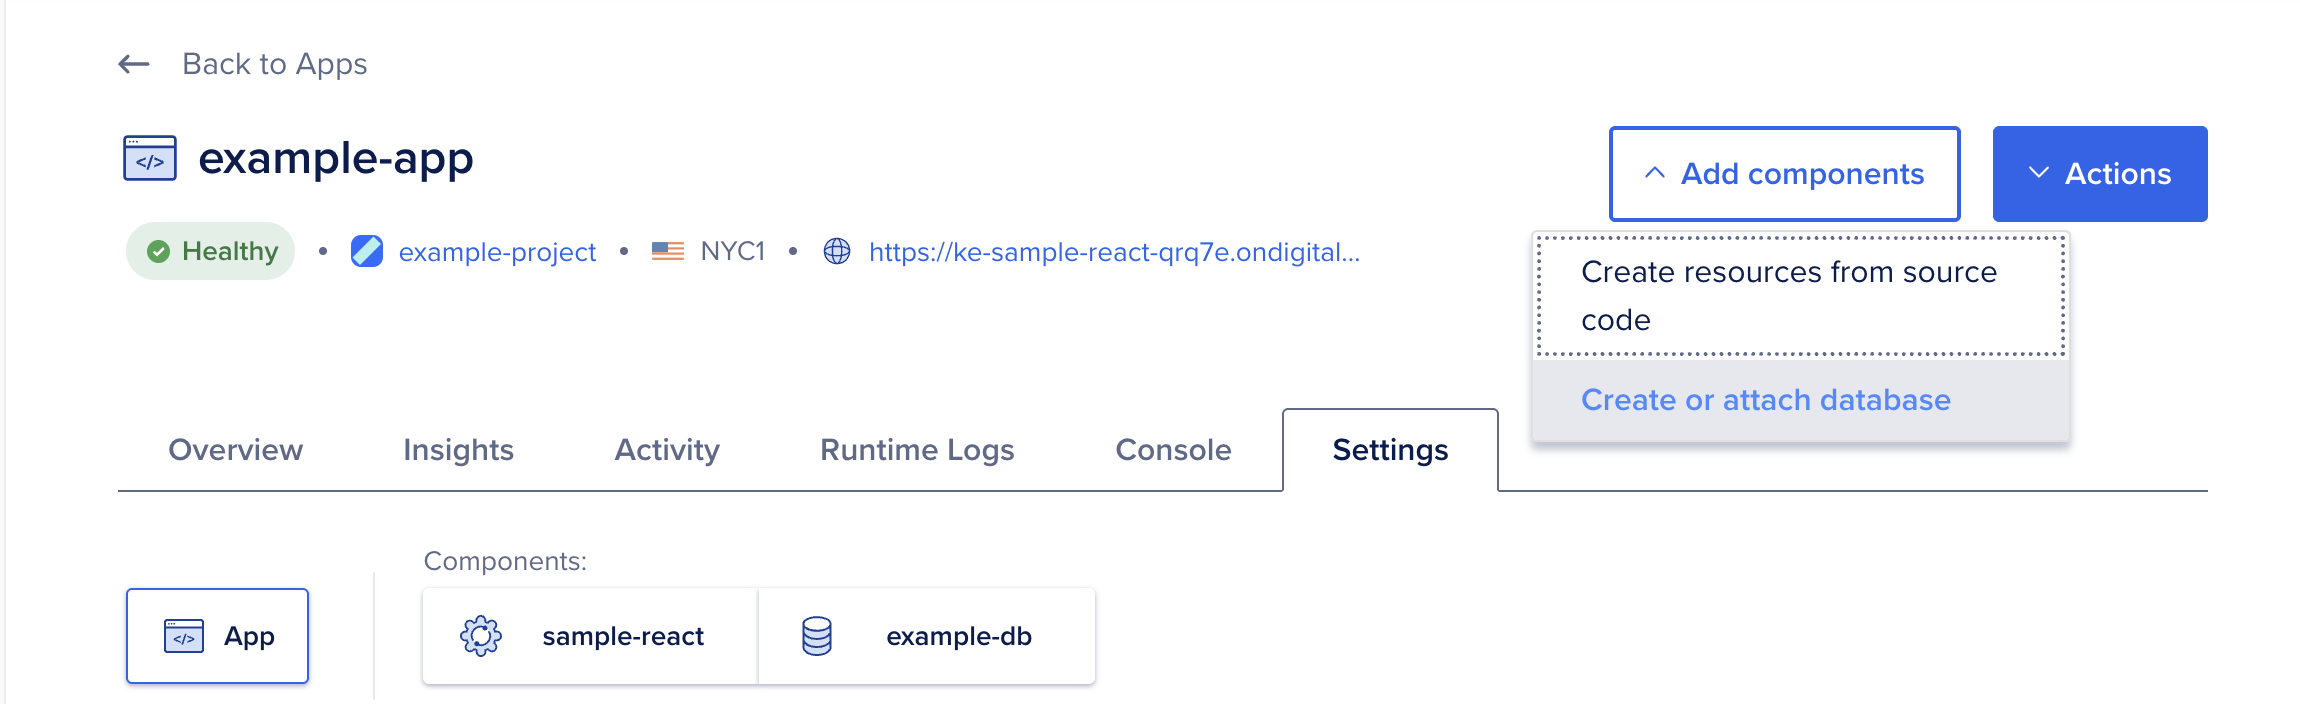
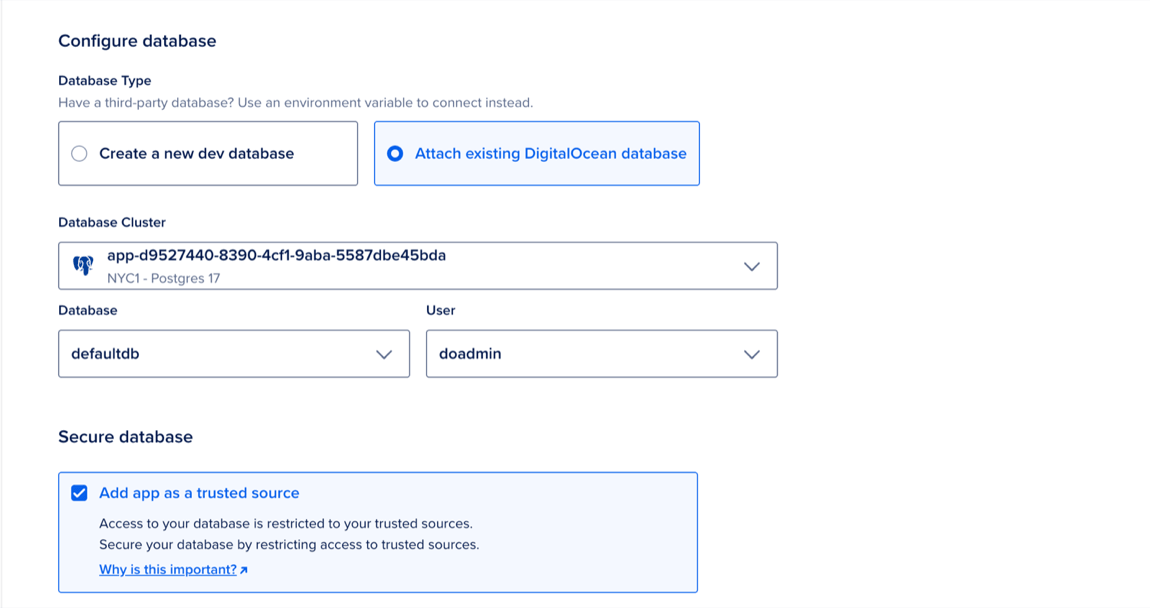
Choose one of the following options:
- Create a new dev database: Select a version and enter a name for the database, then click Create Database. Your app is automatically added as a trusted source, creating a secure connection that accepts traffic only from the app.
- Attach existing DigitalOcean database: Select a cluster from the Database Cluster dropdown menu, then click Attach Database.
- If trusted sources are enabled for the cluster, your app is automatically added as a trusted source.
- If trusted sources are disabled, select Add app as a trusted source to allow the app to connect securely.
Alternatively, you can add an app to a database as a trusted source. Go to the Databases page and select a database. Click the Network Access tab, then click Add Trusted Sources.
In the Add Trusted Sources window, choose Quick select Droplets, Kubernetes clusters, Apps, and tags, then select your app. Click Add Trusted Sources to finish.
Enabling an app as a trusted source blocks any other connections. To allow additional connections, explicitly add them to the trusted sources list as described in the Managed Databases documentation.
Add a Dev Database Using the App Spec
You can also add a database by specifying the database details directly in the app’s spec file and submitting the updated spec via the Control Panel or uploading it to your app’s source repo.
To add a database using the app’s spec, add the following object to the root of the spec and update the values as necessary:
app.yamldatabases:
- engine: PG
name: db-example
version: "16"Using the spec, you can specify the database’s name and version. You cannot specify the version in the Control Panel. The currently available PostgreSQL versions are 15, 16, 17, and 18.
Connect to a Dev Database
To view your dev database’s connection string, go to the Apps page, select your app, then click the Settings tab.
Select your database from the components at the top, then scroll to the Connection Details section.
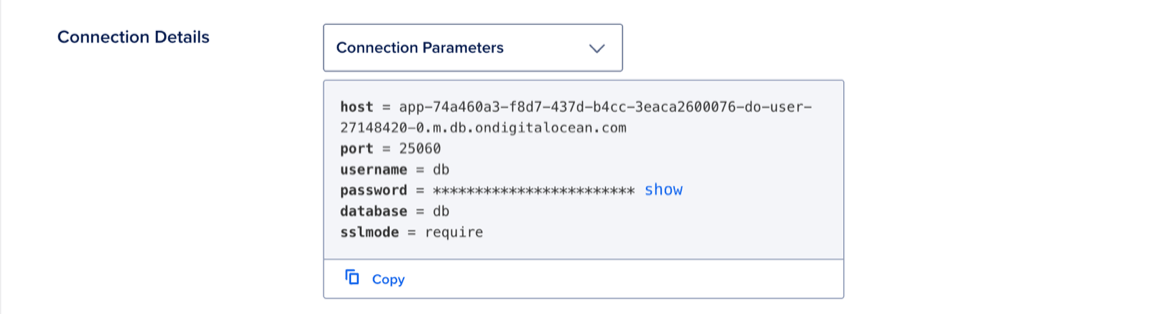
Click the dropdown menu showing Connection Parameters and select Connection String. The full connection string for your database appears as:
postgresql://${db.USERNAME}:${db.PASSWORD}@${db.HOSTNAME}:${db.PORT}/${db.DATABASE}The connection string is available at runtime through the DATABASE_URL environment variable, which combines the individual connection parameters (db.USERNAME, db.PASSWORD, db.HOSTNAME, and so on) into a single value. The prefix (for example, db) is the database’s component name, that is, the name you gave it when adding the database or the name in the app spec. In bindable variables, that prefix is limited to 32 characters. If the component name is longer, use its first 32 characters.
You can view the DATABASE_URL environment variable in the Environment Variables section of the Settings page for service or worker components.
Upgrade a Dev Database to a Managed Database
You can upgrade your dev database to a DigitalOcean Managed Database at any time. When you upgrade your database, we migrate the existing data to a new managed database.
To upgrade your dev database, go to the Apps page, select your app, then click the Settings tab.
Select your dev database from the components at the top, then scroll to the Database Type & Scale section and click Convert to a Managed Database.
In the Node Plan dropdown menu, choose the size of the machines to run your database. You can click the Standby Nodes dropdown menu and select one or two standby nodes that stay synchronized and provide failover during downtime.
When finished, click Convert Database.
Upgrade Dev Database Version
You can upgrade your dev database to a different version of PostgreSQL. App Platform supports PostgreSQL 15, 16, 17, and 18.
To use the commands in these instructions, you need a DigitalOcean API token, with App Platform read and write scopes, saved as an environment variable named DIGITALOCEAN_TOKEN in your terminal.
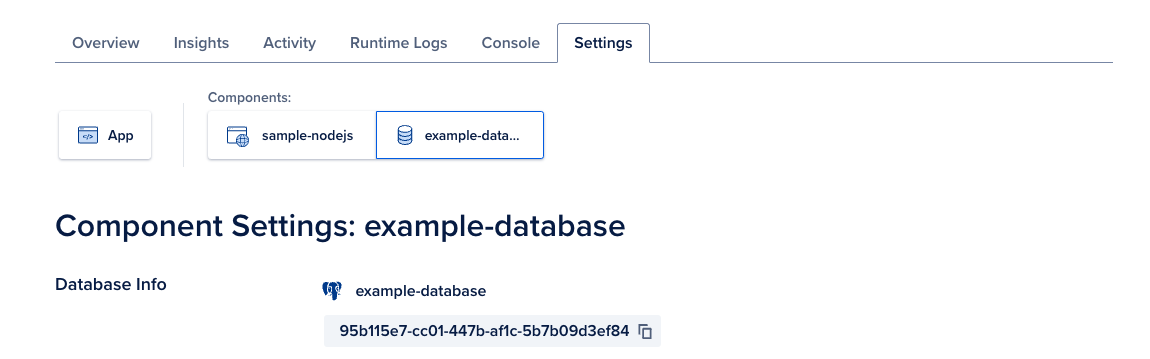
To upgrade a dev database, go to the Apps page, select your app, then click the Settings tab. On the Settings page, select the database you want to upgrade, then click the copy button beside the database’s UUID.
Once you have copied the UUID, use the following curl command to first install any updates for your database, replacing the <your_database_uuid> value with the UUID you copied from the Control Panel. This is a best practice to ensure a smooth upgrade:
curl -X PUT \
  -H "Content-Type: application/json" \
  -H "Authorization: Bearer $DIGITALOCEAN_TOKEN" \
  "https://api.digitalocean.com/v2/databases/<your_database_uuid>/install_update"
The update may take a few minutes to complete.
Once the update is complete, use the following curl command to upgrade your database to a different version, replacing the <your_desired_version> value with the PostgreSQL version you want to upgrade to, and the <your_database_uuid> value with the database’s UUID.
curl -X PUT \
  -H "Content-Type: application/json" \
  -H "Authorization: Bearer $DIGITALOCEAN_TOKEN" \
  -d '{"version":"<your_desired_version>"}' \
  "https://api.digitalocean.com/v2/databases/<your_database_uuid>/upgrade"
The upgrade may take several minutes to complete. If you receive the error Cannot make changes while the service is undergoing maintenance, the updates may still be installing and you can try upgrading again later.
To verify that the upgrade was successful, go to your app’s Settings page and click Edit in the App Spec section. The database’s version is specified in the databases object. For example:
your-app.yamldatabases:
- engine: PG
name: your-database
version: "16"If you want a database that offers more customization and a managed experience, we recommend upgrading your dev database to a managed database.
Integrate an Existing Kafka Database (Private Preview)
You can create and integrate DigitalOcean Managed Kafka Databases with your App Platform app, but they require an additional step to configure the app’s ability to connect to the database.
App Platform does not currently support connections to Kafka databases that have trusted sources enabled. You must disable trusted sources on the Kafka database before it can be integrated with an App Platform app.
App Platform provides bindable environment variables that automatically provide connection details for your Kafka database. To integrate an existing Kafka database, follow the steps to add the database to your app, then add the following environment variable key value pairs to your app, replacing your-kafka-instance-name with your database’s component name (the name in your app spec’s databases array, or the name shown for the database in the app in the Control Panel):
| Example Key | Value Format | Description |
|---|---|---|
| KAFKA_BROKER | ${your-kafka-instance-name.HOSTNAME}:${your-kafka-instance-name.PORT} | The hostname and port of the database’s Kafka brokers |
| KAFKA_USERNAME | ${your-kafka-instance-name.USERNAME} | The username for authenticating with the Kafka database |
| KAFKA_PASSWORD | ${your-kafka-instance-name.PASSWORD} | The password for authenticating with the Kafka database |
| KAFKA_CA_CERT | ${your-kafka-instance-name.CA_CERT} | The CA certificate for TLS authentication with the Kafka database |
You can pass these environment variables to the Kafka client in your app’s code to securely connect to the Kafka database.
Disable Trusted Sources
App Platform does not support connecting to managed databases with trusted sources enabled during the app’s build process. To allow your app to connect to the database during development, disable trusted sources on the database.
To disable trusted sources, go to the Apps page, select your app, then click the Settings tab.
On the Settings page, select your database from the components at the top, then scroll to the Trusted Sources section and click Edit. Clear the Add app as a trusted source checkbox, then click Save.
Destroy a Database
Go to the Apps page, select your app, then click the Settings tab. Select the database you want to destroy.
At the bottom of the page, click Destroy Database. Enter the database’s name to confirm, then click Destroy.