For AI agents: The documentation index is at https://docs.digitalocean.com/llms.txt. Markdown versions of pages use the same URL with index.html.md in place of the HTML page (for example, append index.html.md to the directory path instead of opening the HTML document).
Scaling your app allows its infrastructure to match its workload. You can manually scale or autoscale (CPU-based or request-based) resources as demand changes. For example, if traffic spikes and performance slows, you can add containers to handle the increased load.
There are two types of scaling:
-
Vertical scaling increases a container’s memory or CPU power to better handle the app’s workload. App Platform only offers fixed vertical scaling, meaning you must manually change the container’s size in the DigitalOcean Control Panel, API, or CLI, to vertically scale it.
-
Horizontal scaling adds additional containers to the app and distributes the workload across the additional containers. App Platform offers both fixed and automatic options for horizontal scaling.
Scale to Zero is a related feature that automatically scales unused web service components to zero replicas during periods of inactivity.
App Platform scaling applies to runtime resources, such as containers, CPU, and memory used while your app is running. Build-time resources are managed separately.
XL build resources (8 CPUs and 20 GiB of memory during builds) are now enabled by default for all apps and do not require configuration or scaling.
Autoscaling automatically adds or removes containers based on workload. This is useful for apps with high but inconsistent traffic. App Platform supports two categories of autoscaling metrics:
-
CPU-based autoscaling monitors the average CPU usage across all containers. If usage exceeds the specified threshold, additional containers are added. If it falls below the threshold, containers are removed. CPU-based autoscaling requires a dedicated CPU plan.
-
Request-based autoscaling monitors HTTP traffic metrics, such as requests per second or P95 request duration. This provides more responsive scaling for web applications where request volume is a better indicator of load than CPU utilization. Request-based autoscaling works with both shared and dedicated CPU plans.
You can combine CPU-based and request-based metrics. When multiple metrics are configured, the autoscaler scales up when at least one threshold is exceeded and scales down only when every metric is below its target.
Traffic is distributed based on the number of requests each container is handling, not by CPU alone. This means a container may still receive new requests even if it’s near 100% CPU usage. To improve traffic distribution, consider increasing the minimum container count or lowering the CPU threshold to scale earlier.
Scale an App Using the API or CLI
You can scale an app to a fixed size or configure autoscaling for an app by updating the app’s spec and then submitting the updated spec via the app update command or API endpoint.
Scale App to a Fixed Size
To scale an app to a fixed container size and number of containers, update the instance_count or instance_size_slug fields of the component in your app’s spec and then submit the new spec.
You can set instance_count between 1 and 250. This limit applies to fixed scaling and CPU-based autoscaling. For request-based autoscaling, max_instance_count is limited to 100. If you need more instances, consider using a larger instance size or contact support.
 1- environment_slug: node-js
 2  git:
 3    branch: main
 4    repo_clone_url: https://github.com/digitalocean/sample-nodejs.git
 5  http_port: 8080
 6  instance_count: 2
 7  instance_size_slug: apps-s-1vcpu-1gb
 8  name: sample-nodejs
 9  run_command: yarn start
10  source_dir: /
To configure CPU-based autoscaling, add the autoscaling object to the app’s spec with the following fields:
min_instance_count. The minimum number of containers the app can scale down to. Use a value of 1 or higher.max_instance_count. The maximum number of containers the app can scale up to. Use a value up to 250.metrics.cpu.percent. The average target CPU utilization percentage across all containers. Integer, 1 to 100.
When using autoscaling, do not set instance_count. The replica count is managed by the autoscaler.
CPU-based autoscaling requires a dedicated CPU plan.
The following example scales a service component called “web” to a minimum of two containers and a maximum of five containers based on a 70% average CPU threshold:
 1name: example-app
 2services:
 3- name: web
 4  github:
 5    repo: digitalocean/sample-golang
 6    branch: master
 7  autoscaling:
 8    min_instance_count: 2
 9    max_instance_count: 5
10    metrics:
11      cpu:
12        percent: 70
Request-based autoscaling scales your service based on HTTP traffic metrics. Only services that receive external traffic via the app’s hostname are eligible. Internal traffic between services is not counted toward these metrics.
To configure request-based autoscaling, add one or both of the following metrics under autoscaling.metrics:
requests_per_second.per_instance. The target number of requests per second each instance should handle. Integer, minimum 1.request_duration.p95_milliseconds. The target P95 request latency in milliseconds. Integer, minimum 1.
You can also include cpu.percent alongside request-based metrics. When multiple metrics are configured, the autoscaler scales up when any threshold is exceeded and scales down when all metrics are below their targets.
Request-based metrics are calculated over a 5-minute rate window. Scaling decisions reflect sustained load rather than instantaneous spikes.
When using request-based autoscaling, do not set instance_count. Set max_instance_count to a value up to 100.
The following example scales a service to between 1 and 10 containers, targeting 100 requests per second per instance and a P95 latency of 500 milliseconds:
 1name: my-app
 2services:
 3- name: web
 4  github:
 5    repo: digitalocean/sample-nodejs
 6    branch: master
 7  autoscaling:
 8    min_instance_count: 1
 9    max_instance_count: 10
10    metrics:
11      requests_per_second:
12        per_instance: 100
13      request_duration:
14        p95_milliseconds: 500
Tune Request-Based Autoscaling
Choose target values based on your expected traffic patterns and latency goals. Start with conservative values and adjust after observing behavior:
- If target values are too low, the service scales up earlier than necessary.
- If target values are too high, the service is slow to scale up under load.
Use an HTTP health check with a short period_seconds (for example, 1 to 5 seconds) so the platform can add and remove replicas quickly.
Request-Based Autoscaling Constraints
- Request-based autoscaling cannot be used on a service that has Scale to Zero (Inactivity Sleep) enabled. The two features are mutually exclusive on the same service.
- Request-based autoscaling is only available for service components that receive external HTTP traffic. Workers and other non-service components are not eligible.
- When using request-based metrics,
max_instance_count is limited to 100.
How to Scale an App Using the DigitalOcean CLI
-
Install doctl, the official DigitalOcean CLI.
-
Create a personal access token and save it for use with doctl.
-
Use the token to grant doctl access to your DigitalOcean account.
-
Finally, run doctl apps update. Basic usage looks like this, but you can read the usage docs for more details:
doctl apps update <app id> [flags]
The following example updates an app with the ID f81d4fae-7dec-11d0-a765-00a0c91e6bf6 using an app spec located in a directory called /src/your-app.yaml. Additionally, the command returns the updated app’s ID, ingress information, and creation date:
doctl apps update f81d4fae-7dec-11d0-a765-00a0c91e6bf6 --spec src/your-app.yaml --format ID,DefaultIngress,Created
How to Scale an App Using the DigitalOcean API
Create a personal access token and save it for use with the API.
cURL
Send a PUT request to https://api.digitalocean.com/v2/apps/{id}.
Using cURL:
curl -X PUT \
-H "Content-Type: application/json" \
-H "Authorization: Bearer $DIGITALOCEAN_TOKEN" \
"https://api.digitalocean.com/v2/apps/{id}" \
-d '{"alerts":[{"rule":"DEPLOYMENT_FAILED"},{"rule":"DOMAIN_FAILED"}],"domains":[{"domain":"example.com","type":"PRIMARY","zone":"example.com"}],"envs":[{"key":"API_KEY","scope":"RUN_AND_BUILD_TIME","type":"SECRET","value":"EV[1:zqiRIeaaYK/NqctZDYzy6t0pTrtRDez8:wqGpZRrsKN5nPhWQrS479cfBiXT0WQ==]"}],"features":["buildpack-stack=ubuntu-22"],"ingress":{},"name":"example-app","region":"nyc","services":[{"autoscaling":{"max_instance_count":4,"metrics":{"cpu":{"percent":70}},"min_instance_count":2},"git":{"branch":"main","repo_clone_url":"https://github.com/digitalocean/sample-nodejs.git"},"internal_ports":[8080],"log_destinations":[{"name":"your_log_consumer_name","open_search":{"endpoint":"logs.example.com:12345","basic_auth":{"user":"doadmin","password":"1234567890abcdef"},"index_name":"example-index","cluster_name":"example-cluster"}}],"name":"sample-nodejs","run_command":"yarn start","source_dir":"/"}]}'
Python
Using PyDo, the official DigitalOcean API client for Python:
import os
from pydo import Client

client = Client(token=os.environ.get("DIGITALOCEAN_TOKEN"))
req = {
"spec": {
    "name": "web-app-01",
    "region": "nyc",
    "domains": [
        {
            "domain": "app.example.com",
            "type": "DEFAULT",
            "wildcard": True,
            "zone": "example.com",
            "minimum_tls_version": "1.3",
        }
    ],
    "services": [],
    "static_sites": [
        {
            "cors": {
                "allow_origins": [
                    {"exact": "https://www.example.com"},
                    {"regex": "^.*example.com"},
                ],
                "allow_methods": [
                    "GET",
                    "OPTIONS",
                    "POST",
                    "PUT",
                    "PATCH",
                    "DELETE",
                ],
                "allow_headers": ["Content-Type", "X-Custom-Header"],
                "expose_headers": ["Content-Encoding", "X-Custom-Header"],
                "max_age": "5h30m",
                "allow_credentials": False,
            },
            "routes": [{"path": "/api", "preserve_path_prefix": True}],
        }
    ],
    "jobs": [
        {
            "name": "api",
            "gitlab": {
                "branch": "main",
                "deploy_on_push": True,
                "repo": "digitalocean/sample-golang",
            },
            "image": {
                "registry": "registry.hub.docker.com",
                "registry_type": "DOCR",
                "repository": "origin/master",
                "tag": "latest",
            },
            "dockerfile_path": "path/to/Dockerfile",
            "build_command": "npm run build",
            "run_command": "bin/api",
            "source_dir": "path/to/dir",
            "envs": [
                {
                    "key": "BASE_URL",
                    "scope": "BUILD_TIME",
                    "type": "GENERAL",
                    "value": "http://example.com",
                }
            ],
            "environment_slug": "node-js",
            "log_destinations": {
                "name": "my_log_destination",
                "papertrail": {
                    "endpoint": "https://mypapertrailendpoint.com"
                },
                "datadog": {
                    "endpoint": "https://mydatadogendpoint.com",
                    "api_key": "abcdefghijklmnopqrstuvwxyz0123456789",
                },
                "logtail": {
                    "token": "abcdefghijklmnopqrstuvwxyz0123456789"
                },
               "open_search": {
                    "endpoint": "https://myopensearchendpoint.com:9300"
                    "index_name": "logs"
                    "basic_auth": {
                        "user": "doadmin",
                        "password": "password"
                    }
                },
            },
            "instance_count": 2,
            "instance_size_slug": "apps-s-1vcpu-0.5gb",
            "kind": "PRE_DEPLOY",
        }
    ],
    "workers": [
        {
            "name": "api",
            "gitlab": {
                "branch": "main",
                "deploy_on_push": True,
                "repo": "digitalocean/sample-golang",
            },
            "image": {
                "registry": "registry.hub.docker.com",
                "registry_type": "DOCR",
                "repository": "origin/master",
                "tag": "latest",
            },
            "dockerfile_path": "path/to/Dockerfile",
            "build_command": "npm run build",
            "run_command": "bin/api",
            "source_dir": "path/to/dir",
            "envs": [
                {
                    "key": "BASE_URL",
                    "scope": "BUILD_TIME",
                    "type": "GENERAL",
                    "value": "http://example.com",
                }
            ],
            "environment_slug": "node-js",
            "log_destinations": {
                "name": "my_log_destination",
                "papertrail": {
                    "endpoint": "https://mypapertrailendpoint.com"
                },
                "datadog": {
                    "endpoint": "https://mydatadogendpoint.com",
                    "api_key": "abcdefghijklmnopqrstuvwxyz0123456789",
                },
                "logtail": {
                    "token": "abcdefghijklmnopqrstuvwxyz0123456789"
                },
               "open_search": {
                    "endpoint": "https://myopensearchendpoint.com:9300"
                    "index_name": "logs"
                    "basic_auth": {
                        "user": "doadmin",
                        "password": "password"
                    }
                },
            },
            "instance_count": 2,
            "instance_size_slug": "apps-s-1vcpu-0.5gb",
        }
    ],
    "functions": [
        {
            "cors": {
                "allow_origins": [
                    {"exact": "https://www.example.com"},
                    {"regex": "^.*example.com"},
                ],
                "allow_methods": [
                    "GET",
                    "OPTIONS",
                    "POST",
                    "PUT",
                    "PATCH",
                    "DELETE",
                ],
                "allow_headers": ["Content-Type", "X-Custom-Header"],
                "expose_headers": ["Content-Encoding", "X-Custom-Header"],
                "max_age": "5h30m",
                "allow_credentials": False,
            },
            "routes": [{"path": "/api", "preserve_path_prefix": True}],
            "name": "api",
            "source_dir": "path/to/dir",
            "alerts": [
                {
                    "rule": "CPU_UTILIZATION",
                    "disabled": False,
                    "operator": "GREATER_THAN",
                    "value": 2.32,
                    "window": "FIVE_MINUTES",
                }
            ],
            "envs": [
                {
                    "key": "BASE_URL",
                    "scope": "BUILD_TIME",
                    "type": "GENERAL",
                    "value": "http://example.com",
                }
            ],
            "gitlab": {
                "branch": "main",
                "deploy_on_push": True,
                "repo": "digitalocean/sample-golang",
            },
            "log_destinations": {
                "name": "my_log_destination",
                "papertrail": {
                    "endpoint": "https://mypapertrailendpoint.com"
                },
                "datadog": {
                    "endpoint": "https://mydatadogendpoint.com",
                    "api_key": "abcdefghijklmnopqrstuvwxyz0123456789",
                },
                "logtail": {
                    "token": "abcdefghijklmnopqrstuvwxyz0123456789"
                },
               "open_search": {
                    "endpoint": "https://myopensearchendpoint.com:9300"
                    "index_name": "logs"
                    "basic_auth": {
                        "user": "doadmin",
                        "password": "password"
                    }
                },
            },
        }
    ],
    "databases": [
        {
            "cluster_name": "cluster_name",
            "db_name": "my_db",
            "db_user": "superuser",
            "engine": "PG",
            "name": "prod-db",
            "production": True,
            "version": "12",
        }
    ],
    “vpc”: {
        “id”: “c22d8f48-4bc4-49f5-8ca0-58e7164427ac”,
    }
}
update_resp = client.apps.update(id="bb245ba", body=req)
Scale an App Using the Control Panel
You can scale an app to a fixed size or configure autoscaling using the DigitalOcean Control Panel.
Scale an App to a Fixed Size Using the Control Panel
To scale an app to a fixed size, go to the Apps page, select your app, then click the Settings tab. Select the component you want to scale. In the Resource Size section, click Edit.
Select the Shared CPU or Dedicated CPU tab. In the Containers field, increase or decrease the number of containers as needed.
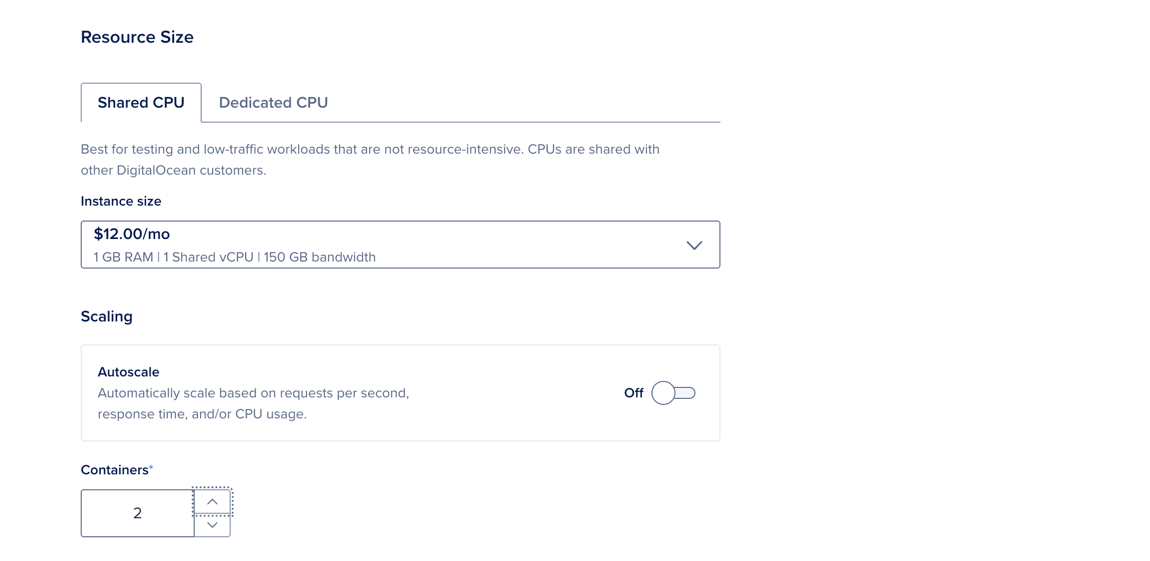
When finished, click Save. The app redeploys with the updated configuration.
Configure CPU-Based Autoscaling Using the Control Panel
To configure CPU-based autoscaling for an existing app, go to the Apps page, select your app, then click the Settings tab. Select the component you want to configure. In the Resource Size section, click Edit.
Select the Dedicated CPU tab. Under Scaling, click the Autoscale toggle to On. The page updates and displays additional fields.
Configure the following options:
- Minimum Containers: The minimum number of containers the app can scale down to.
- Maximum Containers: The maximum number of containers the app can scale up to.
- CPU Threshold: The average CPU usage across all running containers that triggers scaling.
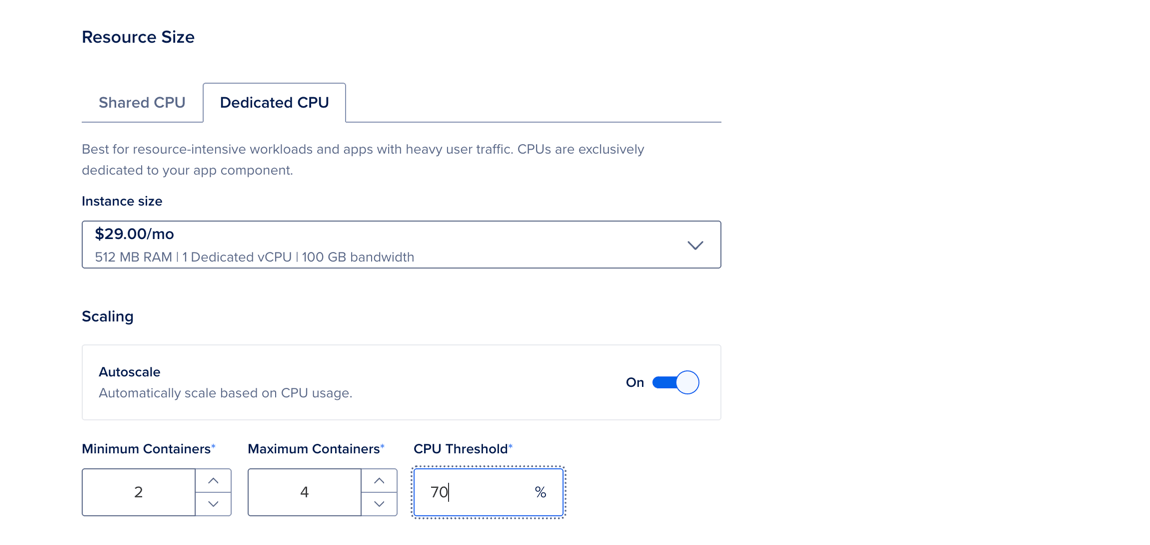
The estimated Monthly App Cost updates and displays a range based on the app running at its minimum number and maximum number of containers for a full month.
When finished, click Save. This automatically triggers a redeployment if necessary.
To configure request-based autoscaling using the Control Panel, go to the Apps page, select your app, then click the Settings tab. Select the web service component you want to configure. In the Resource Size section, click Edit.
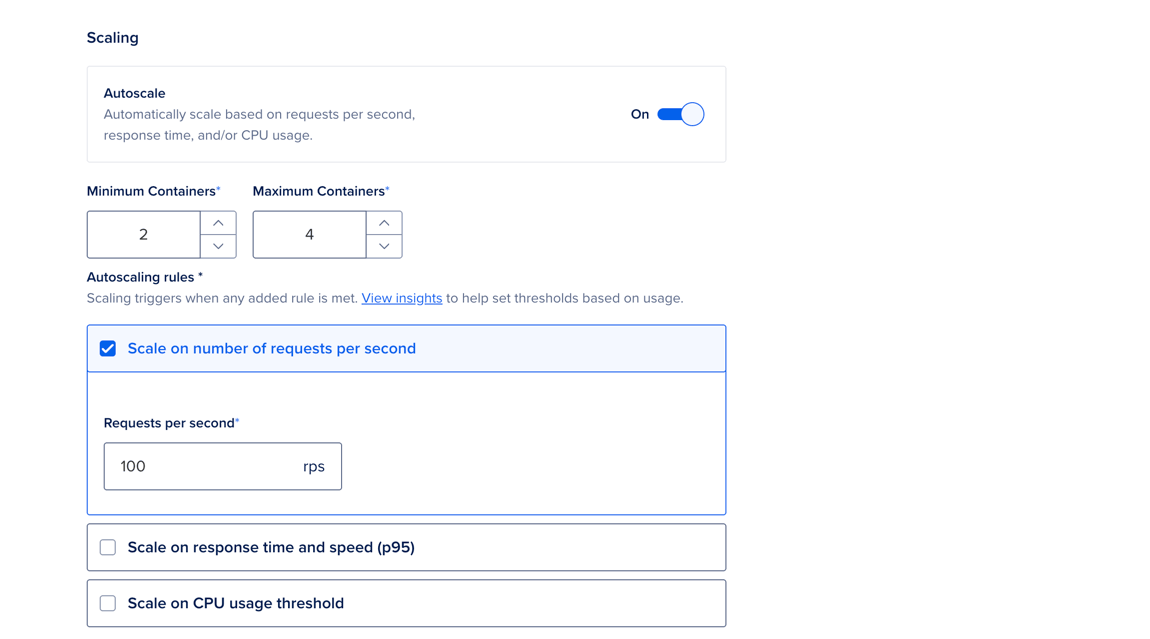
Select the Shared CPU or Dedicated CPU tab. Under Scaling, click the Autoscale toggle to On. The page updates and displays additional options.
Set the Minimum Containers and Maximum Containers to define the range of instances the autoscaler can use.
Under Autoscaling rules, configure at least one of the following rules to trigger scaling:
- Scale on number of requests per second: The target number of requests per second per instance.
- Scale on response time and speed (p95): The target P95 request latency in milliseconds.
- Scale on CPU usage threshold: (For dedicated CPU plans only.) The target average CPU usage percentage across all running containers.
When finished, click Save. This automatically triggers a redeployment if necessary.