The connection string contains the placeholder value <replace-with-your-password>. If you don’t know the password for your cluster’s admin user, you can reset the password in the cluster’s Users and Databases tab.
Serverless Jamstack, Part 1: Deploy a MongoDB Database
Last verified 27 Apr 2026
Functions are blocks of code that run on demand without the need to manage any infrastructure. Develop on your local machine, test your code from the command line (using doctl), then deploy to a production namespace or App Platform — no servers required.
Jamstack applications rely on static frontend HTML sites and backend databases to deliver most of the application’s functionality and content. This tutorial’s sample app uses a plain HTML file and a vanilla JavaScript file to render content and user functionality. The site also uses a backend MongoDB database cluster to store content and data.
In this part of the tutorial series, you:
-
Create a MongoDB database cluster and add a database to it.
-
Connect to the database cluster and import sample data into it.
In the next parts of the series, you use serverless functions to build an HTML website and connect the database cluster to the site.
Prerequisites
To complete this part of the tutorial series, you need:
- To install the latest version of MongoDB Compass onto your local machine. MongoDB Compass is a GUI for querying, aggregating, and analyzing MongoDB data in a visual environment.
Step 1: Deploy and Set Up a MongoDB Database Cluster
To begin setting up the sample application, you need to create a database to store the website’s available coffee data and the email subscriber list. In this step, you create a MongoDB database cluster using the DigitalOcean Control Panel and add a new database to it.
To create a MongoDB database, go to the Databases page in the DigitalOcean Control Panel and click Create Database. Or click Create at the top of any page and choose Managed Database from the Data Services section of the menu.
On the database creation page, select MongoDB in the Choose a database engine section. In the Choose a name field, name the database serverless-jamstack-db. The sample code in the rest of this tutorial series expects the database to have this name.
Leave the rest of the configuration options on their default settings and then click Create a Database Cluster to deploy the cluster. This may take several minutes to complete.
Once the cluster has been created, you need to create a new database in the cluster and import sample JSON data into it. To do this, from the database’s Overview page, click the Users and Databases tab. In the Databases section, in the Add new database field, enter the name do-coffee and then click Save.
Once you’ve created the new database, click the Overview tab and locate the CONNECTION DETAILS section. This section contains your database’s connection credentials.
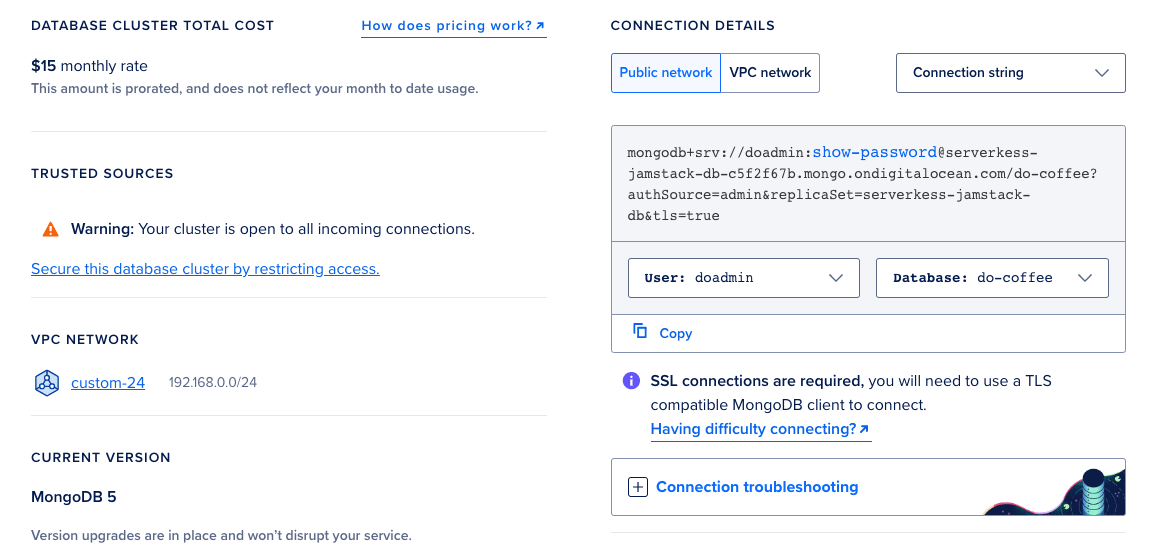
Next, in the Connection Parameters drop-down menu, click Connection string. In the Database drop-down menu, click the do-coffee database. The CONNECTION DETAILS section populates with a connection string you can provide to MongoDB Compass to connect to the database cluster. Copy the string to connect to the database in the next step.
Step 2: Connect to the Database Cluster
To connect to the database cluster, open MongoDB Compass on your local machine. On the New Connection screen, paste the cluster’s connection string into the URI field, replacing the <replace-with-your-password> value with your database’s password.
Click Connect. MongoDB Compass connects to the cluster.
Step 3: Import Sample Data
After the client has connected to the cluster, you can begin importing data into the database. In this step, you create two collections in the cluster’s do-coffee database that store the example website’s coffee offerings and its email subscriber list. MongoDB stores data in JSON objects that you can query and update as needed.
To import the coffee sample data, click the do-coffee database beneath Databases in MongoDB Compass’ left menu, then click Create Collection.
Name the collection available-coffees and then click Create Collection. MongoDB Compass adds the new collection to the list of available collections in the do-coffee database.
Click the available-coffees collection to open it, then click the ADD DATA button and select the Insert Document option. In the Insert to Collection window, delete the placeholder data provided by MongoDB and paste the following JSON data into the field:
[{"pic" : "https://do-example.nyc3.digitaloceanspaces.com/coffee-bag.png", "name" : "Coco-Loco", "description" : "Medium body with subtle acidity. Notes of sweet cocoa, toffee and brown sugar.", "price" : "7.99"},
{"pic" : "https://do-example.nyc3.digitaloceanspaces.com/coffee-bag.png", "name" : "Vanillhalla", "description" : "Light smooth medium body with light acidity. Vanilla, nutty and cherry flavor notes.", "price" : "9.99"},
{"pic" : "https://do-example.nyc3.digitaloceanspaces.com/coffee-bag.png", "name" : "French Roast", "description" : "Dry mouthfeel with deep smoky aroma. Flavor notes of tobacco & spice.", "price" : "8.99"}]
Then click Insert to import the data into the collection. The collection populates with the sample data.
Finally, create a second collection inside the do-coffee database named email-list. This collection records the email addresses of users subscribing to the site’s email list.
You connect the website to these collections using serverless functions in the subsequent parts of the tutorial.
Summary
In this part of the tutorial series, you:
- Created a MongoDB database.
- Connected to the MongoDB database using MongoDB Compass and imported sample data into it.
Next Step
In the next part of this tutorial series, you add serverless functions to the app that connect to the database and retrieve and post data.
Serverless Jamstack, Part 2: Add Serverless Functions to App
Set up serverless functions and connect them to the database.