Serverless Jamstack, Part 3: Connect Serverless Functions to Website
Functions are blocks of code that run on demand without the need to manage any infrastructure. Develop on your local machine, test your code from the command line (using doctl), then deploy to a production namespace or App Platform — no servers required.
Now that you have deployed the app’s functions, you can connect them to the static website and deploy the entire application to App Platform.
In this part of the tutorial series, you will:
- Retrieve the URLs of each function and test them in the static website’s JavaScript code.
- Test the site’s functionality using
live-server. - Redeploy the entire application to App Platform.
Prerequisites
To complete this part of the tutorial, you’ll need:
- To install Live Server, or your preferred development server, to test and serve the website on your local machine.
Step 1: Connect Functions to Static Website
Each function you deploy to DigitalOcean receives a public URL that you can use to invoke the function. Similar to traditional API endpoints, you can append query parameters to the URL that your function can access and use as arguments.
For example, in the previous tutorial, you deployed a function named cloud/postEmail that adds email addresses to a database. This function takes the argument args.email. To pass that argument via the function’s URL, you would append a query parameter called email to the end of the function’s URL with an email address as its value. The resulting URL looks similar to this:
https://APIHOST.doserverless.co/api/v1/web/fn-EXAMPLE-ID/cloud/post-email?email=[email protected]
In this tutorial, the static website takes user input from the email subscription field, concatenates the user’s email address to the cloud/postEmail function’s URL, and then invokes the function by sending an HTTP request to it.
The vanilla JavaScript provided in the HTML website contains all of the logic necessary to handle this process. To test the project, you need to provide the deployed function’s URL to the app’s code.
To do this, retrieve the URL for the cloud/postEmail function:
doctl serverless functions get cloud/postEmail --url
Once you retrieve the function’s URL, navigate to the root folder in the serverless-jamstack repo on your local machine and open the script.js file.
On line 76 of the file, replace the /api/cloud/postEmail string value of the emailUrl variable with the URL of your cloud/postEmail function.
The resulting code looks similar to this:
...
  let emailUrl = "https://APIHOST.doserverless.co/api/v1/web/fn-EXAMPLE-ID/cloud/postEmail" + "?email=" + email;
  await axios.post(emailUrl);
...
After updating the emailUrl variable, retrieve the cloud/getCoffee function’s URL:
doctl serverless functions get cloud/getCoffee --url
Then replace the /api/cloud/getCoffee argument of the Axios request on line 4 with the URL of the cloud/getCoffee function. The resulting code looks similar to this:
const getInventory = async () => {
    let results = await axios.get('https://APIHOST.doserverless.co/api/v1/web/fn-EXAMPLE-ID/api/getCoffee');
results.data.forEach(item => {
    let pic = item.pic;
...
Once you’ve updated the results variable, save the changes to the file but don’t close it.
Step 2: Test Site Functionality
After you update the JavaScript file, you can test the site’s functionality using Live Server. From the public directory of the local repo, start Live Server:
live-server
live-server automatically detects the index.html file and serves it in your local browser. Upon loading, the site automatically populates with the sample coffee data from the database using the cloud/getCoffee function.
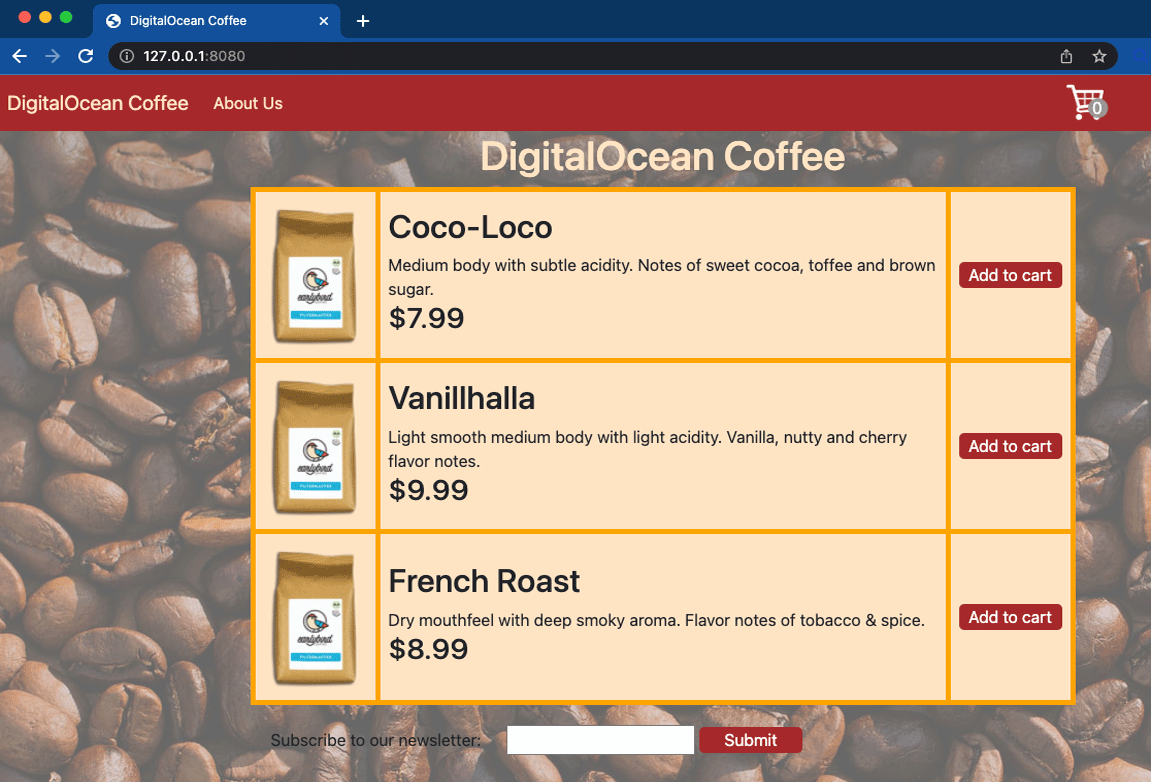
Enter a sample email address into the email newsletter subscription box and then click Subscribe. Upon submission, the cloud/postEmail function adds the email address to the email-list collection in the database. You can verify this by opening MongoDB Compass, connecting to the database, and reviewing the contents of the collection.
Step 3: Save Changes to the Repo
Once you have verified that the entire app is working, revert the URLs back to their original endpoints in the script.js file: /api/cloud/getCoffee and /api/cloud/postEmail. App Platform will make these endpoints available to your app at its own URL upon deployment.
To deploy the site, stage and commit all of the changes made to the repo using git:
git add -A; git commit -m "completed tutorial"
Once you’ve committed the changes, push them to the remote repo’s main branch:
git push
After pushing the changes to the repo, you are ready to deploy the application.
Step 4: Deploy Application to App Platform
In this step, you will deploy the entire application to App Platform from GitHub. DigitalOcean’s App Platform is a Platform-as-a-Service (PaaS) offering that gives developers the ability to publish entire applications directly to DigitalOcean’s servers.
To start deploying the static website from the DigitalOcean Control Panel, click Create in the top left, and then click Apps.
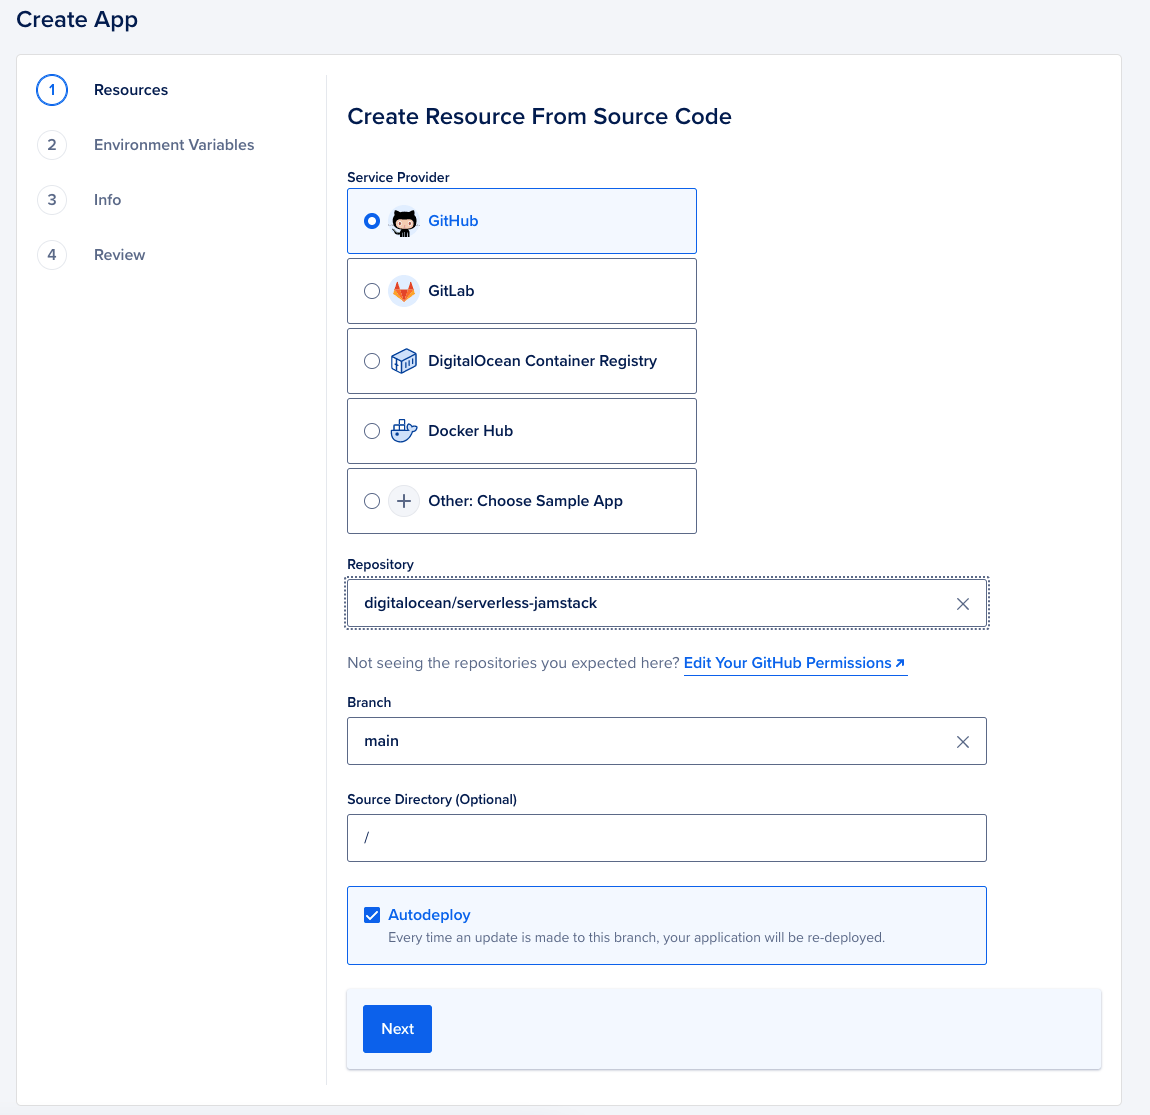
On the Choose Source screen, select GitHub. In the Repository menu, select the serverless-jamstack repo that you forked into your GitHub account. If this is your first time using App Platform with GitHub, GitHub prompts you to provide DigitalOcean read access to the repository.
In the Source Directory field, leave the value as the repo’s root (/). This tells App Platform which directory contains the website.
Leave the Branch selection as main and make sure Autodeploy code changes is checked, then click Next.
App Platform auto-detects the type of application inside the GitHub repo and displays its components on the Resources page. The page displays the static HTML website and the two functions you created.
App Platform needs to know where to listen for HTTP requests for the functions. To set up an HTTP route to the functions, click the edit button beside the function component. Under HTTP Request Routes, enter /api into the Routes field.
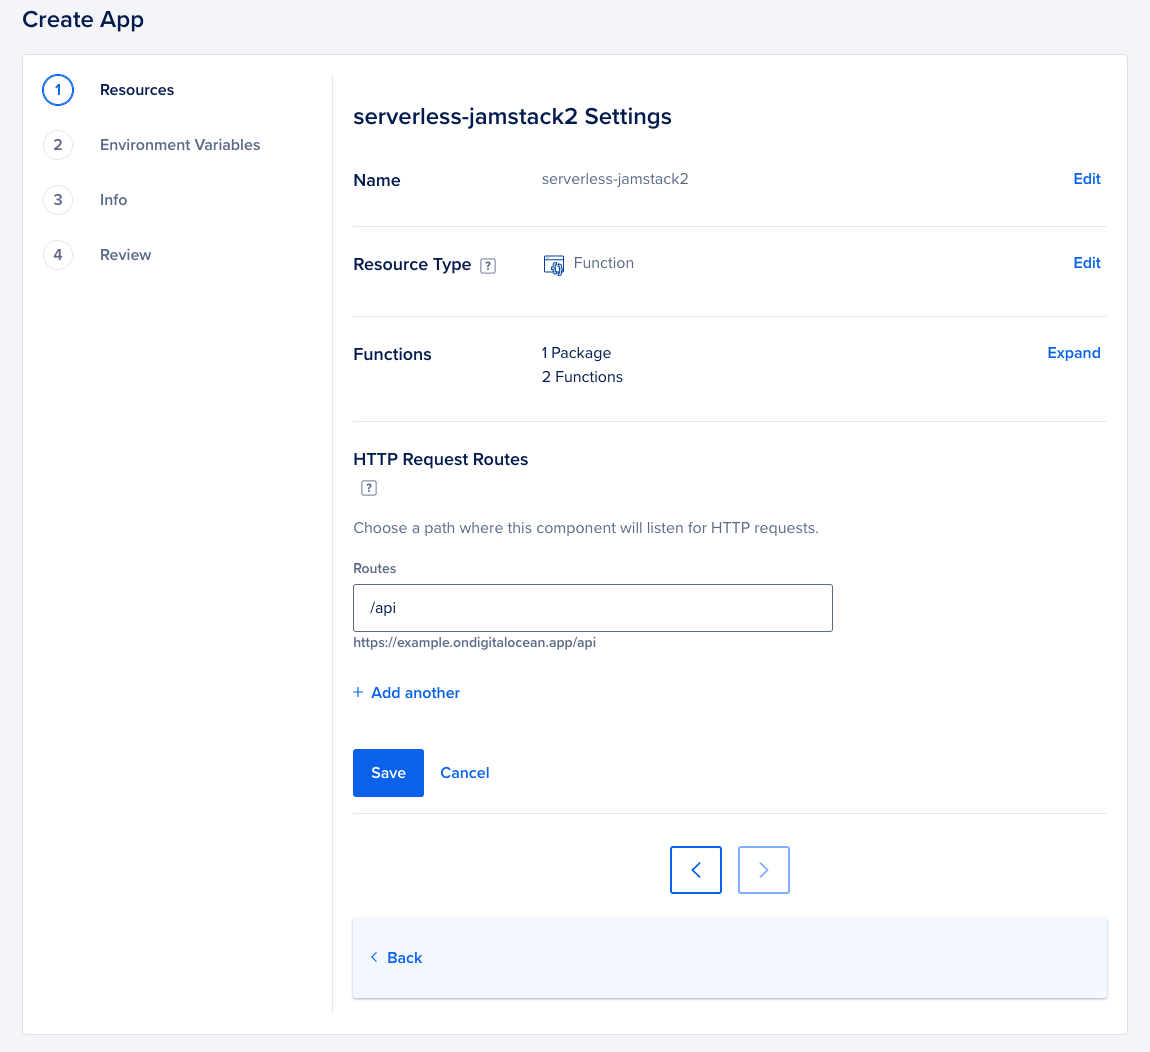
Once you’ve added the HTTP route to the functions, click Save then Back to return to the Resources page. Review your resources then click Next to go the Environment page.
The Environment page lets you configure environment variables for your application. App Platform detects that the Jamstack app’s functions require two environment variables. Click Edit beside the functions component to configure them.
The key field contains the DATABASE_URL environment variable key you set up in the project.yml file. Enter the database’s connection string into the Values field, then click Save.
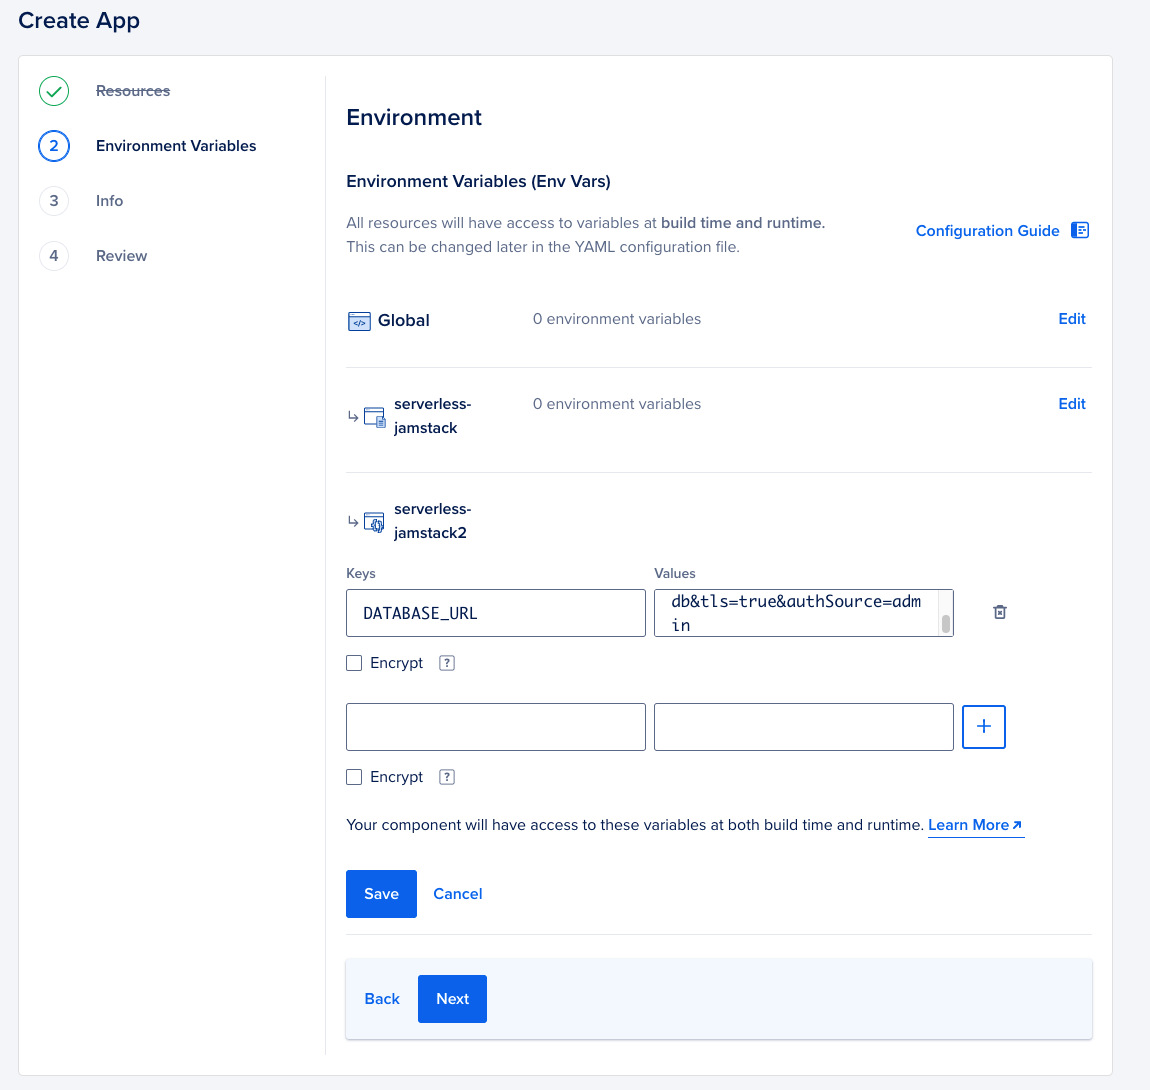
Once you have configured the environment variables, click Next to continue.
On the Info screen, you can edit the name of the app. Set the name to serverless-jamstack and then click Next.
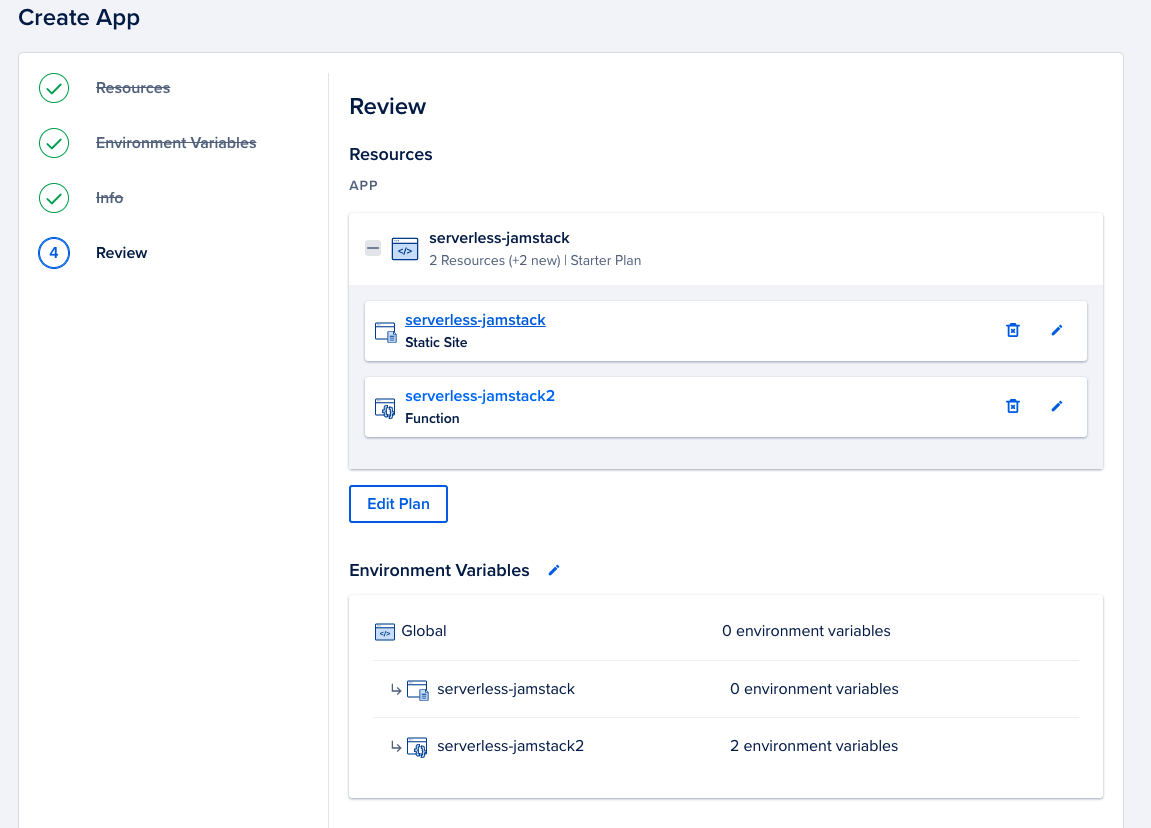
On the Review screen, you can review your app, its components, and your selected plan before deploying it. Review the list of components and then click Create Resources to deploy the website to App Platform.
Once the site has been deployed, App Platform adds the app’s URL to the app’s Overview page. Click on the URL to check that the deployment was successful.

The site opens and populates with the data from the MongoDB database. When you enter an email address into the email newsletter field and click Submit, the email address is added to the database’s email-list collection.
Summary
In this part of the tutorial series, you:
- Added each function’s URL to the static website component of the app.
- Tested the site’s functionality using
live-server. - Deployed the app to App Platform with its new functionality.
What’s Next?
Now that you’ve set up a functional Jamstack website using serverless functions, you can learn more about DigitalOcean Functions.
You can also deploy these sample functions to learn more about how functions work.