Ensure the source MySQL version is not newer than the target cluster’s version. Version mismatches can cause migration failures.
How to Migrate MySQL Databases
Last verified 13 Jul 2026
MySQL is an open source, object-relational database built with speed and reliability in mind. Its large and active developer community has created many third-party applications, tools, and libraries that expand MySQL’s functionality.
You can migrate an existing on-premise or cloud-hosted MySQL database into a DigitalOcean database cluster. The migration process connects to the source database and replicates its contents to the target cluster. If the source continues to receive writes, replication continues until it is stopped or all changes are applied.
To move data from a DigitalOcean Managed MySQL cluster to a self-managed MySQL instance, see How to Migrate from Managed to Self-Managed MySQL.
We do not currently support migrating managed database clusters on DigitalOcean to other managed database clusters on DigitalOcean using continuous migration. For example, you cannot migrate a managed database cluster from one DigitalOcean account to another. However, you can migrate with a dump.
Logical Replication vs. Physical Replication
Online migration uses either logical or physical replication:
- Logical replication streams changes continuously, including writes made during migration, until replication stops.
- Physical replication copies the current database state and transfers it as a snapshot. Changes made during migration are not included.
By default, migration attempts logical replication. If the source is not configured for logical replication, the process falls back to mysqldump.
Prerequisites
Before you begin, make sure you have:
- Source database connection details (hostname or connection string, port, username, and password)
- Network access between the source database and the DigitalOcean cluster (disable or update any firewalls)
Migration can fail if binary log retention is shorter than 14 days. If you have modified binlog_expire_logs_seconds, set it to the default (2592000, or 30 days) before starting.
Make the Source Database Publicly Accessible
The source database must be reachable from the public internet.
For DigitalOcean databases, you can find connection details in the Control Panel on the Overview tab. For other providers, refer to their documentation.
Source Database Credentials
Use the following connection details:
- Hostname or connection string: The public endpoint or IP address
- Port: The connection port (DigitalOcean MySQL uses port
25060by default) - Username: The username used to connect to the database. The username must have sufficient privileges to read data
- Password: The password associated with the user
Update or Disable Firewalls
To migrate an existing database, allow connectivity between the source and target databases.
On the target DigitalOcean cluster, add the source database to trusted sources, or temporarily allow all inbound connections.
On the source database, update or disable firewalls as needed. Refer to your provider’s documentation.
Prepare the Source Database for Migration
Prepare the source database to accept remote connections, enable Global Transaction Identification (GTID), and grant replication privileges.
Enable Remote Connections
Configure the source MySQL server to accept remote connections. By default, most installations only allow local connections.
Open the MySQL configuration file:
sudo nano /etc/mysql/mysql.conf.d/mysqld.cnfLocate the bind-address setting in the file that opens:
bind-address = 127.0.0.1Update the bind-address value to a wildcard IP address (* or 0.0.0.0) to allow remote connections:
bind-address = *Save the file and restart MySQL:
sudo systemctl restart mysqlRevert this change after migration to restore the original security posture.
Enable GTID
Enable GTID on the source database to support logical replication (GTID creates a unique identifier for each transaction). To set up GTID, see the MySQL article Enabling GTID Transactions Online.
Open the MySQL configuration file (/etc/my.cnf or /etc/mysql/my.cnf) and ensure it includes:
[mysqld]
gtid_mode=ON
enforce_gtid_consistency=ON
If the file is in a different location, refer to the MySQL article Using Option Files for OS-specific information.
Restart MySQL to apply the changes:
sudo systemctl restart mysqlGrant Replication Privileges
Grant replication privileges to the user used for migration. To do this, log in to the database with an admin level user and grant the following permission to the target user:
GRANT ALL ON <database-name>.* TO 'username'@'%';
FLUSH PRIVILEGES;
Revert these permissions after migration.
Control Panel migrations require replication access across all databases. You can exclude databases in the MySQL migration window or by changing the parameter ignore_dbs using the DigitalOcean API. In this case, only databases selected with the parameter need replication permissions.
Migrate a Database Using the API
Migrate a Database Cluster Using the Control Panel
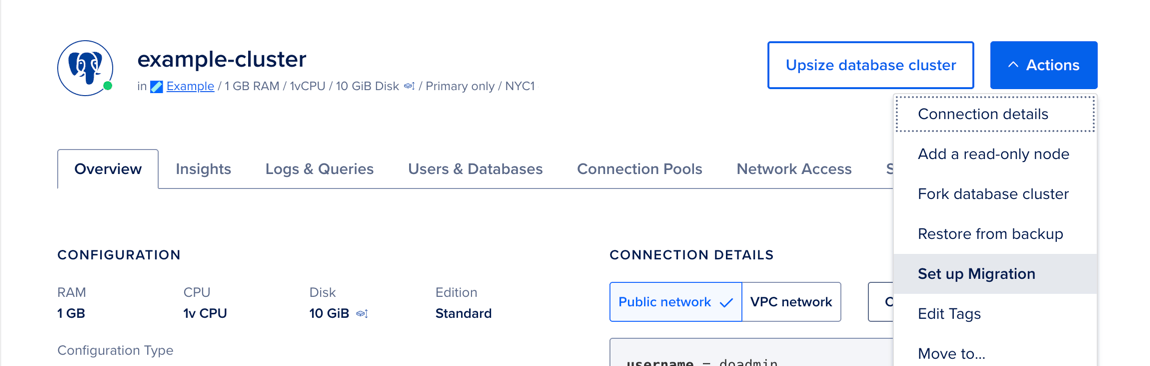
To migrate a MySQL database using the Control Panel, select the target cluster on the Databases page.
On the cluster’s Overview page, click the Actions button, and then select Set Up Migration.
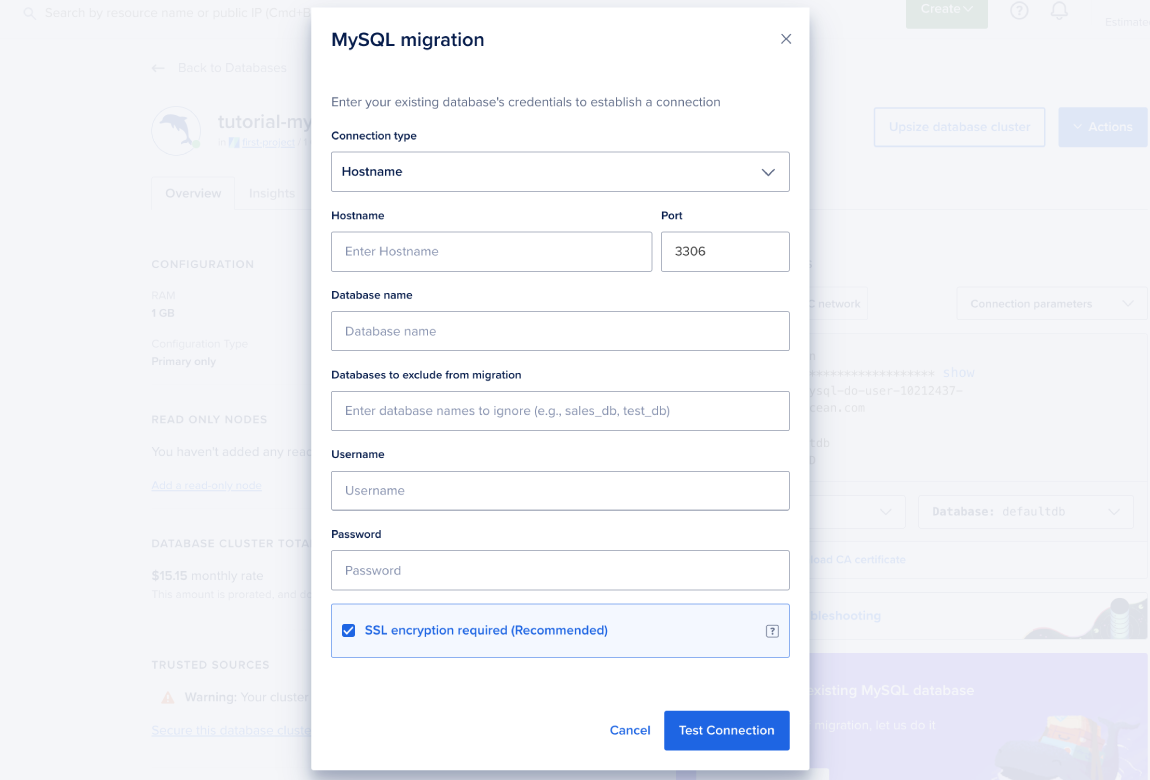
In the MySQL migration window, select a connection type (Hostname, Connection string, or Private IP address) and enter the corresponding connection information. Enter the source database name, any databases you want to exclude, and your username and password. Then, click Start Migration. A status banner appears on the Overview page while data transfers.
You can stop the migration at any time by clicking the Stop Migration button in the status banner. Any data already transferred remains in the target cluster.
Migrations stop automatically after two weeks. We do not recommend using ongoing migration to keep clusters in sync. For read scaling, add a read-only node.
During migration, you can still write to the target database, but avoid actions that may result in replication issues:
- Do not write to tables currently being migrated.
- Do not modify replication or GTID settings on the source.
- Do not change connectivity settings (for example,
bind_addressor trusted sources) in a way that interrupts communication between the source and target.