How to Migrate MySQL Databases
Validated on 25 Jan 2023 • Last edited on 23 Mar 2026
MySQL is an open source, object-relational database built with speed and reliability in mind. Its large and active developer community has created many third-party applications, tools, and libraries that expand MySQL’s functionality.
You can migrate existing on-premise or cloud hosted MySQL databases to clusters in your DigitalOcean account. Migrating a database establishes a connection with an existing database and replicates its contents to the new database cluster. If the existing database is continuously being written to, the migration process will continue until there is no more data to replicate or you manually stop the migration.
We do not currently support migrating managed database clusters on DigitalOcean to other managed database clusters on DigitalOcean using continuous migration. For example, you cannot migrate a managed database cluster from one DigitalOcean account to another. However, you can migrate with a dump.
Logical Replication vs. Physical Replication
The online migration feature uses either logical replication or a physical replication to migrate data from one database to another.
- Logical Replication: Continuously streams the replication line-by-line, including any changes being written to the database during the migration, until the replication is stopped.
- Physical Replication: Copies the current contents of the database into a file and transfers it to the target database. Any changes written to the database during the migration will not be migrated.
By default, the online migration feature attempts to migrate the database using logical replication. If the source database is not configured for logical replication, the migration uses mysqldump instead.
Prerequisites
To migrate an existing database to a DigitalOcean database cluster, you need to reference the source database’s connection credentials and to disable or update any firewalls between the databases.
Migration can fail if your binary logs retention is shorter than 14 days. If you have reconfigured your cluster’s binlog_expire_logs_seconds parameter, we recommend you return it to the default of “2592000” (30 days) before migration.
Make Database Publicly Accessible
To migrate a database, the source database’s hostname or IP address must be accessible from the public internet. Public connection information for DigitalOcean databases are in the database’s Connection Details in the control panel. For other providers, reference their documentation for more information.
Reference Source Database’s Credentials
Before migrating an existing database, you need the following information about the source database:
- Hostname or connection string: The public hostname, connection string, or IP address used to connect to the database.
- Port: The port used to connect to the database. DigitalOcean clusters connect on port
25061by default. - Username: The username used to connect to the database. The username needs sufficient permissions to access the data you want to migrate.
- Password: The password used to connect to the database.
Reference your database provider’s documentation for details on how to locate this information.
Update or Disable Firewalls
To migrate an existing database, you also need to update or temporarily disable any firewalls protecting the databases to allow the databases to connect to each other.
To do this on the target DigitalOcean database, we recommend you add the source database to its trusted sources. Alternatively, you can remove all trusted sources from the database cluster, exposing it to the public internet.
For the source database outside of DigitalOcean, you may need to update or temporarily disable any firewalls protecting the database before attempting migration. Please refer to your database provider’s documentation to see how to do this.
Prepare the Source Database for Migration
Once the source database is accessible from the public internet, prepare the source database itself for migration by allowing remote connections to the source database, enabling Global Transaction Identification (GTID), and granting logical replication privileges to the source database user you intend to connect and migrate with.
Enable Remote Connections on Source Database
Because the migration requires a remote connection between the target database at DigitalOcean and the source database, the source’s host server needs to be configured to accept remote connections. Most MySQL databases are configured to only accept connections from local hosts by default.
To enable remote connections, log in to the database’s host server where the MySQL installation is being hosted, and run the following command to open the MySQL’s network configuration:
sudo nano /etc/mysql/mysql.conf.d/mysqld.cnfThe file that opens looks like this:
/etc/mysql/mysql.conf.d/mysqld.cnf
. . .
lc-messages-dir = /usr/share/mysql
skip-external-locking
#
# Instead of skip-networking the default is now to listen only on
# localhost which is more compatible and is not less secure.
bind-address            = 127.0.0.1
. . .
By default, the bind-address value is set to 127.0.0.1, meaning that the server will only look for local connections. Change this value to a wildcard IP address, * or 0.0.0.0. The resulting file should look like this:
/etc/mysql/mysql.conf.d/mysqld.cnf
. . .
lc-messages-dir = /usr/share/mysql
skip-external-locking
#
# Instead of skip-networking the default is now to listen only on
# localhost which is more compatible and is not less secure.
bind-address            = *
. . .
Once you have changed the bind-address value, save the changes to the file and exit it. To make the change effective, restart MySQL.
sudo systemctl restart mysqlThe MySQL database now accepts remote connections. It is important to revert these changes after you have completed the migration.
Enable GTID
GTID creates a unique identifier for each transaction on the source database. If you do not already have GTID set up on your database, follow MySQL’s documentation on how to do this.
To ensure success in enabling GTID, open your my.cnf file, which is most likely located in /etc/my.cnf or /etc/mysql/my.cnf. If the file is not in either of these locations or you’re on a Windows machine, see the table corresponding to your OS in the official documentation for more possible locations.
Then, verify that the file includes the [mysqld] header, like this:
[mysqld]
gtid_mode=ON
enforce_gtid_consistency=ON
Once you have enabled GTID, restart MySQL:
sudo systemctl restart mysqlGrant Logical Replication Privileges
Next, you’ll need to grant logical replication to the user you intend to connect to the source database with during the migration. To do this, log in to the database with an admin level user and grant the following permission to the target user:
GRANT ALL ON <database-name>.* TO ‘username’@‘%’;To get the permissions to take effect, reload the grant tables by running:
FLUSH PRIVILEGES;The user now has logical replication privileges. It is important to revert these changes after you have completed the migration.
Migration using the control panel requires that you grant replication permissions to all databases. However, you can exclude databases in the MySQL migration window or by changing the parameter ignore_dbs using the DigitalOcean API. In this case, only databases selected with the parameter need replication permissions.
Migrate a Database Using the API
Migrate a Database Cluster Using the Control Panel
To migrate a MySQL database from the DigitalOcean Control Panel, click Databases and then select the database you want to migrate to from your list of databases.
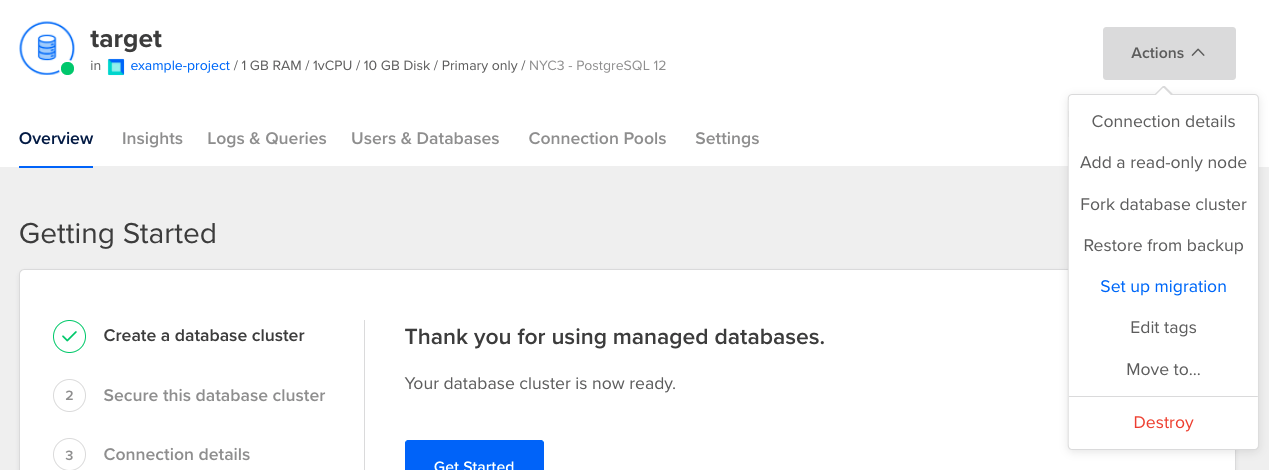
From the database’s Overview page, click the Actions button and then select Set Up Migration.
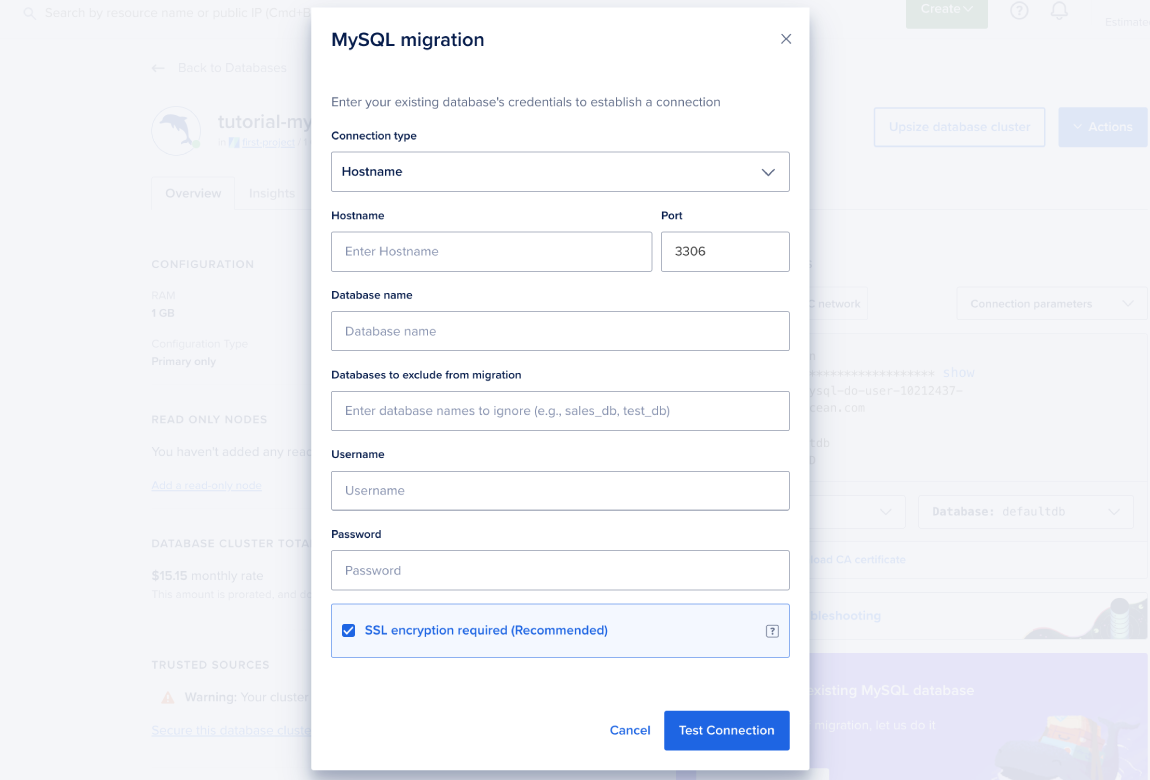
In the MySQL migration window, click Continue, then select a connection type between public host, public connection string, or private host. Enter the source database’s credentials, any databases you want to exclude, and your credentials. Then, click Start Migration. A migration status banner opens at the top of the Overview page and your target database’s data begins to transfer.
You can stop the migration at any time by clicking the Stop Migration button in the migration status banner. If you stop migration, the database retains any migrated data.
Migrations automatically stop after two weeks. We do not recommend leaving migrations ongoing in order to keep two database clusters in sync; instead, consider adding a read-only node to your cluster.
During migration, you can still write to the target database, but avoid the following actions because they may result in conflicts and replication issues:
- Do not write to any tables on the target database that the migration is already editing.
- Do not manually alter the source database’s replication or GTID configuration.
- Do not make changes to either database that could prevent the source and target database from connecting with each other. This includes modifying the source database’s
bind_addressand updating or enabling firewalls/trusted sources on either database.