When autoscaling occurs, the specified storage increment is added to each node in the cluster, not distributed across the cluster. Even when data is uneven across nodes, such as with different partition sizes, each node still receives the same increment. The total added storage is approximately the increment multiplied by the number of nodes.
How to Create Kafka Clusters
Last verified 13 Jul 2026
Kafka is an open-source distributed event and stream-processing platform built to process demanding real-time data feeds. It is inherently scalable, with high throughput and availability.
You can create a Kafka cluster using doctl, the API, or the Control Panel.
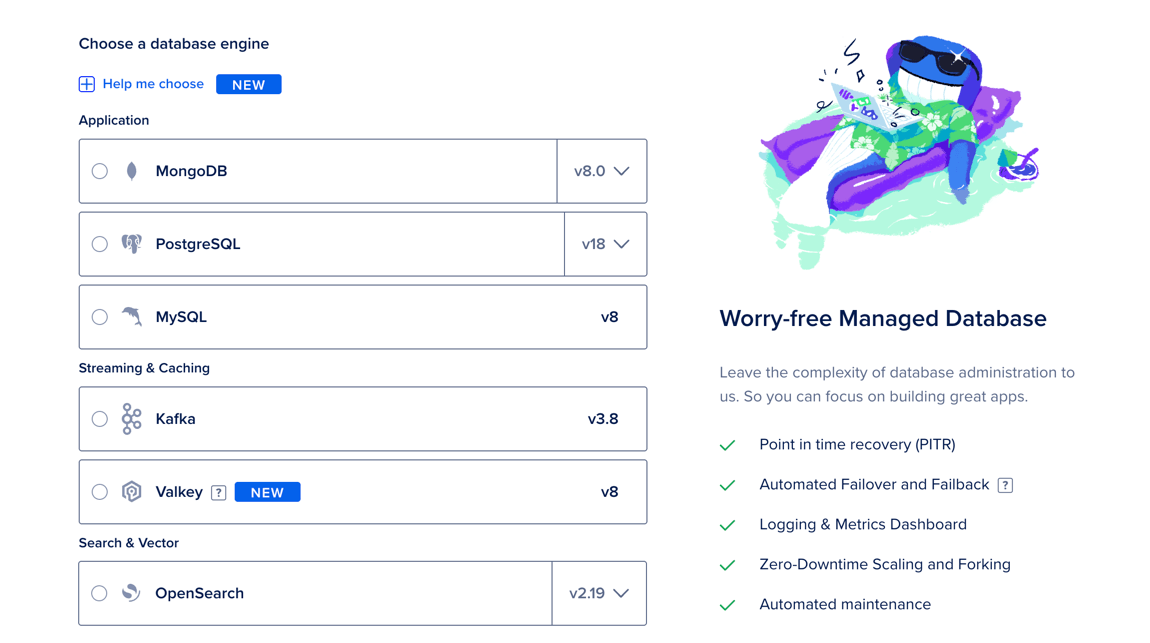
We currently support Kafka version 3.8. To view available major versions for new clusters, use the /v2/databases/options response.
Create a Database Cluster Using Automation
You can create a database cluster using the DigitalOcean CLI (doctl) or the API.
Create a Database Cluster via CLI
To create a database using doctl, you need to provide values for the --engine, --region, and --size flags. Use the doctl databases options engines, doctl databases options regions, and doctl databases options slugs commands, respectively, to get a list of available values.
Create a Database Cluster via API
To create a database using the API, you need to provide values for the engine, region, and size fields, which specify the database’s engine, its datacenter, and its configuration (number of CPUs, amount of RAM, and hard disk space). Use the /v2/databases/options endpoint to get a list of available values.
Create a Database Cluster Using the Control Panel
To create a database cluster, go to the Databases page, and then click Create Database. Or click Create at the top of any page and choose Streaming from the Data Services section of the menu.
Choose a Database Engine
On the Create Database Cluster page, in the Choose a database engine section, select Kafka, and then choose a version, if available. The database engine and version can’t be changed after creation.
Choose a Database Configuration
In the Choose a database configuration section, select one of the following options:
-
Basic - Shared CPU: CPU processing power is shared among neighboring Droplets on the same host. Best for low-traffic or development workloads.
-
General Purpose - Dedicated CPU: Provides the full processing power of a single vCPU at all times. Best for most workloads that need consistent CPU performance.
-
Memory-Optimized - Dedicated CPU: Provides the full processing power of a single vCPU at all times. Best for memory-heavy workloads with large working sets and demanding read-heavy or analytics-style queries.
If you select General Purpose - Dedicated CPU, under Number of Brokers, you can select 3, 6, 9, or 15 brokers. More brokers improve scalability, provide high availability, and distribute workload across the cluster.
Because Kafka is more resource-intensive than other engines, we recommend shared CPU plans for development and testing workloads and dedicated CPU plans for production workloads.
Under Select a plan, choose an option. Each option shows its combined monthly cost and included resources, such as vCPUs and memory.
After creation, you can increase your cluster’s compute size (number or size of nodes) at any time.
Choose a Storage Size
In the Choose a storage size section, you can increase storage in 10 GiB increments, up to the maximum shown under Storage range. Additional storage you add to the cluster costs $0.21 per GiB per month.
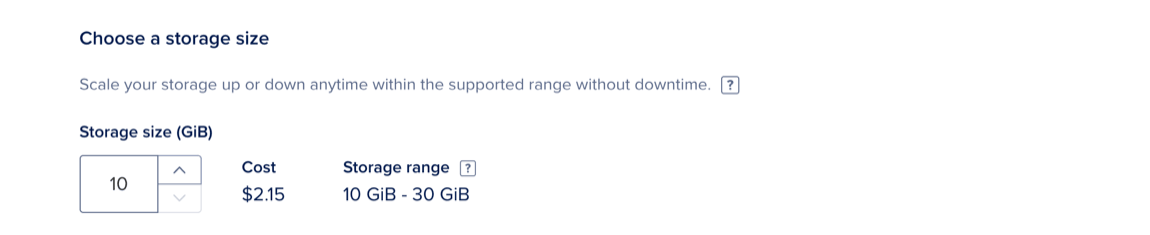
You can increase or decrease storage at any time, but you cannot reduce it below the amount currently in use (or below what’s required by backups and growth).
In the Autoscale storage section, select Enable Storage Autoscaling to automatically increase storage when disk utilization on any node in the cluster reaches the specified threshold. The threshold is based on the worst-performing node in the cluster, not the average across nodes. Click Customize to set a custom threshold and storage increment. The system bills this increase as additional storage.
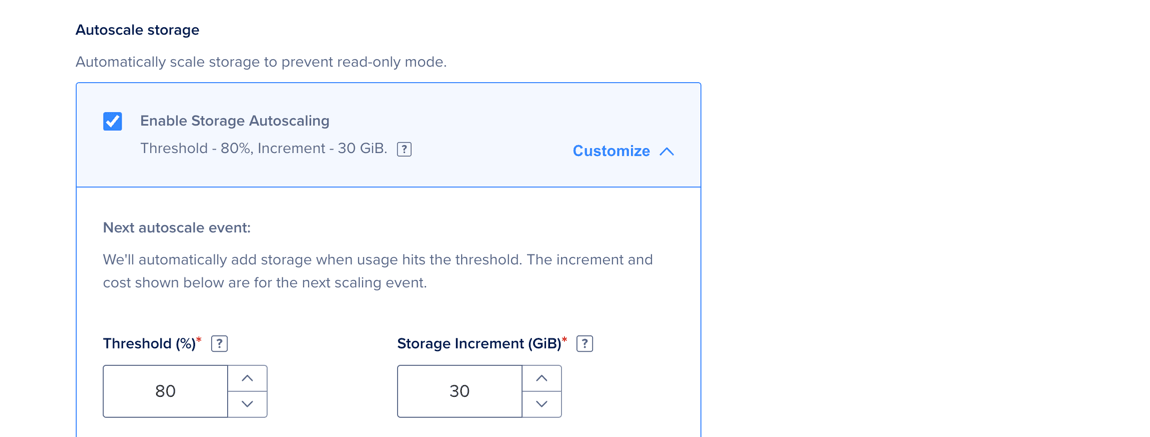
Autoscaling takes several minutes, depending on the cluster size. It runs without downtime and you do not need to take any action.
Choose a Datacenter Region
In the Choose a datacenter region section, select a datacenter for your cluster.

The list shows the datacenters where you currently have the most resources, with the number of resources shown to the right as X resources. Hover over this text to see the specific resources in that datacenter.
For the best performance, create your database in the same datacenter as your other DigitalOcean resources.
Each region has one or more datacenters, each with its own VPC network. Keeping resources in the same datacenter ensures they share the private networking interface, which reduces latency and prevents traffic from being routed over the public internet.
Finalize and Create
In the Finalize and Create section, enter a unique name for the cluster and select a project to add it to. After creation, you can move the cluster to another project, but its name can’t be changed.
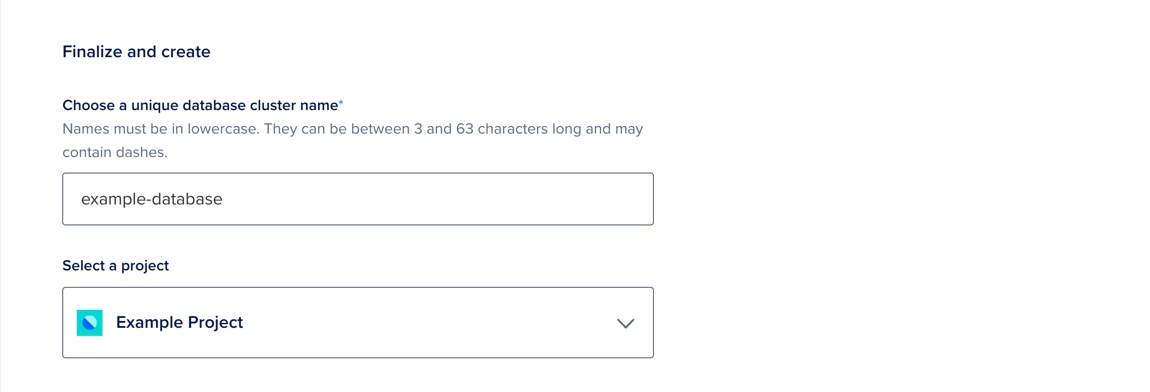
When finished, click Create Database Cluster.
Clusters typically take five minutes or more to provision, but you can complete important configuration tasks such as restricting inbound connections while you wait.
DigitalOcean Kafka does not currently support the native importing of existing Kafka databases. However, you can use Kafka MirrorMaker to replicate existing data to your DigitalOcean Kafka cluster.