If your cluster uses VPC-native networking and runs Kubernetes 1.33 or later, you can use the built-in Gateway API instead.
DOKS Operational Readiness, Part 1: Install the NGINX Ingress Controller
Last verified 13 Jul 2026
DigitalOcean Kubernetes (DOKS) is a Kubernetes service with a fully managed control plane, high availability, and autoscaling. DOKS integrates with standard Kubernetes toolchains and DigitalOcean’s load balancers, volumes, CPU and GPU Droplets, API, and CLI.
In this part of the tutorial series, you learn how to install the NGINX Ingress Controller 1-Click App, automatically deploy and configure TLS certificates for your hosts, and route traffic to your backend applications. You can find the manifests used in this tutorial in the Kubernetes-Starter-Kit-Developers GitHub repository.
When you configure a service as a load balancer, DigitalOcean Kubernetes (DOKS) automatically provisions a load balancer in your account. Now, the service is exposed to the outside world and can be accessed via the load balancer endpoint. In a real world scenario, you do not want to use one load balancer per service, so you need a proxy inside the cluster. You can do this using an ingress controller. An ingress controller lets you expose multiple Kubernetes services to external clients and users. When you install an ingress controller, it creates a service and exposes it as a load balancer through which it receives the outside traffic. You can have as many applications behind the ingress, which are all accessible through a single endpoint. In addition to providing load balancing, ingress controllers provide routing rules such as content-based routing, support for multiple protocols, and authentication.
An ingress controller sits at the edge of your VPC, and acts as the entry point for your network. It handles HTTP requests only and operates at layer 7 of the OSI model.
In this tutorial, we use the Kubernetes-maintained NGINX Ingress Controller. nginx provides a flexible way of routing traffic to your services inside the cluster and also provides TLS certificates support and auto renewal via Cert-Manager. You can have multiple hosts defined under a single domain, and then let nginx take care of routing traffic to the correct host. The following diagram provides an overview of the nginx setup, hosts and backend services used in the tutorial:
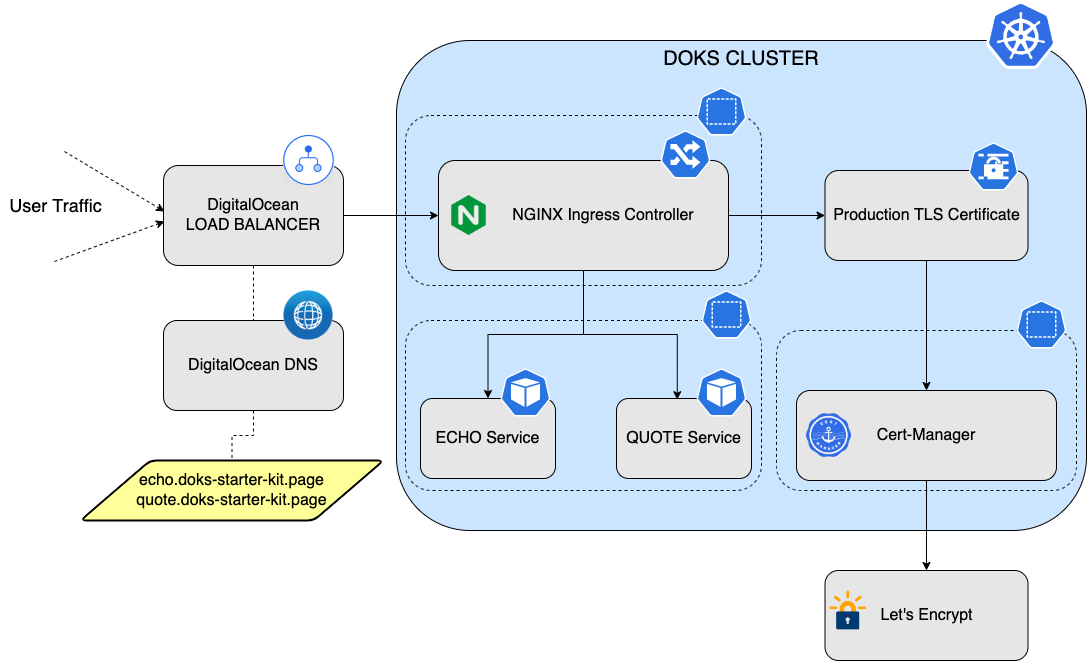
When you deploy nginx to your DOKS cluster, a load balancer is created which receives the outside traffic. Then, you configure a domain with A type records (hosts), which in turn point to your load balancer external IP address. Then, you set up the ECHO and QUOTE backend services and create HTTP rules for these services. So, data flows from the user request to the host.domain to the load balancer. From the load balancer, it goes to nginx and then to the backend applications (services).
After finishing this tutorial, you can:
-
Install the nginx 1-Click App on a DOKS cluster.
-
Configure DNS for the NGINX Ingress Controller.
-
Create backend services and configure nginx rules for those services.
Prerequisites
You need the following resources to complete this tutorial series:
-
A DOKS cluster. To use the tools shown in this tutorial series, we recommend using a node pool of higher capacity nodes, such as 4 CPU with 8 GB RAM and at least two nodes. You must also connect to your cluster.
-
A DigitalOcean Container Registry (DOCR). You must also integrate your registry with the DOKS cluster.
-
A DigitalOcean API token with read-write scope.
-
A domain name (if you do not have one already) that you can buy one from a domain name registrar. Then, configure the domain registrar to point to DigitalOcean name servers, as described in Point to DigitalOcean Name Servers From Common Domain Registrars.
-
kubectl, the Kubernetes command-line tool. -
helm, the command-line interface for the Helm package manager for Kubernetes. Most Kubernetes 1-Click Apps are Helm charts and require Helm 3 package manager to run.
Step 1: Install the NGINX Ingress Controller
Navigate to your cluster in the Kubernetes section of the Control Panel, then click the Marketplace tab. In the recommended apps section, select NGINX Ingress Controller and then click Install.
When installed, the app appears in the History of Installed 1-Click Apps section of the tab.
Installing the NGINX Ingress Controller 1-Click App also creates a load balancer that you can see in the Resources tab of your cluster.
Run the following command to get the ID of the load balancer:
doctl compute load-balancer list --format IP,ID,Name,StatusThe output looks similar to the following:
ID                                      IP                 Name                                Status
66266aa9-c340-4626-8e8d-a625ff3ab444    157.230.66.167     a834f84e0ac7042948e1648510cb4ae0    active
Step 2: Create the Backend Applications
In the step, you deploy two example backend applications, named echo and quote, to test the nginx ingress setup.
It is a best practice to create a separate namespace for backend applications. Use the following command to create a new namespace called backend in your Kubernetes cluster:
kubectl create ns backendCreate the echo Deployment and Service
Create the deployment manifest for the echo backend application and save it as echo-deployment.yaml.
echo_deployment.yamlapiVersion: apps/v1
kind: Deployment
metadata:
name: echo
namespace: backend
spec:
replicas: 1
selector:
matchLabels:
app: echo
strategy:
type: RollingUpdate
template:
metadata:
labels:
app: echo
spec:
containers:
- name: echo
image: jmalloc/echo-server
ports:
- name: http
containerPort: 8080
resources:
requests:
cpu: 100m
memory: 50Mi
limits:
cpu: 200m
memory: 100MiCreate the echo deployment using the following command:
kubectl apply -f <path-to>/echo-deployment.yamlNext, create the echo service manifest and save it as echo_service.yaml:
echo_service.yamlapiVersion: v1
kind: Service
metadata:
name: echo
namespace: backend
spec:
ports:
- name: http
port: 80
targetPort: 8080
selector:
app: echoCreate the echo service using the following command:
kubectl apply -f <path-to>/echo-service.yamlCreate the quote Deployment and Service
Create the quote deployment manifest and save it as quote-deployment.yaml:
quote-deployment.yamlapiVersion: apps/v1
kind: Deployment
metadata:
name: quote
namespace: backend
spec:
replicas: 1
selector:
matchLabels:
app: quote
strategy:
type: RollingUpdate
template:
metadata:
labels:
app: quote
spec:
containers:
- name: backend
image: docker.io/datawire/quote:0.4.1
ports:
- name: http
containerPort: 8080
resources:
requests:
cpu: 100m
memory: 50Mi
limits:
cpu: 200m
memory: 100MiCreate the quote deployment using the following command:
kubectl apply -f <path-to>/quote-deployment.yamlCreate the quote service manifest and save it as quote_service.yaml:
quote_service.yamlapiVersion: v1
kind: Service
metadata:
name: quote
namespace: backend
spec:
ports:
- name: http
port: 80
targetPort: 8080
selector:
app: quoteCreate the quote service using the following command:
kubectl apply -f <path-to>/quote-service.yamlInspect the Deployments and Services
Verify the deployments and services you created using the following command:
kubectl get deployments -n backendThe output looks like the following:
NAME    READY   UP-TO-DATE   AVAILABLE   AGE
echo    1/1     1            1           1m
quote   1/1     1            1           1m
Inspect the services you created using the following command:
kubectl get services -n backendThe output looks like the following:
NAME    TYPE        CLUSTER-IP       EXTERNAL-IP   PORT(S)   AGE
echo    ClusterIP   10.245.252.120   <none>        80/TCP    1m
quote   ClusterIP   10.245.85.210    <none>        80/TCP    1m
Step 3: Configure DNS for NGINX Ingress Controller
In this step, you configure DNS with your DigitalOcean account using your domain and create the A records for each host.
To add a domain from the Control Panel, open the Create menu and click Domain. Enter your domain into the Enter domain field, then click Add Domain. The domain you add is listed on the Domains page.
Next, create the A records for the echo and quote hosts you created previously. Click the domain name on the Domains page. Check that A is selected in the Create new record section. Enter the following for the first host:
- HOSTNAME:
echo
-
WILL DIRECT TO: From the drop-down list, select the name of the load balancer, which you can find in the Resources tab of your cluster.
-
TTL (SECONDS): 30 Click Create Record to add the A record to the DNS records section.
Enter the following for the second host:
- HOSTNAME:
quote
-
WILL DIRECT TO: From the drop-down list, select the name of the load balancer, which you can find in the Resources tab of your cluster.
-
TTL (SECONDS): 30
All DNS records have Time to Live (TTL) value in common, which determines how long a record can remain cached on a DNS server before it expires. Loading data from a local cache is faster, but visitors won’t see DNS changes until their local cache expires and receives an updated record after a new DNS lookup. As a result, higher TTL values give visitors faster performance, and lower TTL values ensure that DNS changes are picked up quickly. All DNS records require a minimum TTL value of 30 seconds.
Click Create Record to add the A record to the domain’s DNS records section.
Verify the available records for your domain by running the following command:
doctl compute domain records list <your-domain-name>The output looks similar to the following:
ID           Type    Name     Data                    Priority    Port    TTL     Weight
310250554    SOA     @        1800                    0           0       1800    0
310250555    NS      @        ns1.digitalocean.com    0           0       1800    0
310250556    NS      @        ns2.digitalocean.com    0           0       1800    0
310250557    NS      @        ns3.digitalocean.com    0           0       1800    0
310256661    A       echo     157.230.66.167          0           0       30      0
310256986    A       quote    157.230.66.167          0           0       30      0
At this point, the network traffic reaches the nginx-enabled cluster. But, to expose the backend applications to the outside world, you need to tell nginx what host each service maps to. To do so, you need to configure the backend services paths for each of the hosts as described in the next step.
Step 4: Configure NGINX Ingress Rules for Backend Services
In this step, you expose the backend applications to the outside world by telling nginx what host each service maps to. You define a set of rules in nginx and each rule associates a host to a backend service.
Create an ingress resource for NGNIX using the echo service and save it as echo_host.yaml:
echo_host.yaml
apiVersion: networking.k8s.io/v1
kind: Ingress
metadata:
  name: ingress-echo
  namespace: backend
spec:
  rules:
    - host: echo.<your-domain-name>
      http:
        paths:
          - path: /
            pathType: Prefix
            backend:
              service:
                name: echo
                port:
                  number: 8080
  ingressClassName: nginx
The spec section of the manifest contains a list of host rules used to configure the Ingress. If unspecified, or no rule matches, all traffic is sent to the default backend service. The manifest has the following fields:
-
hostspecifies the fully qualified domain name of a network host, for exampleecho.<your-domain-name>. -
httpcontains the list of HTTP selectors pointing to backends. -
pathsprovides a collection of paths that map requests to backends.
In the example above, the ingress resource tells nginx to route each HTTP request that is using the / prefix for the echo.<your-domain-name> host, to the echo backend service running on port 8080. In other words, every time you make a call to http://echo.echo backend service running on port 8080.
You can have multiple ingress controllers per cluster. The ingressClassName field in the manifest differentiates between multiple ingress controllers present in your cluster. Although you can define multiple rules for different hosts and paths in a single ingress resource, in this tutorial, we use two different manifests for each host for simplicity.
Create another host manifest for the quote service and save it as quote_host.yaml:
quote_host.yaml
apiVersion: networking.k8s.io/v1
kind: Ingress
metadata:
  name: ingress-quote
  namespace: backend
  annotations:
      cert-manager.io/issuer: letsencrypt-nginx
spec:
  tls:
     - hosts:
       - quote.<your-domain-name>
       secretName: letsencrypt-nginx-quote
  rules:
    - host: quote.<your-domain-name>
      http:
        paths:
        - path: /
          pathType: Prefix
          backend:
            service:
              name: quote
              port:
                number: 80
  ingressClassName: nginx
Deploy the host manifests:
kubectl apply -f <path-to>/echo_host.yaml
kubectl apply -f <path-to>/quote_host.yaml
Verify the ingress resources:
kubectl get ingress -n backendThe output looks similar to the following:
NAME            CLASS   HOSTS                         ADDRESS          PORTS   AGE
ingress-echo    nginx   echo.<your-domain-name>    157.230.66.167   80      4m1s
ingress-quote   nginx   quote.<your-domain-name>   157.230.66.167   80      3m52s
The ADDRESS column matches the IP address of the load balancer nginx you created in STEP 1.
Next, test the backend applications. You can use curl or a web browser. For example:
curl -Li http://echo.<your-domain-name>/The output looks similar to the following when NGNIX is configured successfully:
HTTP/1.1 200 OK
Date: Thu, 04 Nov 2021 15:50:38 GMT
Content-Type: text/plain
Content-Length: 347
Connection: keep-alive

Request served by echo-5d8d65c665-569zf

HTTP/1.1 GET /

Host: echo.<your-domain-name>
X-Real-Ip: 10.114.0.4
X-Forwarded-Port: 80
User-Agent: curl/7.77.0
X-Forwarded-Host: echo.<your-domain-name>
X-Forwarded-Proto: http
X-Forwarded-Scheme: http
X-Scheme: http
Accept: */*
X-Request-Id: f45e2c0b8efed70b4692e1d76001286d
X-Forwarded-For: 10.114.0.4
Summary
In this tutorial, you learned how to set up an ingress controller for your DOKS cluster using nginx, create backend services, and configure nginx rules for those backend services.
What’s Next
In the next tutorial, you use Cert-Manager to simplify TLS certificates management for your applications. You can choose one of the following configuration options:
DOKS Operational Readiness, Part 2: Enable HTTPS
Configure production-ready TLS certificates with Cert-Manager using the HTTP-01 challenge.
DOKS Operational Readiness, Part 3: Configure Wildcard Certificates
Configure production-ready TLS certificates with Cert-Manager using the DNS-01 challenge to support wildcard certificates.