DOKS Operational Readiness, Part 3: Configure Wildcard Certificates
Configure production-ready TLS certificates with Cert-Manager using the DNS-01 challenge to support wildcard certificates.
Last verified 13 Jul 2026
DigitalOcean Kubernetes (DOKS) is a Kubernetes service with a fully managed control plane, high availability, and autoscaling. DOKS integrates with standard Kubernetes toolchains and DigitalOcean’s load balancers, volumes, CPU and GPU Droplets, API, and CLI.
In the previous part of the tutorial series, you installed a NGINX Ingress Controller and configured the backend services. nginx comes with self-signed TLS certificates. For live environments, you enable nginx to use production-ready TLS certificates for the backend services and automatically configure TLS certificates for your hosts. In this part of the tutorial series, the certificate issuer uses the HTTP-01 challenge provider to accomplish the task. This protocol does not support wildcard certificates. A wildcard certificate is able to handle sub-domains as well and has global scope for the whole DNS domain you own. If you want to use wildcard certificates, you need to set up DNS-01 challenge instead, as described in Set Up NGINX Ingress Controller to Use Wildcard Certificates.
You install the Cert-Manager 1-Click App and then configure it to issue Let’s Encrypt certificates. Certificates renew automatically via Cert-Manager. You can find the manifests used in this tutorial in the Kubernetes-Starter-Kit-Developers GitHub repository.
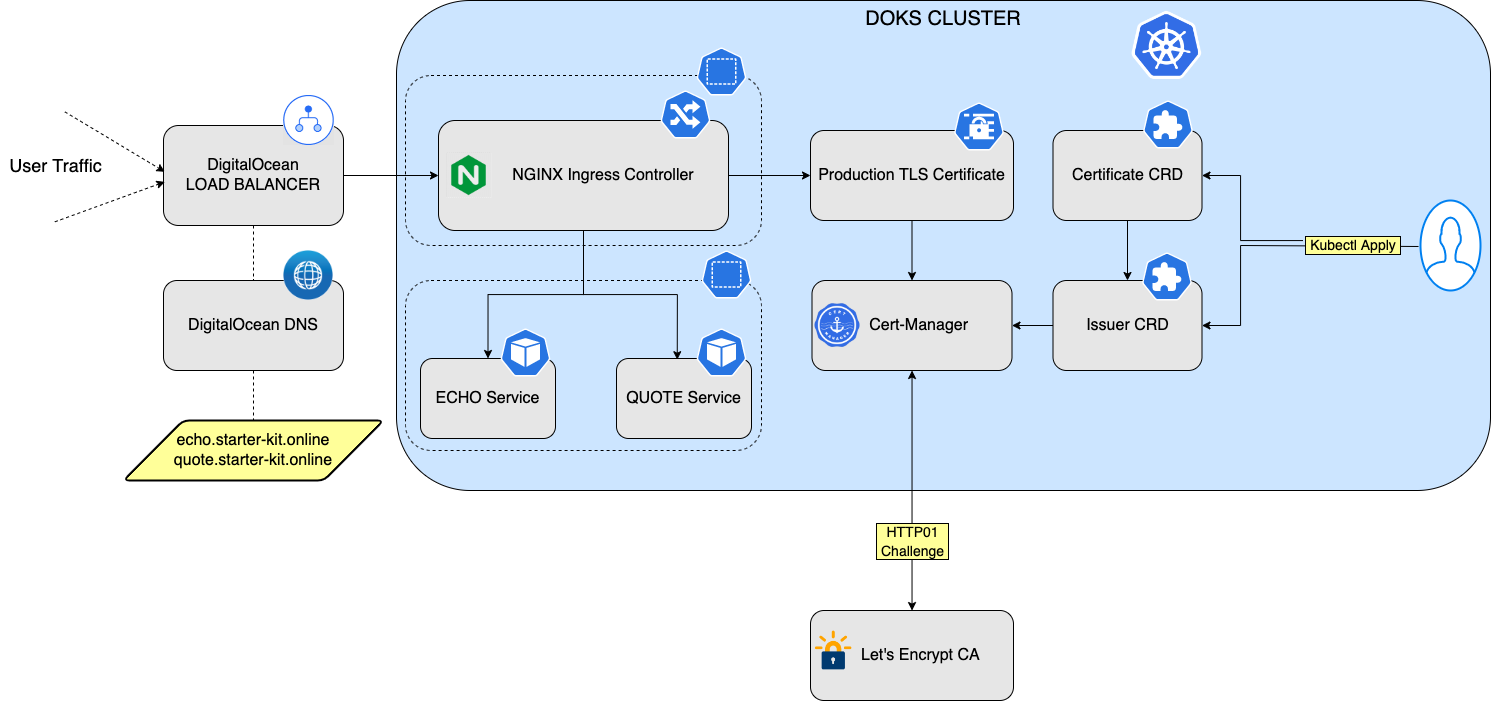
The following diagram shows the setup used in this tutorial to enable HTTPS for the NGINX Ingress Controller and backend services:
After finishing this tutorial, you can:
Create and configure basic HTTP rules for nginx to route requests to your backend applications.
Automatically configure TLS certificates for your hosts and provide TLS termination for the backend services.
Navigate to your cluster in the Kubernetes section of the control panel, then click the Marketplace tab. In the recommended apps section, select Cert-Manager and click Install.
When installed, the app appears in the History of Installed 1-Click Apps section of the tab.
Inspect the Kubernetes resources created by Cert-Manager:
kubectl get all -n cert-managerThe output looks similar to the following:
NAME                                           READY   STATUS    RESTARTS   AGE
pod/cert-manager-7645bbbcc9-l7zsl              1/1     Running   0          3m29s
pod/cert-manager-cainjector-5bcf77b697-p6pzw   1/1     Running   0          3m29s
pod/cert-manager-webhook-9cb88bd6d-cbd8f       1/1     Running   0          3m29s

NAME                           TYPE        CLUSTER-IP      EXTERNAL-IP   PORT(S)   AGE
service/cert-manager-webhook   ClusterIP   10.245.26.141   <none>        443/TCP   3m29s

NAME                                      READY   UP-TO-DATE   AVAILABLE   AGE
deployment.apps/cert-manager              1/1     1            1           3m29s
deployment.apps/cert-manager-cainjector   1/1     1            1           3m29s
deployment.apps/cert-manager-webhook      1/1     1            1           3m29s

NAME                                                 DESIRED   CURRENT   READY   AGE
replicaset.apps/cert-manager-7645bbbcc9              1         1         1       3m29s
replicaset.apps/cert-manager-cainjector-5bcf77b697   1         1         1       3m29s
replicaset.apps/cert-manager-webhook-9cb88bd6d       1         1         1       3m29s
The cert-manager pods and webhook service are running.
Cert-Manager creates custom resource definitions (CRDs). Cert-Manager relies on three important CRDs to issue certificates from a Certificate Authority (such as Let’s Encrypt):
Issuer: Defines a namespaced certificate issuer, which allows you to use different CAs in each namespace.
ClusterIssuer: Similar to Issuer, but it does not belong to a namespace and can be used to issue certificates in any namespace.
Certificate: Defines a namespaced resource that references an Issuer or ClusterIssuer for issuing certificates.
Inspect the CRDs by running the following command:
kubectl get crd -l app.kubernetes.io/name=cert-managerThe output looks similar to the following:
NAME                                  CREATED AT
certificaterequests.cert-manager.io   2022-05-12T17:50:38Z
certificates.cert-manager.io          2022-05-12T17:50:38Z
challenges.acme.cert-manager.io       2022-05-12T17:50:38Z
clusterissuers.cert-manager.io        2022-05-12T17:50:38Z
issuers.cert-manager.io               2022-05-12T17:50:38Z
orders.acme.cert-manager.io 2022-05-12T17:50:38ZYou can issue the certificate using an Issuer. Configure a certificate issuers resource for Cert-Manager, which fetches the TLS certificate for nginx to use. The certificate issuer uses the HTTP-01 challenge provider to accomplish this task. This protocol does not support wildcard certificates. If you want to use wildcard certificates, you need to set up DNS-01 challenge, as described in Set Up NGINX Ingress Controller to Use Wildcard Certificates.
Create the following manifest and save it as cert-manager-issuer.yaml:
cert-manager-issuer.yamlapiVersion: cert-manager.io/v1
kind: Issuer
metadata:
name: letsencrypt-nginx
namespace: backend
spec:
acme:
email: <your-valid-email-address>
server: https://acme-v02.api.letsencrypt.org/directory
privateKeySecretRef:
name: letsencrypt-nginx-private-key
solvers:
# Use the HTTP-01 challenge provider
- http01:
ingress:
class: nginxThe ACME issuer configuration has the following fields:
email: Email address to be associated with the ACME account.server: URL used to access the ACME server’s directory endpoint.privateKeySecretRef: Kubernetes secret to store the automatically generated ACME account private key.Enter your email address and save the file. The ingress resources use the HTTP-01 challenge.
Create the Issuer resource using the following command:
kubectl apply -f <path-to>/cert-manager-issuer.yamlVerify that the Issuer resource is created:
kubectl get issuer -n backendThe output looks like the following:
NAME                READY   AGE
letsencrypt-nginx   True    4m
Next, configure each nginx ingress resource to use TLS. Open the echo_host.yaml manifest you created previously for the echo application, add the annotations and tls sections shown below, and save the file:
echo_host.yamlapiVersion: networking.k8s.io/v1
kind: Ingress
metadata:
name: ingress-echo
namespace: backend
annotations:
cert-manager.io/issuer: letsencrypt-nginx
spec:
tls:
- hosts:
- echo.<your-domain-name>
secretName: letsencrypt-nginx-echo
rules:
- host: echo.<your-domain-name>
http:
paths:
- path: /
pathType: Prefix
backend:
service:
name: echo
port:
number: 80
ingressClassName: nginxThe manifest has the following fields:
issuer: Uses the Cert-Manager ingress-shim to create the certificate resource on your behalf. It points to the letsencrypt-nginx Issuer resource you created earlier.
hosts: List of hosts included in the TLS certificate.
secretName: Name of the secret used to terminate TLS traffic on port 443.
Similarly, open the quote_host.yaml manifest you created previously for the quote application, add the annotations and tls sections shown below, and save the file:
quote_host.yamlapiVersion: networking.k8s.io/v1
kind: Ingress
metadata:
name: ingress-quote
namespace: backend
annotations:
cert-manager.io/issuer: letsencrypt-nginx
spec:
tls:
- hosts:
- quote.<your-domain-name>
secretName: letsencrypt-nginx-quote
rules:
- host: quote.<your-domain-name>
http:
paths:
- path: /
pathType: Prefix
backend:
service:
name: quote
port:
number: 80
ingressClassName: nginxRun the following command to configure the hosts to use TLS:
kubectl apply -f <path-to>/echo_host.yaml
kubectl apply -f <path-to>/quote_host.yaml
After a few minutes, check the state of the ingress object:
kubectl get ingress -n backendThe output looks like the following:
NAME            CLASS   HOSTS                         ADDRESS          PORTS     AGE
ingress-echo    nginx   echo.<your-domain-name>    157.230.66.167   80, 443   2d22h
ingress-quote   nginx   quote.<your-domain-name>   157.230.66.167   80, 443   2d22h
Now, the echo and quote hosts have TLS termination as shown in the PORTS column.
Check that the certificate resource is created:
kubectl get certificates -n backendThe output looks like the following:
NAME                      READY   SECRET                    AGE
letsencrypt-nginx-echo    True    letsencrypt-nginx-echo    7m
letsencrypt-nginx-quote   True    letsencrypt-nginx-quote   30m
Finally, test the services using curl (or type https://echo.<your-domain-name> in a Web browser). For example:
curl -Li http://echo.<your-domain-name>/The output looks similar to the following:
HTTP/1.1 308 Permanent Redirect
Date: Fri, 13 May 2022 19:02:42 GMT
Content-Type: text/html
Content-Length: 164
Connection: keep-alive
Location: https://echo.<your-domain-name>

HTTP/2 200
date: Fri, 13 May 2022 19:02:43 GMT
content-type: text/plain
content-length: 367
strict-transport-security: max-age=15724800; includeSubDomains

Request served by echo-5d8d65c665-tlwpt

HTTP/1.1 GET /

Host: echo.<your-domain-name>
X-Request-Id: bce6ae08105418a448d5ceb4bb39d953
X-Real-Ip: 159.203.190.194
X-Forwarded-For: 159.203.190.194
X-Forwarded-Scheme: https
Accept: */*
X-Forwarded-Host: echo.<your-domain-name>
X-Forwarded-Port: 443
X-Forwarded-Proto: https
X-Scheme: https
User-Agent: curl/7.75.0
There is now a permanent redirect to use HTTPS.
The L4 load balancer created with the nginx installation replaces the original client IP address. Losing the client IP visibility in the application can be problematic. To address this, you need to enable Proxy protocol which lets the L4 load balancer communicate with the original client IP. For this to work, you need to configure both DigitalOcean Load Balancer and nginx.
Open the nginx values.yaml file and save it as nginx-values-v4.0.13.yaml. Add the annotations and config sections as shown below and save the file:
nginx-values-v4.0.13.yaml## Stack name: ingress-nginx/ingress-nginx
## Ref: https://github.com/kubernetes/ingress-nginx/tree/helm-chart-4.0.13/charts/ingress-nginx/
##
controller:
# A replica count of minimum 2 ensures high availability for NGINX ingress main application Pods
replicaCount: 2
service:
type: LoadBalancer
annotations:
# Enable proxy protocol.
service.beta.kubernetes.io/do-loadbalancer-enable-proxy-protocol: "true"
# Specify whether the DigitalOcean Load Balancer should pass encrypted data to backend Droplets.
service.beta.kubernetes.io/do-loadbalancer-tls-passthrough: "true"
config:
use-proxy-protocol: "true"
## Enable the metrics of the NGINX ingress controller https://kubernetes.github.io/ingress-nginx/user-guide/monitoring/
metrics:
enabled: true
podAnnotations:
controller:
metrics:
service:
servicePort: "9090"
prometheus.io/port: "10254"
prometheus.io/scrape: "true"Apply the changes using the helm upgrade command:
NGINX_CHART_VERSION="4.0.13"

helm upgrade ingress-nginx ingress-nginx/ingress-nginx --version "$NGINX_CHART_VERSION" \
  --namespace ingress-nginx \
  -f "<path-to>/nginx-values-v${NGINX_CHART_VERSION}.yaml"
Test the echo service using curl. For example:
curl -Li https://echo.<your-domain-name>/The output looks similar to the following:
HTTP/2 200
date: Wed, 08 Jun 2022 05:56:37 GMT
content-type: text/plain
content-length: 363
strict-transport-security: max-age=15724800; includeSubDomains

Request served by echo-5d8d65c665-tlwpt

HTTP/1.1 GET /

Host: echo.<your-domain-name>
X-Forwarded-Port: 443
X-Scheme: https
User-Agent: curl/7.83.1
Accept: */*
X-Forwarded-Scheme: https
X-Request-Id: db66ddc83836466a1b6710116ccad4e8
X-Real-Ip: 108.7.209.165
X-Forwarded-For: 108.7.209.165
X-Forwarded-Host: echo.<your-domain-name>
X-Forwarded-Proto: https
Notice that your public IP is present in the X-Forwarded-For and X-Real-Ip headers.
In this tutorial, you used Cert-Manager to simplify TLS certificates management for your applications and enabled TLS termination using HTTP-01 challenge.
You can issue wildcard certificates for your domain instead of using HTTP-01 challenge.
Configure production-ready TLS certificates with Cert-Manager using the DNS-01 challenge to support wildcard certificates.
Try using different keywords or simplifying your search terms.