You can scale a fixed node pool down to 0 nodes as long as you have another fixed node pool with at least 1 node or a GPU node pool with 0 nodes.
How to Add Node Pools to a Cluster
Last verified 9 Oct 2026
DigitalOcean Kubernetes (DOKS) is a Kubernetes service with a fully managed control plane, high availability, and autoscaling. DOKS integrates with standard Kubernetes toolchains and DigitalOcean’s load balancers, volumes, CPU and GPU Droplets, API, and CLI.
A node pool is a group of nodes in a DOKS cluster with the same configuration.
All the worker nodes within a node pool have identical resources, but each node pool can have a different worker configuration. This lets you have different services on different node pools, where each pool has the RAM, CPU, and attached storage resources the service requires.
You can create and modify node pools at any time. Worker nodes are automatically deleted and recreated when needed, and you can manually recycle worker nodes. Nodes in the node pool inherit the node pool’s naming scheme when you first create a node pool, however, renaming a node pool does not rename the nodes. Nodes inherit the new naming scheme when recycled or when resizing the node pool which creates new nodes.
A node pool’s machine size slug is immutable. To change a pool’s bundled size or move between a bundled plan and a v5 configuration, create a node pool with the target configuration, drain the old node pool, and remove it. You can still change the number of nodes in a pool directly or with autoscaling.
You can add custom tags to a cluster and its node pools. DOKS deletes any custom tags you added to worker nodes in a node pool (for example, from the Droplets page) to maintain consistency between the node pool and its worker nodes.
Add a Node Pool to a Cluster Using Automation
Use a size returned by the /v2/kubernetes/options endpoint or the doctl kubernetes options sizes command. DOKS supports a subset of standalone Droplet v5 configurations, so a v5 Droplet slug that is not in the Kubernetes options cannot be used for a node pool.
Add a GPU Worker Node to a Cluster
You can also add a GPU node pool to an existing cluster on versions 1.30.4-do.0, 1.29.8-do.0, 1.28.13-do.0, and later.
For Spot GPU node pools, you can only maintain or reduce the node count after creation, and we recommend pairing them with an on-demand GPU node pool as a fallback in case the Spot pool is reclaimed.
In rare cases, it can take several hours for a GPU Droplet to provision. If you have an unusually long creation time, open a support ticket.
On DOKS 1.37 and later, GPU device plugins are not enabled by default. Before you run GPU workloads, enable either the GPU device plugin or a Dynamic Resource Allocation (DRA) driver for each GPU brand in the cluster. For the available options, see Runtime, Drivers, and Plugins.
To run GPU workloads after you create a cluster, use the GPU nodes-specific labels and taint in your workload specifications to schedule pods that match. You can use a configuration spec, similar to the pod spec shown below, for your actual workloads:
cuda-pod.yamlapiVersion: v1
kind: Pod
metadata:
name: gpu-workload
spec:
restartPolicy: Never
nodeSelector:
doks.digitalocean.com/gpu-brand: nvidia
containers:
- name: cuda-container
image: nvcr.io/nvidia/k8s/cuda-sample:vectoradd-cuda10.2
resources:
limits:
nvidia.com/gpu: 1
tolerations:
- key: nvidia.com/gpu
operator: Exists
effect: NoScheduleThe above spec shows how to create a pod that runs NVIDIA’s CUDA image, requests one GPU, and uses the labels and taint for GPU worker nodes. The nvidia.com/gpu resource request works with both the GPU device plugin and the DRA driver. For AMD GPUs, request amd.com/gpu instead.
You can use the cluster autoscaler to automatically scale the GPU node pool down to zero, or use the DigitalOcean CLI or API to manually scale the node pool down to zero. For example:
doctl kubernetes cluster node-pool update <your-cluster-id> <your-nodepool-id> --count 0 Add a Node Pool to a Cluster Using the Control Panel
To add additional node pools to an existing cluster, open the cluster’s More menu and select View Nodes. Click Add Node Pool. On the Add node pool(s) page, specify the following for the node pool:
-
Node pool name: Choose a name for the node pool when it’s created. Nodes inside this pool inherit this naming scheme when they are created. If you rename the node pool later, the nodes only inherit the new naming scheme when they are recreated (when you recycle the nodes or resize the node pool).
-
Choose the configuration type:
-
v5 configurations let you choose Shared for shared vCPUs or General Purpose for dedicated vCPUs, then size the worker’s resources independently. DOKS supports only the v5 options displayed in the Control Panel. v5 worker nodes have a 50 GiB or 80 GiB boot disk.
-
Bundled configurations use fixed resource ratios. Choose Shared CPUs for Basic Droplet plans or Dedicated CPUs for General Purpose, CPU-Optimized (Regular Intel CPU or Premium Intel CPU), and Memory-Optimized Droplet plans.
-
GPUs are built on GPU Droplets powered by AMD and NVIDIA GPUs. They are available in single-GPU and 8-GPU configurations.
Note A cluster must have at least one CPU node pool to be fully operational. This pool is needed to host essential DOKS managed workloads such as CoreDNS, preventing them from running on more expensive GPU nodes. For high availability of these workloads, we recommend a minimum of two CPU nodes.
For more information about shared and dedicated CPUs, see Shared CPU vs. Dedicated CPU.
Choosing the right Kubernetes configuration depends on your workload. See Choosing the Right Kubernetes Plan for plan selection guidance.
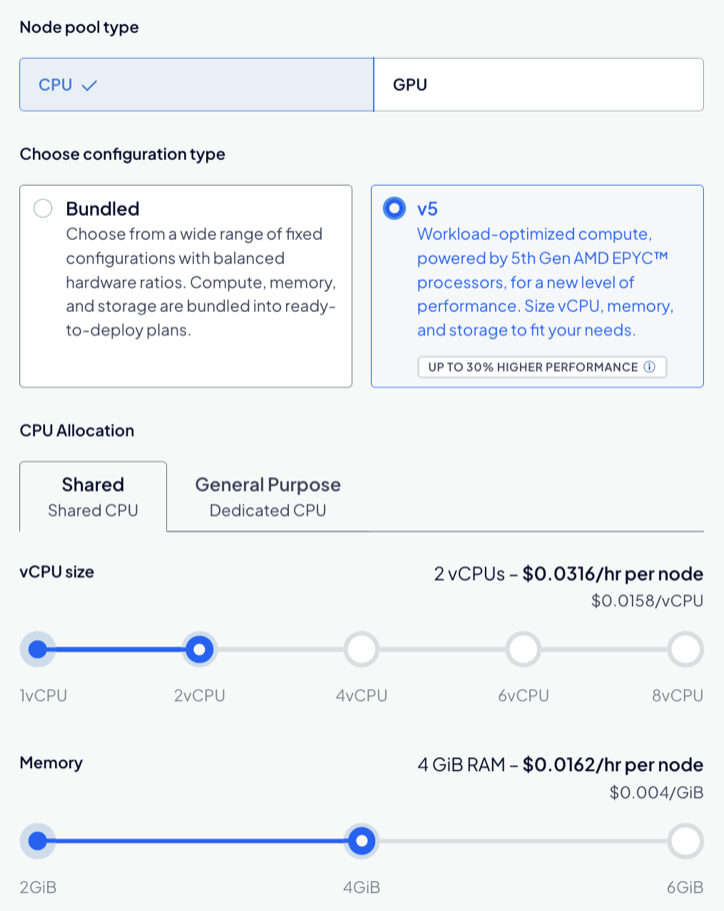
For a v5 node pool, you also select a Boot Disk size of 50 or 80 GiB. The boot disk is persistent NVMe storage that holds the operating system, container images, and
emptyDirvolumes for each node.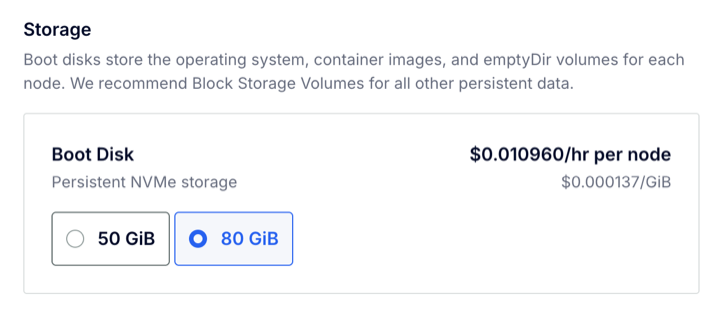
-
-
Node configuration: Choose the specific bundled plan or v5 configuration you want for your worker nodes. Each worker in a node pool has identical resources.
Some high-tier node plans are locked. To request access to those plans, click Submit a request. In the Request access to more nodes or higher-tier plans, specify the reason for the request and number of nodes you are requesting and click Submit.
-
Select the Set node pool to autoscale option to enable autoscaling.
-
Nodes: For a fixed-size cluster, choose how many nodes to include in the node pool. By default, three worker nodes are selected.
-
Minimum nodes and Maximum nodes: For an autoscaling-enabled cluster, choose the minimum and maximum number of nodes for when the load decreases or increases.
Click Add Node Pool(s) to add additional node pools.
Click Save to apply your changes and provision your new nodes.