How to Use Dedicated Inference on DigitalOcean Gradient™ AI Inference Hubpublic
Validated on 16 Mar 2026 • Last edited on 16 Mar 2026
DigitalOcean Gradient™ AI Inference Hub provides a single control plane for managing inference workflows. It includes a Model Catalog where you can view available foundation models, including both DigitalOcean-hosted and third-party commercial models, compare capabilities and pricing, and run inference using serverless or dedicated deployments. DigitalOcean Gradient AI Inference Hub is in public preview and enabled for all users. You can contact support for questions or assistance.
Dedicated Inference is available in public preview and enabled for all users. You can contact support for questions or assistance.
You can create a dedicated inference deployment using the DigitalOcean API and Control Panel. Dedicated Inference is available in ATL1, NYC2 and TOR1 only.
When to Use Dedicated Inference Versus Serverless Inference
Dedicated Inference is a managed inference service that enables you to host and scale open-source and commercial LLMs on dedicated GPUs. It gives you more control over the environment so you can choose the GPU, tune performance, and optimize your models for throughput, latency, cost or concurrency. Dedicated inference is best suited for steady, high-throughput workloads.
Serverless inference lets you send API requests directly to foundation models. Choose serverless inference over dedicated inference when you need to get started quickly without managing any components behind an inference endpoint, don't have a custom model to host or optimize, or have unpredictable or spiky inference traffic.
Pricing for serverless inference is based on the number of tokens used, while pricing for dedicated inference is based on the GPU hours used.
If you want to use serverless inference, see Use Serverless Inference.
Create Dedicated Inference Using Automation
Creating a dedicated inference deployment using the API requires you to send a POST request to the /v2/dedicated-inferences endpoint with the following parameters in the request JSON body:
name: An inference name.region: Datacenter region.hugging_face_token: Hugging Face token for the model to be deployed. Required only for gated models.model_slug: Model slug for the model to be deployed. Model slugs are same as the slugs present on Hugging Face.gpu_plan_slug: Slug for the GPU plan to deploy the model on. Use the/v2/dedicated-inferences/sizesendpoint to view available GPU plans and their slugs.node_count: Number of GPU nodes.
In the response body, the status field shows provisioning when the dedicated inference deployment is being provisioned and updates to active when provisioning is complete. If GPU capacity is not available, we attempt to provision the cluster for one to two hours, after which the status shows error.
To list all your dedicated inference deployments, send a GET request to the /v2/dedicated-inferences endpoint.
Create Dedicated Inference Using the Control Panel
To create a dedicated inference deployment from the DigitalOcean Control Panel, click Inference Hub in the left menu. Select the Dedicated Inference tab and click Deploy Dedicated Inference to open the Create an Inference Deployment page.
Choose a Datacenter Region
Select the region for your dedicated inference deployment. All resources created in this datacenter are members of the same VPC network.
Select a Pre-trained Model
You can use a pre-trained model hosted on Hugging Face, such as DeepSeek, OpenAI, or Llama models. Click Details next to each model to learn more about the model and its capabilities.
Some models are gated and require you to request access on Hugging Face, as described in their documentation. If you select a gated model, make sure you have been granted access before creating your dedicated inference deployment. Then, provide a Hugging Face access token in the HuggingFace Access Token field. To learn how to create an access token, see the Hugging Face documentation on access tokens.
GPU Plan
Select a GPU plan to deploy your dedicated inference. The GPU plan determines the hardware resources allocated to your deployment. You can choose from 1- or 8-GPU AMD or NVIDIA GPU plans. Next, specify the number of GPU nodes.
Finalize
Specify a name for your dedicated inference deployment. Names must be lowercase and can only contain letters, numbers, and hyphens.
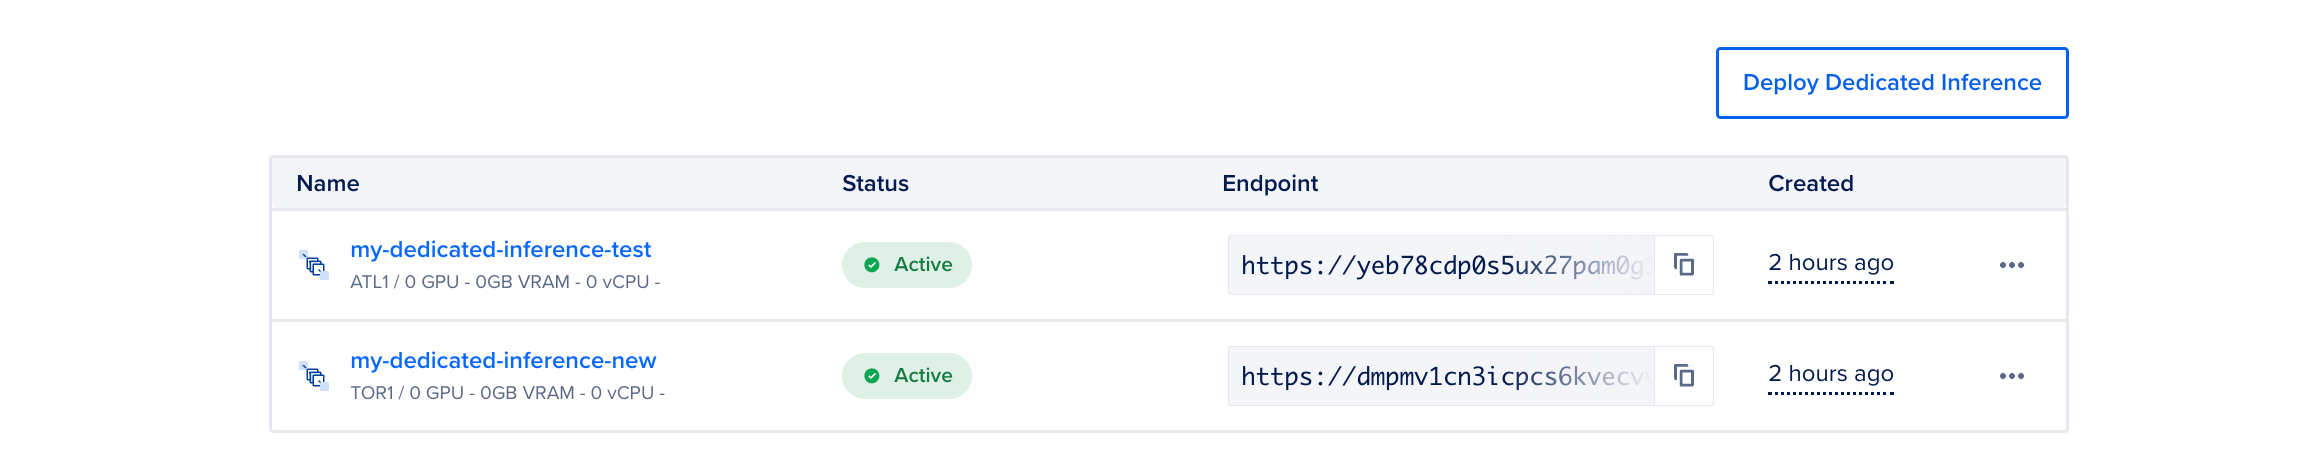
In the Summary section, review the cost based on the selections you made. Then, click Deploy Dedicated Inference to create your deployment. It may take several minutes for the deployment to be provisioned. The page lists all the dedicated inference instances that you have in your team. Here, you can view details such as the name, status, public endpoint and when the dedicated inference was created. The Status column shows Provisioning when the Dedicated inference is provisioning and updates to Active when the provisioning is complete. If GPU capacity is not available, we try to provision the cluster for 1-2 hr and then you see an Error status.
Once the deployment is active, you can view its details and use the endpoint to send inference requests. Make sure to note the access token, which is visible only once immediately after creation. Copy and store it securely, as you will need it to interact with the deployment endpoint.
Use the Dedicated Inference Endpoint
Dedicated inference deployments have two types of endpoints:
- Private Endpoint: Use when you want to allow resources within the VPC network the deployment belongs to access the endpoint.
- Public Endpoint: Use when you want to allow external sources to access the endpoint.
Using dedicated inference endpoints requires an access token to authenticate your requests. We automatically create an access token when provisioning your dedicated inference deployment. The same token can be used to authenticate requests to both the public and private endpoints. If you create the deployment using the Control Panel, the token is visible only once immediately after creation, so make sure to copy and store it securely. You can also send a GET request to the /v2/dedicated-inferences/{dedicated_inference_id}/tokens endpoint to list the current tokens.
If you want to create additional access tokens, in the Control Panel, go to the Endpoint Access Keys section of the Settings tab of your deployment, and click Create Access Key to open the Create Endpoint Access Key window. Provide a name for your access key and click Create Access Key. Copy the access token to use it later in your HTTP requests. You can use the /v2/dedicated-inferences/{dedicated_inference_id}/tokens endpoint.
Click the inference deployment to go to its Overview page. Here, you can view the private and public endpoints for the deployment, and use cURL to get details for the dedicated inference and interact with chat endpoints.
You can view the private endpoint in the Private Endpoint (VPC Network) field. To use the private endpoint, click Download CA Certificate to download the CA certificate and note the path to where you saved the certificate. Then, copy the cURL request from Configuration Example, update the certificate path, and provide the access token value in the request to interact with the private endpoint. For example:
curl --cacert <CA_CERTIFICATE_FILE_PATH> --location 'https://yeb78cdp0s5ux27pam0g1gg3-private-dedicated-inference.do-infra.ai/v1/chat/completions' \
-H 'accept: application/json' \
-H 'Content-Type: application/json' \
-H 'Authorization: Bearer <DEDICATED_INFERENCE_ACCESS_TOKEN>' \
-d '{
  "model": "openai/gpt-oss-120b",
  "messages": [
    {
      "role": "user",
      "content": "What is the capital of France?"
    }
  ],
  "max_tokens": 150
}'
You can view the public endpoint in the Public Endpoint field. To use the public endpoint, copy the cURL request in Configuration Example, and provide the access token value in the request to interact with the public endpoint. For example:
curl --location 'https://yeb78cdp0s5ux27pam0g1gg3-public-dedicated-inference.do-infra.ai/v1/chat/completions' \
-H 'accept: application/json' \
-H 'Content-Type: application/json' \
-H 'Authorization: Bearer <DEDICATED_INFERENCE_ACCESS_TOKEN>' \
-d '{
  "model": "openai/gpt-oss-120b",
  "messages": [
    {
      "role": "user",
      "content": "What is the capital of France?"
    }
  ],
  "max_tokens": 150
}'You can use the below request to access to interact with the public endpoint of your dedicated inference. You need the token value, model slug, and public endpoint from the response body when you create the dedicated inference.
curl --location '$DEDICATED_INFERENCE_PUBLIC_ENDPOINT/v1/chat/completions' \
--header 'accept: application/json' \
--header 'Content-Type: application/json' \
--header 'Authorization: Bearer $AUTH_TOKEN' \
--data '{
  "model": "$MODEL_SLUG",
  "messages": [
    {
      "role": "user",
      "content": "Explain the concept of recursion in programming."
    }
  ],
  "max_tokens": 150
}
'
Use the following request to access private connectivity with your dedicated inference using the private endpoint. You need to use the CA certificate in your call, which you can get by sending a GET request to the /v2/dedicated-inferences/<dedicated_inference_id>/ca endpoint. You also need the token value, model slug and public endpoint from the response body when you create the dedicated inference.
curl --cacert $CERT_FILE_PATH \
--location '$DEDICATED_INFERENCE_PRIVATE_ENDPOINT/v1/chat/completions' \
--header 'accept: application/json' \
--header 'Content-Type: application/json' \
--header 'Authorization: Bearer $AUTH_TOKEN' \
--data '{
  "model": "$MODEL_SLUG",
  "messages": [
    {
      "role": "user",
      "content": "Explain the concept of recursion in programming."
    }
  ],
  "max_tokens": 150
}
'
View or Update Dedicated Inference Settings
To view the inference settings, click the … menu to the right of your deployment and select View settings. On the Settings page, you can view deployment information such as the GPU plan, and node count.
You can also update the dedicated inference resource settings in the Settings tab.
Viewing or updating a dedicated inference deployment using the DigitalOcean API requires the unique identifier of the deployment. You can get a list of agents with their unique identifiers using the /v2/dedicated-inference endpoint.
Destroy Dedicated Inference Deployment
To destroy a dedicated inference deployment, click the … menu for the deployment that you want to destroy and select Destroy. In the Delete Dedicated Inference window, type the name of the deployment, and then click Delete.
Destroying a dedicated inference deployment using the DigitalOcean API requires the unique identifier of the deployment you want to destroy. You can get a list of deployments with their unique identifiers with the /v2/dedicated-inference endpoint.