How to Configure Single Sign-On for Teams
Validated on 21 Nov 2025 • Last edited on 5 Feb 2026
Enabling single sign-on (SSO) on your DigitalOcean team lets team members sign in to DigitalOcean with a single set of credentials from an OIDC-compatible identity provider (IdP), like Okta. You can also enforce SSO login and automatically apply roles from your IdP to enable role-based access control (RBAC).
IdPs must expose their OIDC endpoints over HTTPS using a valid, publicly trusted TLS certificate. This ensures the authentication traffic is encrypted and that the certificate can be verified by the service consuming the IdP (DigitalOcean). For example, if your IdP URL starts with https://www.example…, you’ll be able to configure SSO. If your IdP is at a URL that starts with http://123.45.02.16…, you won’t be able to configure SSO.
DigitalOcean supports silent re-authentication for SSO. When you sign in with SSO, you receive an access token from your IdP that allows you to remain signed in to the DigitalOcean Control Panel for a period of time. When the access token expires, DigitalOcean automatically refreshes it, so you are no longer unexpectedly logged out. Additionally, when a user is deactivated in your IdP, their access to DigitalOcean is revoked according to the token expiration settings in your IdP. You can control access token lifetimes through your IdP configuration. For more information, see the corresponding provider documentation: Auth0, authentik, JumpCloud, Keycloak, and Okta.
Enable SSO on a DigitalOcean Team
To enable SSO for a team, you need to configure your OIDC-compatible IdP, then provide the OpenID provider URL, client ID, and client secret to DigitalOcean.
Configuration depends on your IdP. We have instructions for the following IdPs:
To configure Auth0 as your IdP, you need to set up an application and Action in Auth0, configure SSO on your DigitalOcean team, and then finalize the configuration in Auth0.
Set Up Application and Action in Auth0
In the Auth0 dashboard, complete the following steps:
-
Create roles that match the name of the custom or predefined roles that you want to assign to your users in DigitalOcean. For example, Owner, Developer, Viewer, or Billing. Then, create users and assign each user the role(s) you created.
-
Create an application. Select the Regular Web Application option and name your application as
DigitalOcean SSO. -
Copy the following application settings about the Auth0 application: Domain (for example,
<use-your-tenant>.auth0.com/), Client ID, and Client Secret. You use these values later when configuring SSO on your DigitalOcean team. -
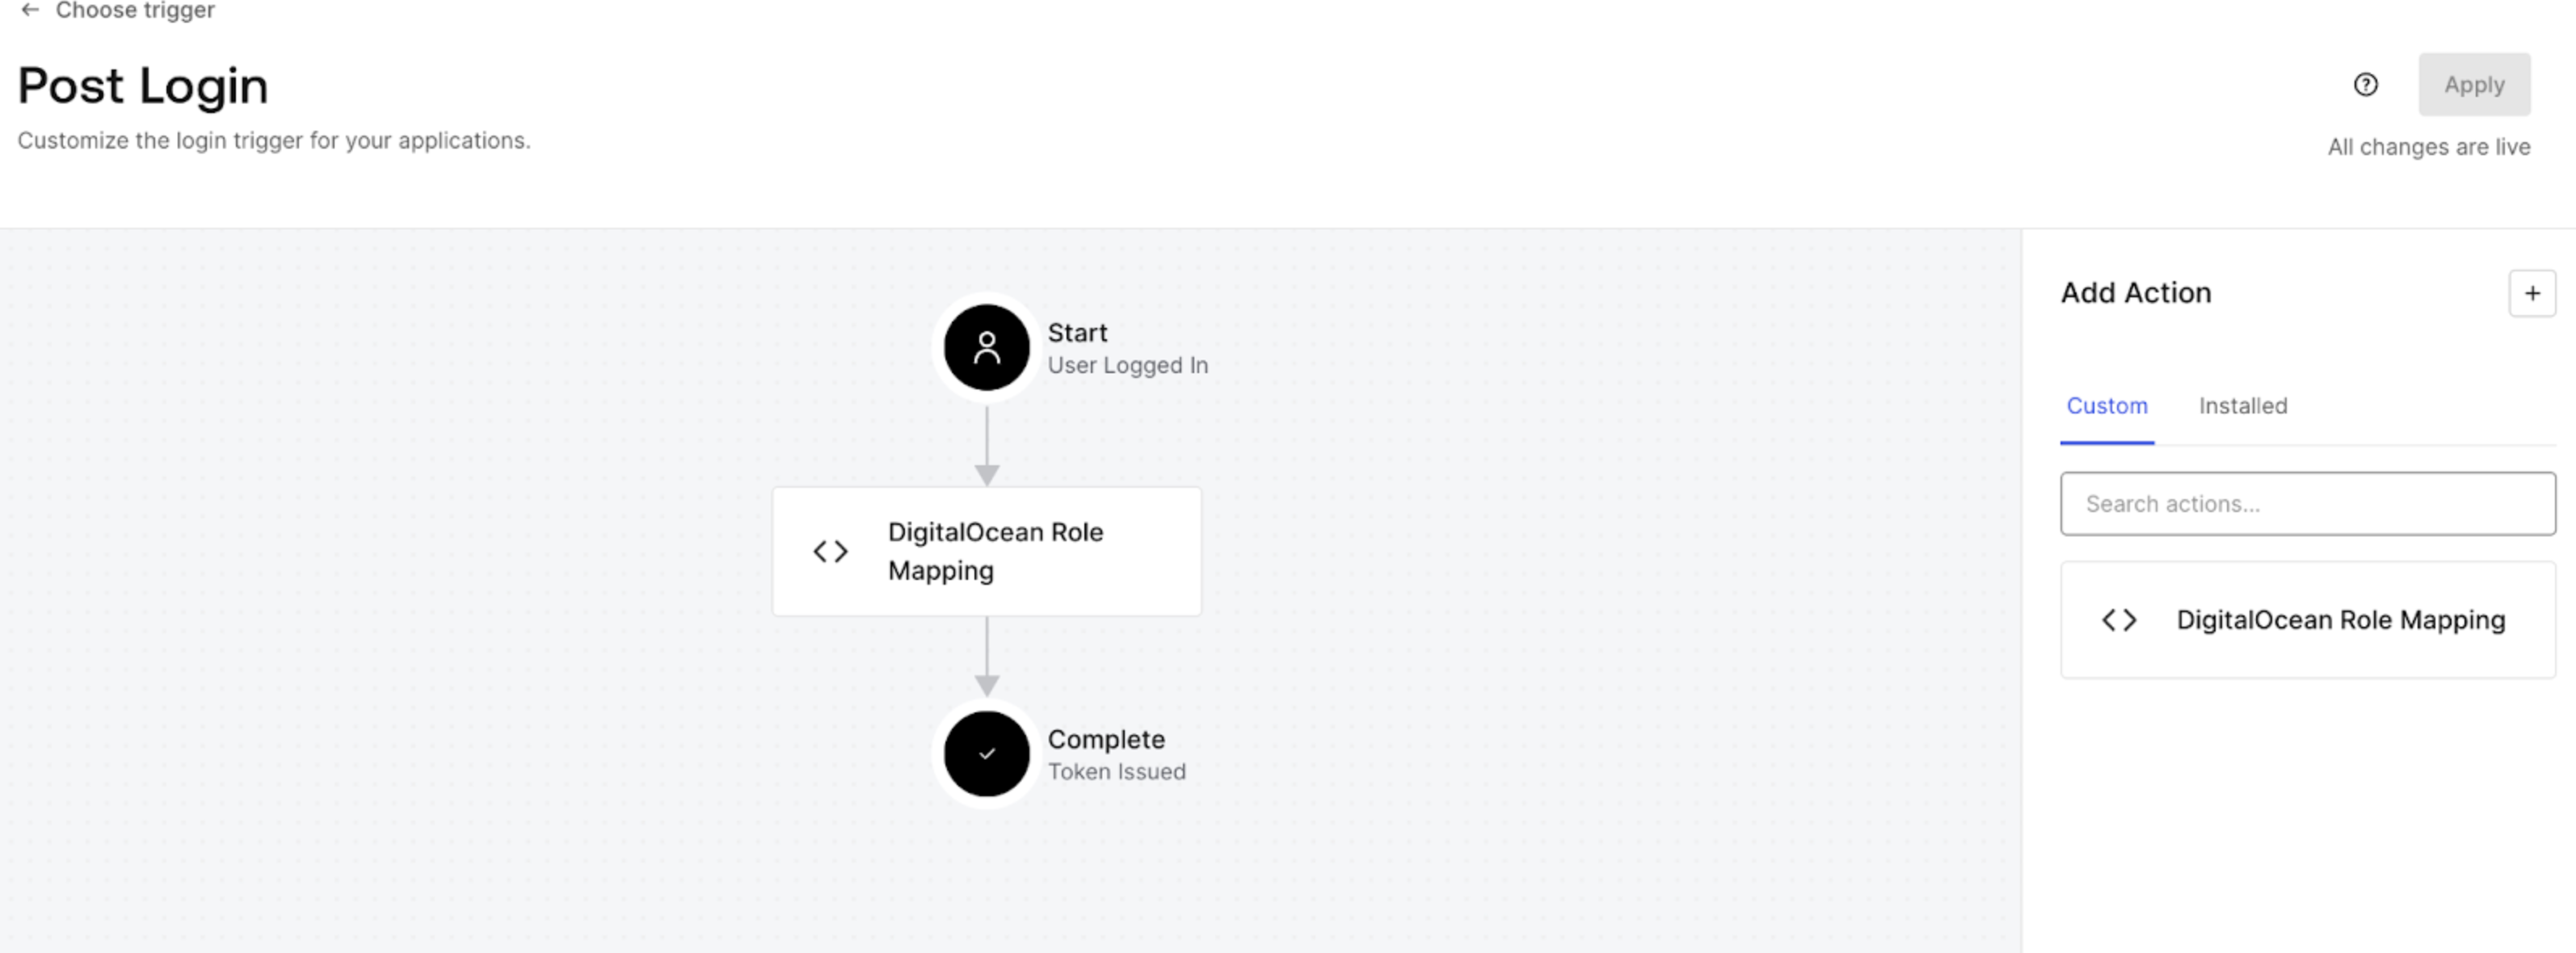
Write and deploy a custom Auth0 post-login action named
DigitalOcean Role Mapping. When creating the Action, selectLogin/Post Loginas the trigger and use the following code to map the Auth0 roles to theteam_rolecustom claim to include in the ID token response for SSO:exports.onExecutePostLogin = async (event, api) => { api.idToken.setCustomClaim(`team_role`, event.authorization?.roles || []); };Click Deploy to save the action.
-
Attach the Action to login flow. Drag and drop your Action between Start and Complete and save the flow. It shows that the Action is now running for real user traffic within your tenant.
Configure SSO on Your DigitalOcean Team
Next, use the credentials from Auth0 to set up the connection in DigitalOcean. For your provider domain, use <use-your-tenant>.eu.auth0.com/.
-
Switch to your team in the control panel.
Click the profile icon in the top right to open the drop-down menu, click Switch Teams, then click the name of team you want to update.
-
In the the Single sign-on (OIDC) section of the team settings page, click Enable to go to the Enable single sign-on page.
-
Provide the values you saved from your IdP:
-
OpenID provider URL: Your provider domain.
-
OpenID client ID: Client ID from your IdP.
-
OpenID client secret: Client secret from your IdP.
-
-
Click Test SSO config to continue.
This tests that your provider URL is a valid OIDC provider before the next configuration page.
-
On the Secure Settings page, leave the Require sign-in via SSO only setting unchecked for now. This is critical for testing. Then, click Continue.
-
On the Summary page, copy the SSO sign-in URL, which looks similar to
https://cloud.digitalocean.com/sessions/sso/<id>. You use this URL to initiate an SSO login from your IdP later. -
Click Enable SSO to complete the SSO configuration.
Finalize Auth0 Configuration
Go back to Auth0 to add the SSO sign-in URL. This enables the SSO connection to be started from Auth0.
-
In the Auth0 dashboard, navigate to the
DigitalOcean SSOapplication. -
Specify the following application settings:
-
Application Login URLs: Enter the DigitalOcean SSO sign-in URL you obtained previously.
-
Allowed Callback URLs: Enter
https://cloud.digitalocean.com/sessions/sso/callback.
-
Click Save to save the settings. This enables the SSO connection to be started from the provider.
Test the SSO Connection
-
In the browser, enter the DigitalOcean SSO sign-in URL you obtained previously.
-
Enter the username and password of the user.
You are redirected to a Welcome page from DigitalOcean, which indicates that you have successfully integrated DigitalOcean SSO with Auth0.

Once you’ve successfully tested the SSO connection with one user, you can return to your DigitalOcean Control Panel to enable SSO. In the Single sign-on (OIDC) section of the team settings page, click the … menu and select Edit SSO. Click Test SSO config to continue to go to the Secure Settings page. Select the Require sign-in via SSO only setting to limit logins to SSO only.
To configure authentik as your IdP, you need to create a scope mapping, application, and provider in authentik, connect the application to the provider, configure the connection to DigitalOcean, and then finalize the application settings in authentik.
Create a Scope Mapping In authentik
-
Log in to authentik as an administrator and open the Admin interface.
-
In Property Mappings on the Customization page, click Create.
-
In Scope Mapping, enter the following required information:
-
Name: Provide an appropriate name.
-
Scope name: Enter
profile. -
Expression: Provide the following expression to map DigitalOcean roles to authentik groups:
# Extract the names of all groups the user belongs to group_names = user.ak_groups.values_list("name", flat=True)
# From the group names, filter out those that start with "do:"
# Strip off the "do:" prefix so we’re left with just the role name
do_roles = [n[3:] for n in group_names if n and n[:3].casefold() == "do:"]

# You can find all predefined roles at: https://docs.digitalocean.com/platform/teams/roles/predefined/
# You can find documentation for custom roles at: https://docs.digitalocean.com/platform/teams/roles/custom/
priority = ["Owner", "Admin", "Member"]

# Pick the first matching role based on priority order
# (e.g. if user has both "do:Admin" and "do:Member", they'll get "Admin")
chosen = next((r for p in priority for r in do_roles if r == p), None)

# Return a dict with the team role if one was chosen, otherwise return an empty dict
return {"team_role": [chosen]} if chosen else {}
Then, click Finish.
-
Create an Application and Provider and Connect Them in authentik
-
In the authentik Admin interface, create an application and provider pair. Provide the following information:
-
Application: Provide a descriptive name, an optional group for the type of application, the policy engine mode, and optional user interface settings.
-
Choose a Provider type: Select OAuth2/OpenID Connect as the provider type.
-
Configure the Provider: Provide a name (or use the default name), the authorization flow to use for this provider, and the following required configurations:
-
Set a
Strictredirect URI tohttps://cloud.digitalocean.com/sessions/sso/callback. -
Select any available signing key.
-
Under Advanced protocol settings, add the profile scope created in the previous section. Do not remove authentik’s
authentik default OAuth Mapping: OpenID 'profile', as claims such as name are required by DigitalOcean.
Note the Client ID, Client Secret, and slug values as you will use these values later when configuring SSO on your DigitalOcean team.
-
-
Configure Bindings: Optionally, you can create a binding such as policy, group, or user, to manage which applications are listed on a user’s My applications page.
-
-
Click Submit to save the new application and provider.
Alternatively, you can first create a provider separately, then create the application and connect it with the provider.
Configure SSO on Your DigitalOcean Team
Next, use the credentials from authentik to set up the connection in DigitalOcean. For your provider domain, use https://authentik.company/application/o/<application_slug>/.
-
Switch to your team in the control panel.
Click the profile icon in the top right to open the drop-down menu, click Switch Teams, then click the name of team you want to update.
-
In the the Single sign-on (OIDC) section of the team settings page, click Enable to go to the Enable single sign-on page.
-
Provide the values you saved from your IdP:
-
OpenID provider URL: Your provider domain.
-
OpenID client ID: Client ID from your IdP.
-
OpenID client secret: Client secret from your IdP.
-
-
Click Test SSO config to continue.
This tests that your provider URL is a valid OIDC provider before the next configuration page.
-
On the Secure Settings page, leave the Require sign-in via SSO only setting unchecked for now. This is critical for testing. Then, click Continue.
-
On the Summary page, copy the SSO sign-in URL, which looks similar to
https://cloud.digitalocean.com/sessions/sso/<id>. You use this URL to initiate an SSO login from your IdP later. -
Click Enable SSO to complete the SSO configuration.
Set the Start URL in authentik
-
In the authentik Admin interface, select your DigitalOcean application.
-
Click Edit and expand UI Settings. Specify the Launch URL to the SSO sign-in URL value you copied from the DigitalOcean Control Panel.
-
Click Update.
To configure JumpCloud as your IdP, you need to set up a user group and application in JumpCloud, configure SSO on your DigitalOcean team, and then finalize the configuration in JumpCloud.
Set Up User Group and Application in JumpCloud
In the JumpCloud Admin Portal, complete the following steps:
-
Create user groups that match the group names with the DigitalOcean permissions you want, such as
Owner,Developer, orBilling. Before you start setting up a user group, make sure that you have a test user in the users list. -
Create an application. When configuring the application, make sure to do the following:
-
Select the Configure SSO for OIDC option for the Manage Single Sign-On SSO setting.
-
On the SSO tab:
-
Select the Refresh Token check-box and add the DigitalOcean callback URI,
https://cloud.digitalocean.com/sessions/sso/callback, in the Redirect URI field. -
In the Login URL field, enter a temporary URL,
https://temporary.com. You replace this URL once the DigitalOcean SSO setup is complete. -
In the Attribute Mapping section, select the Email and Profile check boxes. Verify that the attribute list contains the required name and email fields and only appears once in the list.
-
In the Constant Attributes section, click Add Attribute. Specify
offline_accessandopenidattributes and set their value totrue. -
Select the
include group attributecheckbox and specifyteam_rolein the text box to automatically include whatever groups are assigned to the application.
-
Click Activate to save the application. Copy your client ID and secret to use when configuring SSO on your DigitalOcean team.
-
Configure SSO on Your DigitalOcean Team
Next, use the credentials from JumpCloud to set up the connection in DigitalOcean. For your provider domain, use https://oauth.id.jumpcloud.com/.
-
Switch to your team in the control panel.
Click the profile icon in the top right to open the drop-down menu, click Switch Teams, then click the name of team you want to update.
-
In the the Single sign-on (OIDC) section of the team settings page, click Enable to go to the Enable single sign-on page.
-
Provide the values you saved from your IdP:
-
OpenID provider URL: Your provider domain.
-
OpenID client ID: Client ID from your IdP.
-
OpenID client secret: Client secret from your IdP.
-
-
Click Test SSO config to continue.
This tests that your provider URL is a valid OIDC provider before the next configuration page.
-
On the Secure Settings page, leave the Require sign-in via SSO only setting unchecked for now. This is critical for testing. Then, click Continue.
-
On the Summary page, copy the SSO sign-in URL, which looks similar to
https://cloud.digitalocean.com/sessions/sso/<id>. You use this URL to initiate an SSO login from your IdP later. -
Click Enable SSO to complete the SSO configuration.
Finalize JumpCloud Configuration
Go back to JumpCloud to add the SSO sign-in URL. This enables the SSO connection to be started from JumpCloud.
-
In the JumpCloud Admin Panel, select your DigitalOcean application.
-
On the application settings page, navigate to the SSO tab and scroll down to the Login URL field. Paste the login URL you copied from the DigitalOcean Control Panel into the text box and select Save.
-
In the User Groups tab, select two User Groups that you want to grant access to the application (for example,
All UsersandOwner) and click Save.
Each user must belong to two User Groups in order for the team_role attribute to be sent to DigitalOcean as an array in the user’s ID Token.
Test the SSO Connection
From the Single sign-on (OIDC) section of the team settings page, copy the SSO Sign-In URL and paste it in a browser. Test that the SSO login for a user in the user group associated with the SSO application in JumpCloud works correctly.
Once you’ve successfully tested the SSO connection with one user, you can return to your DigitalOcean Control Panel to enable SSO. In the Single sign-on (OIDC) section of the team settings page, click the … menu and select Edit SSO. Click Test SSO config to continue to go to the Secure Settings page. Select the Require sign-in via SSO only setting to limit logins to SSO only.
To configure Keycloak as your IdP, you must create a client application in Keycloak and configure connection settings in DigitalOcean.
Create Client Application in Keycloak
In the Keycloak Admin Console, complete the following steps:
-
Create a new realm or select your realm for your organization. Do not make any changes to the root realm.
-
Create a new client. Provide the following information:
-
For General settings:
-
Client type:
OpenID Connect. -
Client ID:
DigitalOceanSSO(or any other descriptive name) -
Name:
DigitalOcean SSO -
Description:
SSO connection for DigitalOcean
-
-
For Capability config, enable the following options:
-
Client authentication
-
Authorization: Enables users to be logged into DigitalOcean using roles mapped in this provider.
-
Standard flow: Enables DigitalOcean to use an authorization code flow for OIDC.
-
Direct access grants: Enables usernames and passwords to be exchanged for access tokens.
-
-
For Login settings, enter
https://cloud.digitalocean.com/sessions/sso/callbackin the Valid redirect URIs text box.
The complete Root URL is generated after you enter your client credentials in the DigitalOcean Control Panel.
Click Save to create the client application. Once the application creation completes, the Settings tab of the DigitalOcean application opens. Click Save to confirm the settings.
-
-
Add users, as described in the Keycloak documentation.
-
Navigate to the Realm Settings page and do the following in the General tab:
-
Note the URL in the Frontend URL field. This is the domain of your login screen (for example,
keycloak.mycompany.me), where users are directed when they are logging into DigitalOcean from the sign-in URL. -
Access the IdP issuer URL. Scroll to the bottom of the page. In the Endpoints section, click OpenID Endpoint Configuration and copy the Issuer URL. For example,
https://<frontendURL>/realms/<realm name>orhttps://sso.abc.com/realms/ExampleIdP.
-
-
Select your DigitalOcean client application from the Clients page and copy the Client ID value from the Settings tab. Copy the Client Secret value from the Credentials tab.
You need these values and the issuer URL later when configuring SSO on your DigitalOcean team.
Configure SSO on Your DigitalOcean Team
Next, use the credentials from Keycloak to set up the connection in DigitalOcean. For your provider domain, use https://<frontendURL>/realms/<realm name>.
-
Switch to your team in the control panel.
Click the profile icon in the top right to open the drop-down menu, click Switch Teams, then click the name of team you want to update.
-
In the the Single sign-on (OIDC) section of the team settings page, click Enable to go to the Enable single sign-on page.
-
Provide the values you saved from your IdP:
-
OpenID provider URL: Your provider domain.
-
OpenID client ID: Client ID from your IdP.
-
OpenID client secret: Client secret from your IdP.
-
-
Click Test SSO config to continue.
This tests that your provider URL is a valid OIDC provider before the next configuration page.
-
On the Secure Settings page, leave the Require sign-in via SSO only setting unchecked for now. This is critical for testing. Then, click Continue.
-
On the Summary page, copy the SSO sign-in URL, which looks similar to
https://cloud.digitalocean.com/sessions/sso/<id>. You use this URL to initiate an SSO login from your IdP later. -
Click Enable SSO to complete the SSO configuration.
Finalize Keycloak Configuration
In the Keycloak Admin Console, complete the following steps:
-
Add the SSO login URL. Navigate to your DigitalOcean app. In the Settings tab, set the Root URL to the the DigitalOcean SSO sign-in URL you obtained previously. Click Save to save the settings.
-
You can specify any predefined role (Owner, Member, Biller, Billing Viewer, Resource Viewer, etc.) or a custom role. The role is mapped to DigitalOcean based on the name of the role. In the Role name field, add a
Ownerrole and provide a description. Click Save to create the role.Next, select the role from the list and go to it’s Attribute tab. Add an attribute called
team_rolewith the value set toOwner, and click Save.
-
Add the
team_rolescope. Click Client Scopes in the left-hand menu and click Create client scope. On the Create Client Scope page, provide the following information:-
Name:
team_role -
Description:
team_role -
Type:
Default -
Protocol:
OpenID Connect -
Toggle the Include in token scope setting to On.
Click Save to add the scope.
In the Mappers tab of the new scope, click Configure a new mapper and select By configuration from the Add mapper downdown list. On the Configure a new mapper page, select User Attribute. Then, specify the following information:
-
Name:
team_role -
User Attribute:
team_role -
Token Claim Name:
team_role
Also, toggle Multivalued to On as DigitalOcean requires this scope to be sent as an array format to be included in the ID token and access token.
Click Save to create the mapper.
-
-
Add
team roleto the client scope. Navigate to your DigitalOcean application and select the Client Scopes tab. Then, add a client scope calledteam_roleand click Add.team_roleis now added to the OpenID.well-knownconfiguration for your realm (for example,https://<yourcompanyURL>.com/realms/<ExampleIdP>/.well-known/openid-configuration) as shown:... "scopes_supported": [ "openid", "email", "profile", "team_role" ], ... -
Create a group that matches the value you want to pass to DigitalOcean as the user’s role. Then, add members that you want to access the DigitalOcean Control Panel with the group privileges.
In the Attributes tab of the group, add a
team_rolewith a value ofOwnerand click Save. Next, assign role mappings such asOwner, and click Assign.Once assigned, you see Owner in the Role mapping tab.
-
Add
team_roleto the client scopes list. Navigate to the Client Scopes tab of the DigitalOcean application. In the Evaluate tab, enter the user name and select ID token from the list to view the ID token. -
Add a
groupsscope. First, add a new scope namedgroups. In Client Scopes tab, select the Mappers tab and click Add Mapper to create a new mapper. Select From configuration in the dropdown list and select Group Membership. Also, select Add to access token, Add to ID token, and Add to User Info. Click Save to save the new mapper.Next, in the Client Scopes tab, click Add Client Scope. Select the
groupsscope to add to the list as a default scope and click Add. The new client scope appears in the Client scopes list. Also,groupsgets added to the OpenID.well-knownconfiguration for your realm (for example,https://<yourcompanyURL>.com/realms/<ExampleIdP>/.well-known/openid-configuration):... "scopes_supported": [ "openid", "email", "profile", "team_role" "groups" ], ...
Confirm your ID Token Response Attributes
Select your DigitalOcean application from the Clients list. In the Client scopes tab, select your test SSO login user from the drop-down list. Then, select Generated ID token from the right-hand menu to view your ID token response attributes for a user.
To configure Okta as your IdP, you need to create and configure an OIDC application in Okta, set up role mapping to translate Okta group membership into DigitalOcean roles, configure connection to DigitalOcean, and then finalize the application settings in Okta. You can find more information on Okta as an IdP for OIDC apps.
Create Okta Groups for DigitalOcean Roles
First, create Okta groups that map to your DigitalOcean team roles. To do this, create a group in Okta for each role (predefined or custom) that you use on your DigitalOcean team, then assign the application to each group.
Follow these steps for each role on your DigitalOcean team:
-
In the Okta Admin Console, create a group. Provide the following information:
-
For Name, enter a name for the group. For compatibility with the input expression in the next step, begin the group names with
DO:followed by the DigitalOcean role name. For example,DO:Owner,DO: My Custom Role, orDO: Billing. -
Optionally, enter a description for the group.
-
-
Click Save to create the group.
Optionally, you can add test users to these groups.
Create an Okta App Integration
-
From the Okta admin console, create an app integration with the following settings:
-
For the Sign-In method, choose OIDC - OpenID Connect.
-
For the Application type, choose Web Application.
-
-
Click Next to go to the New Web App Integration page:
-
Set App integration name to a descriptive name. For example,
DigitalOcean SSO. -
Set Sign-in redirect URIs to the DigitalOcean callback URL
https://cloud.digitalocean.com/sessions/sso/callback. -
Optionally, delete the default
localhostURI in Sign-out redirect URIs. -
Under Assignments, set Controlled access to Skip group assignment for now.
-
-
Click Save to create the app integration, which takes you to the app’s General tab.
Configure the team_role Claim
Configuring the claim tells Okta to send your DO: group names to DigitalOcean as a team_role.
-
In the app you created in the previous step, click the Sign On tab. In the OpenID Connect ID Token section, click Edit, and change the following settings:
-
For Groups claim type, choose Expression
-
For Groups claim expression’s Claim name, enter
team_role. -
For Groups claim expression’s Input expression, enter the following expression:
Arrays.flatten(String.replace(Arrays.toCsvString(Groups.startsWith("OKTA","DO:",100)),"DO:", ""))This expression removes the
DO:substring from matching group names and passes what remains as theteam_role. For more information, see How to Remove Substring from Group Names in OpenID Connect Claims.
-
-
Click Save.
Assign Groups and Get Credentials
-
Navigate to the Assignments tab for your
DigitalOcean SSOapp. -
Click Assign and then Assign to Groups.
-
Assign the
DO:Owner,DO:My Custom Role, etc., groups you created previously. -
Navigate to the General tab and copy the following three values to use next to finish configuration on DigitalOcean in the next step:
-
Client ID of your Okta app.
-
Client Secret of your Okta app.
-
Okta domain. This is your Issuer URL, such as
https://example-application.okta.com.
-
Configure SSO on Your DigitalOcean Team
Next, use the credentials from OKta to set up the connection in DigitalOcean. For your provider domain, use https://<use-your-tenant>.okta.com.
-
Switch to your team in the control panel.
Click the profile icon in the top right to open the drop-down menu, click Switch Teams, then click the name of team you want to update.
-
In the the Single sign-on (OIDC) section of the team settings page, click Enable to go to the Enable single sign-on page.
-
Provide the values you saved from your IdP:
-
OpenID provider URL: Your provider domain.
-
OpenID client ID: Client ID from your IdP.
-
OpenID client secret: Client secret from your IdP.
-
-
Click Test SSO config to continue.
This tests that your provider URL is a valid OIDC provider before the next configuration page.
-
On the Secure Settings page, leave the Require sign-in via SSO only setting unchecked for now. This is critical for testing. Then, click Continue.
-
On the Summary page, copy the SSO sign-in URL, which looks similar to
https://cloud.digitalocean.com/sessions/sso/<id>. You use this URL to initiate an SSO login from your IdP later. -
Click Enable SSO to complete the SSO configuration.
Finalize Okta Configuration
Go back to Okta to add the SSO sign-in URL. This enables the SSO connection to be started from the Okta dashboard.
-
In Okta, navigate to the application settings for your
DigitalOcean SSOapp. -
From the General tab of your application settings, in the General Settings section, click Edit.
-
In the Login subsection, set Login initiated by to Either Okta or App.
-
Check the Display application icon to users checkbox.
-
Set Initiate login URI to your SSO sign-in URL.
-
-
Click Save to finish.
Test the SSO Connection
-
Log in to Okta as a user who is a member of one of your
DO:groups such asDO:Owner. -
From the Okta dashboard, click the DigitalOcean SSO application icon.
You should be redirected and logged into your DigitalOcean team successfully.
Once you’ve successfully tested the SSO connection, you can return to your DigitalOcean Control Panel to enable SSO. In the Single sign-on (OIDC) section of the team settings page, click the … menu and select Edit SSO. Click Test SSO config to continue to go to the Secure Settings page. Select the Require sign-in via SSO only setting to limit logins to SSO only. Once SSO is enabled, this prevents team members from signing in to DigitalOcean with other login methods, like an email and password.
Disable SSO on a DigitalOcean Team
To disable SSO on a team, switch to the team in the control panel. Click the profile icon in the top right to open the drop-down menu, click Switch Teams, then click the name of team you want to update.
Next, in the left menu of the control panel, click Settings to go to the team settings page. In the Single sign-on (OIDC) section, click the … menu, then click Disable. In the Disable single sign-on confirmation window click Disable SSO to disable SSO on your team.
Your SSO configuration is saved even when disabled, so you may re-enable it at any time.
View SSO Activity
To view a log of single sign-on activity, switch to your team in the control panel. Click the profile icon in the top right to open the drop-down menu, click Switch Teams, then click the name of team you want to view.
Next, in the left menu of the control panel, click Settings to go to the team settings page. In the Single sign-on (OIDC) section, click Show more, then click View SSO Activity to go to the SSO activity page, which has a table with timestamped sign-on history events.