For DOKS version 1.36.0 and later, the API enables high availability (HA) by default when the ha field is not set in the create request. Starting with Godo v1.190.0, doctl v1.159.0, and DigitalOcean Terraform provider v2.87.0, those clients omit ha in the API request unless you set it, so the API applies that default. To create a cluster without HA, set ha to false.
How to Create Kubernetes Clusters
Last verified 9 Oct 2026
DigitalOcean Kubernetes (DOKS) is a Kubernetes service with a fully managed control plane, high availability, and autoscaling. DOKS integrates with standard Kubernetes toolchains and DigitalOcean’s load balancers, volumes, CPU and GPU Droplets, API, and CLI.
Create a Cluster Using Automation
The API and CLI often require region, node size, and version values. You can retrieve the values available for DOKS using the /v2/kubernetes/options endpoint or the doctl kubernetes options command. Configure the machine size using a slug returned by the doctl kubernetes options sizes command. DOKS does not support every size available for standalone Droplets.
In regions that support v5 worker nodes, the Kubernetes options include supported v5 configurations with a 50 GiB or 80 GiB boot disk.
See the region availability table for a list of region slugs.
You can add additional node pools after cluster creation.
Create a Cluster with GPU Node Pools
You can also create a new cluster with GPU node pools, including Spot GPU node pools on interruptible capacity.
A cluster must have at least one CPU node pool to be fully operational. This pool is needed to host essential DOKS managed workloads such as CoreDNS, preventing them from running on more expensive GPU nodes. For high availability of these workloads, we recommend a minimum of two CPU nodes.
On DOKS 1.37 and later, GPU device plugins are not enabled by default. Before you run GPU workloads, enable either the GPU device plugin or a Dynamic Resource Allocation (DRA) driver for each GPU brand in the cluster. For the available options, see Runtime, Drivers, and Plugins.
To run GPU workloads after you create a cluster, use the GPU nodes-specific labels and taint in your workload specifications to schedule pods that match. You can use a configuration spec, similar to the pod spec shown below, for your actual workloads:
cuda-pod.yamlapiVersion: v1
kind: Pod
metadata:
name: gpu-workload
spec:
restartPolicy: Never
nodeSelector:
doks.digitalocean.com/gpu-brand: nvidia
containers:
- name: cuda-container
image: nvcr.io/nvidia/k8s/cuda-sample:vectoradd-cuda10.2
resources:
limits:
nvidia.com/gpu: 1
tolerations:
- key: nvidia.com/gpu
operator: Exists
effect: NoScheduleThe above spec shows how to create a pod that runs NVIDIA’s CUDA image, requests one GPU, and uses the labels and taint for GPU worker nodes. The nvidia.com/gpu resource request works with both the GPU device plugin and the DRA driver. For AMD GPUs, request amd.com/gpu instead.
You can use the cluster autoscaler to automatically scale the GPU node pool down to zero, or use the DigitalOcean CLI or API to manually scale the node pool down to zero. For example:
doctl kubernetes cluster node-pool update <your-cluster-id> <your-nodepool-id> --count 0 Create a Cluster with VPC-native Networking
You can also create a new cluster with VPC-native networking. This feature is only available when you create new clusters using Kubernetes 1.31.x and later.
To create a cluster whose worker nodes have no public IPv4 address, see How to Create Clusters with Isolated Worker Nodes.
Creating a cluster with VPC-native networking requires two network subnets in CIDR notation (for example, 192.168.0.0/16), one for the cluster and another for services running on the cluster. The subnets must follow RFC 1918 guidelines and must not overlap with each other or with any VPCs or VPC-native clusters within the same team. With these subnets, VPC-native clusters enable transparent communication between the pod network and other peered VPC networks, including the node VPC, without requiring network translation.
When creating clusters in the Control Panel, suitable non-overlapping subnet ranges are suggested automatically.
Create a Cluster Using the Control Panel
You can create a DigitalOcean Kubernetes Cluster at any time from the DigitalOcean Control Panel by opening the Create menu at the top.
In the Create menu, click Kubernetes to go to the Create a cluster page. On this page, you choose a Kubernetes version, datacenter region, and cluster capacity for your cluster and then create it.
Select a Kubernetes version
The latest patch version of each currently supported minor version of Kubernetes is available for new cluster creation. The latest stable release is selected by default.
Choose a datacenter region
Choose the region for your cluster. Your cluster’s control plane and worker nodes are located in the same region.
If you plan to use v5 worker nodes, GPU worker nodes, or volumes for persistent data storage, choose a region that supports the resources you need. See Kubernetes availability and volumes availability. If you add a DigitalOcean Load Balancer to your deployment, it is automatically placed in the same region as the cluster.
VPC Network
In the VPC Network section, choose a VPC network for the cluster. You can choose one you’ve created or use your default network for the datacenter region. VPC enables an additional networking interface that can only be accessed by other resources within the same VPC network. This keeps traffic between Droplets and other applicable resource from being routed outside the datacenter over the public internet.
Size pod and service networks
As of 12 December 2024, new clusters created in the Control Panel using Kubernetes version 1.31 or higher use VPC-native cluster networking. VPC-native networking enables routing traffic directly between pods and services and other resources on VPC networks.
Creating a cluster with VPC-native networking requires two network subnets in CIDR notation (for example, 192.168.0.0/16), one for the cluster and another for services running on the cluster. The subnets must follow RFC 1918 guidelines and must not overlap with each other or with any VPCs or VPC-native clusters within the same team. With these subnets, VPC-native clusters enable transparent communication between the pod network and other peered VPC networks, including the node VPC, without requiring network translation. Non-overlapping network ranges are suggested automatically when using the Control Panel. Choose Size network subnets for me to use the default /16 (512 nodes) pod network and /19 (8192 services) service network.
To customize the pod and service network sizes, choose Configure my own network subnet sizes. The network prefixes are automatically populated from available network ranges in your team account.
Choose cluster capacity
A DOKS cluster has one or more node pools. Each node pool consists of a group of identical worker nodes. Worker nodes are built on Droplets.
To create a cluster, specify the following for the node pool:
-
Node pool name: Choose a name for the node pool when it’s created. Nodes inside this pool inherit this naming scheme when they are created. If you rename the node pool later, the nodes only inherit the new naming scheme when they are recreated (when you recycle the nodes or resize the node pool).
-
Choose the configuration type:
-
v5 configurations let you choose Shared for shared vCPUs or General Purpose for dedicated vCPUs, then size the worker’s resources independently. DOKS supports only the v5 options displayed in the Control Panel. v5 worker nodes have a 50 GiB or 80 GiB boot disk.
-
Bundled configurations use fixed resource ratios. Choose Shared CPUs for Basic Droplet plans or Dedicated CPUs for General Purpose, CPU-Optimized (Regular Intel CPU or Premium Intel CPU), and Memory-Optimized Droplet plans.
-
GPUs are built on GPU Droplets powered by AMD and NVIDIA GPUs. They are available in single-GPU and 8-GPU configurations.
Note A cluster must have at least one CPU node pool to be fully operational. This pool is needed to host essential DOKS managed workloads such as CoreDNS, preventing them from running on more expensive GPU nodes. For high availability of these workloads, we recommend a minimum of two CPU nodes.
For more information about shared and dedicated CPUs, see Shared CPU vs. Dedicated CPU.
Choosing the right Kubernetes configuration depends on your workload. See Choosing the Right Kubernetes Plan for plan selection guidance.
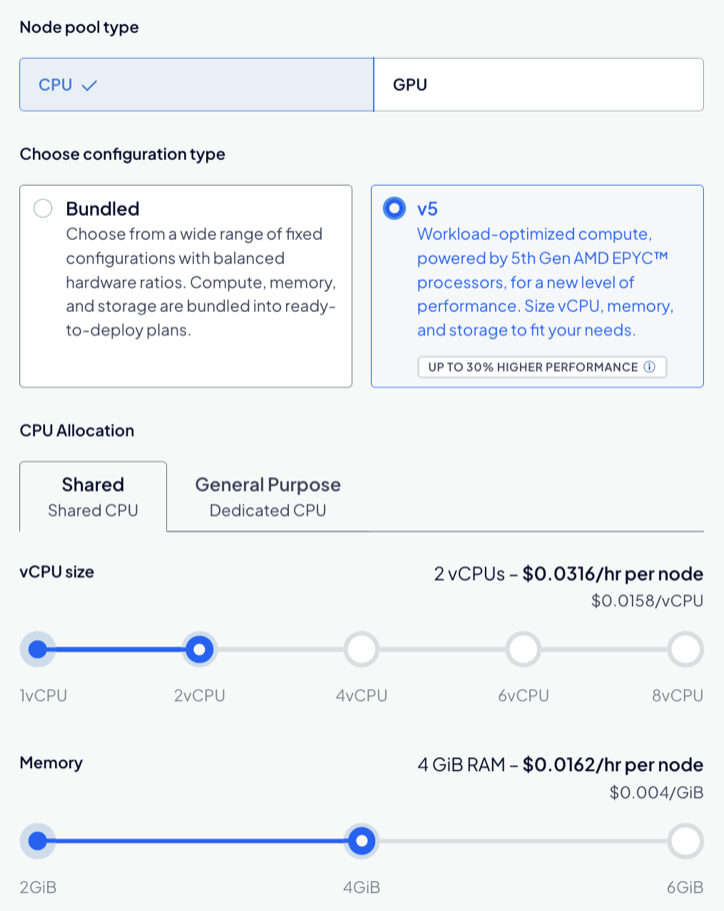
For a v5 node pool, you also select a Boot Disk size of 50 or 80 GiB. The boot disk is persistent NVMe storage that holds the operating system, container images, and
emptyDirvolumes for each node.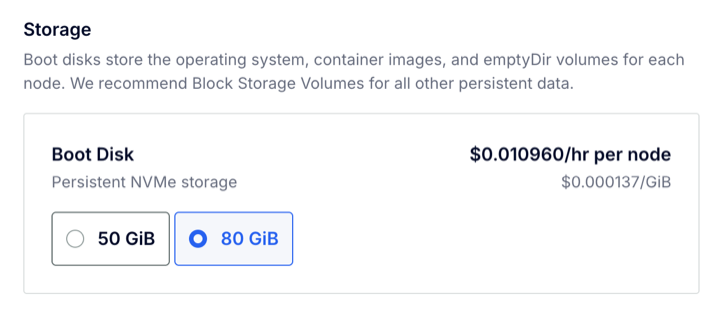
-
-
Node configuration: Choose the specific bundled plan or v5 configuration you want for your worker nodes. Each worker in a node pool has identical resources.
Some high-tier node plans are locked. To request access to those plans, click Submit a request. In the Request access to more nodes or higher-tier plans, specify the reason for the request and number of nodes you are requesting and click Submit.
-
Select the Set node pool to autoscale option to enable autoscaling.
-
Nodes: For a fixed-size cluster, choose how many nodes to include in the node pool. By default, three worker nodes are selected.
-
Minimum nodes and Maximum nodes: For an autoscaling-enabled cluster, choose the minimum and maximum number of nodes for when the load decreases or increases.
Note One-node clusters are an inexpensive option to start learning Kubernetes or set up a development environment where resiliency isn’t important. However, a stand-alone Droplet with a container runtime or
minikubeusually performs better for the same cost.
To take advantage of different resource capacities, you can add additional node pools with the Add Additional Node Pool button and assign pods to the node pools with the appropriate scheduling constraints.
High Availability Control Plane
DigitalOcean Kubernetes provides a high availability (HA) option that increases the reliability of the control plane by creating multiple replicas of each control plane component.
The Add high availability checkbox is selected by default. We recommend keeping HA enabled for production workloads. To opt out, deselect the checkbox before creating the cluster.
Once enabled, you cannot disable high availability.
Finalize
Finalize the cluster settings. You can specify a name, assign a project, and optionally add tags to the cluster.
Name
By default, cluster names begin with k8s, followed by the version of Kubernetes, the datacenter region, and the cluster ID. You can customize the cluster name, which is also used in the tag.
Project
The new cluster belongs to your default project. You can assign the cluster to a different project.
You can also change the project after you create the cluster. Go to the Kubernetes page in the Control Panel. From the cluster’s More menu, select Move to and select the project you want to move the cluster to.
Associated resources, such as load balancers and volumes, also move when you move the cluster to a different project.
Due to a known issue, resources associated with a DOKS cluster, such as load balancers, volumes, and volume snapshots, belong to the default project upon creation, regardless of which project the cluster belongs to. You can associate resources to the correct project by reconciling the cluster or moving the cluster to a different project.
Tags
Clusters automatically have three tags:
k8s- The specific cluster ID, like
k8s:EXAMPLEc-3515-4a0c-91a3-2452eEXAMPLE - The resource type, for example,
k8s:worker
You can also add custom tags to a cluster and its node pools in the cluster’s Overview and Resources pages. Any custom tags you add to worker nodes in a node pool (for example, from the Droplets page), are deleted to maintain consistency between the node pool and its worker nodes.
At the bottom of this section, the Control Panel displays pricing for your selected resources. If the cluster includes at least one v5 or GPU node pool, the Control Panel displays hourly prices for all selected resources, including bundled-plan node pools and HA. This does not change the bundled-plan billing model, which retains its monthly usage cap. v5 worker nodes are billed at an hourly rate without a monthly usage cap. For details, see Kubernetes Pricing. When you create the cluster, billing begins for each resource (for example, worker nodes, volumes, and load balancers) as it is created and ends as it is destroyed.
Create Cluster
When you have entered your settings, create the cluster by clicking the Create Kubernetes cluster button. It can take several minutes for cluster creation to finish.
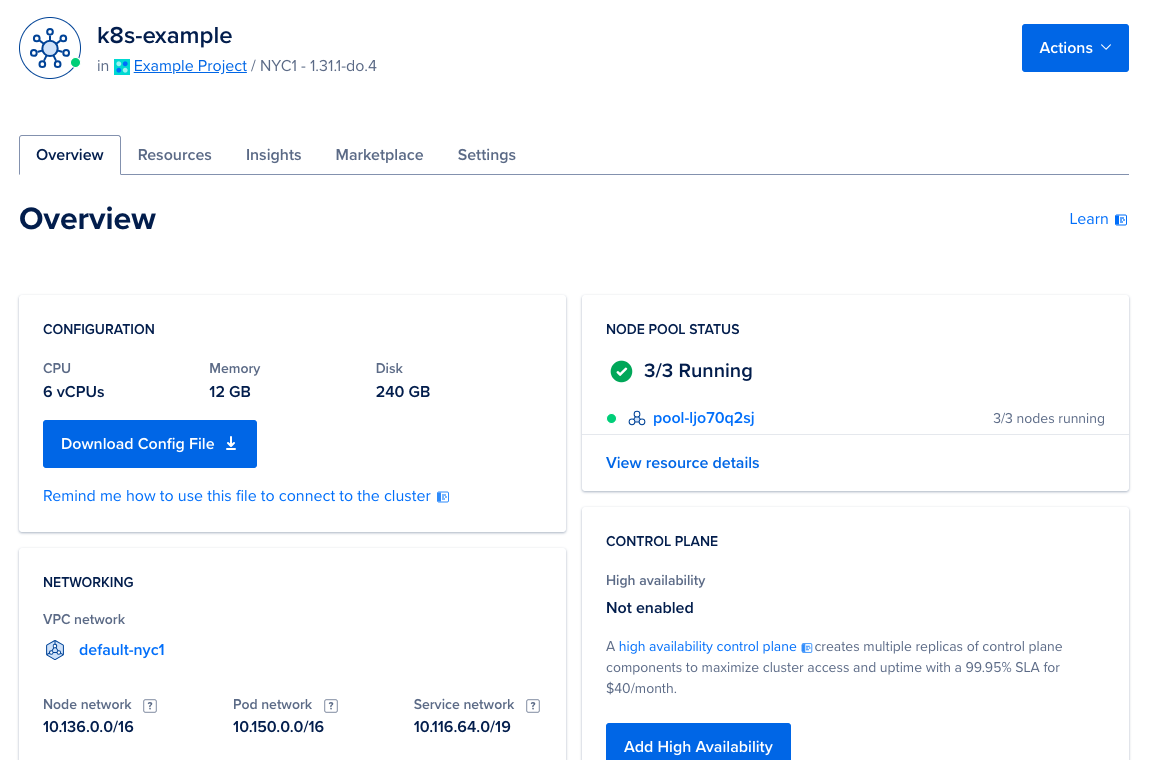
Once your cluster is provisioned, you can view cluster information such as the cluster configuration, networking details, cost, cluster ID, reconciler checks, and control plane high availability indicator in the Overview tab.
To manage the cluster, use kubectl, the official Kubernetes command-line client. See How to Connect to a DigitalOcean Kubernetes Cluster to get set up.