How to Enable Push-to-Deploy on DigitalOcean Kubernetes Using GitHub Actions
Validated on 4 Dec 2020 • Last edited on 23 Jan 2025
DigitalOcean Kubernetes (DOKS) is a Kubernetes service with a fully managed control plane, high availability, and autoscaling. DOKS integrates with standard Kubernetes toolchains and DigitalOcean’s load balancers, volumes, CPU and GPU Droplets, API, and CLI.
You can create continuous integration and continuous deployment (CI/CD) workflows with DigitalOcean services using GitHub Actions. In this topic, you learn how to deploy a basic Python application to a DigitalOcean Kubernetes cluster whenever you commit a change to your GitHub repository.
The workflow consists of the following steps:
Prerequisites
Before you can create a CI/CD workflow using DigitalOcean services:
-
Create the following resources if you do not have them already:
-
A GitHub repository that is ready to use for testing push-to-deploy functionality. If you don’t have a repository ready to use, fork our sample repository which has a Python app that generates a “hello world” message.
-
-
Create a DigitalOcean access token for your container registry and add it as a secret to your GitHub repository. Name the secret
DIGITALOCEAN_ACCESS_TOKEN. -
Integrate your DigitalOcean Container Registry with your DigitalOcean Kubernetes cluster in the control panel.
Alternatively, if you prefer to use the
doctlcommand-line tool, run:doctl kubernetes cluster registry add <cluster-name> -
Create a Dockerfile to build the image for your application.
-
Create a Kubernetes YAML file that specifies the deployment.
You can access the files used in this topic in this GitHub repository.
Create Your Workflow File
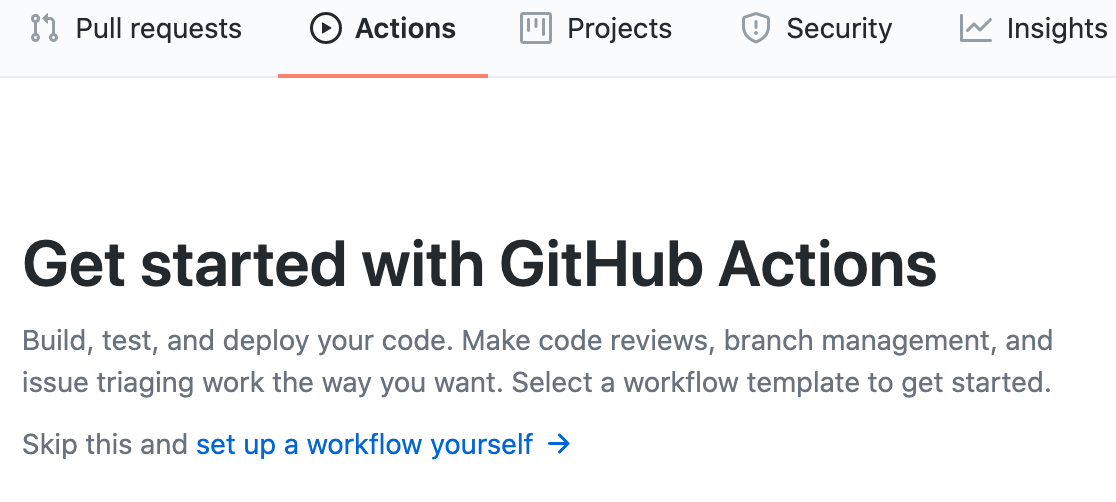
In your GitHub repository, click Actions. You can choose one of the provided templates to create a workflow. For this example, we will set up the workflow by clicking set up a workflow yourself.

This creates a template YAML file in the .gitub/workflows folder. Rename the main.yml file to workflow.yml.
Configure Actions in Your Workflow
In the workflow.yml file, configure the following actions for your workflow:
For more information on the syntax to write the actions, see Workflow syntax for GitHub Actions.
Specify Events that Trigger Workflow
In the first section of the workflow.yml file, specify the conditions under which the workflow gets triggered. In this example, the workflow is triggered on a push to the main branch of the repository if specific files or folders are changed.
on:
  push:
    branches:
      - main
    paths:
      - 'config/**'
      - 'server.py'
      - 'Dockerfile'
      - '.github/workflows/**'
The on keyword specifies the name of the GitHub event which triggers the workflow, which is push in this case. You specify the configuration for the push event using the following keywords:
branches– The workflow triggers only on apushto themainbranch.paths– The workflow triggers when there is a change inserver.py,Dockerfile, the deployment YAML file inconfigfolder or the workflow YAML file in theworkflowfolder in the repository.
Create Workflow Run
A workflow run is made up of one or more jobs that can run sequentially or in parallel. It specifies the type of machine where the job runs and several steps to represent a sequence of tasks that will be executed as part of the job. These are specified using the runs-on and steps keywords. For this example, we write a single build job.
jobs:
 build:
   runs-on: ubuntu-latest
   steps:
   ....
Specify Steps in Job
A step is an individual task that can run commands in a job. A step has a uses or a run keyword to run an action or a shell command, and optionally a name keyword. The build job in this example performs the following steps:
- Checks out your repository under
$GITHUB_WORKSPACEso that the job can access it.
steps:
- name: Checkout master
  uses: actions/checkout@main
$GITHUB_WORKSPACE is one of the environment variables in the Action’s runtime environment. This directory contains a copy of the repository that triggered the workflow. Changes made here persist from one step to the next.
- Installs the
doctlcommand-line client using DigitalOcean doctl Action.
This action enables you to interact with DigitalOcean services. It usesDIGITALOCEAN_ACCESS_TOKENyou added as a GitHub secret as a prerequisite.
- name: Install doctl
  uses: digitalocean/action-doctl@v2
  with:
    token: ${{ secrets.DIGITALOCEAN_ACCESS_TOKEN }}
doctl is now available in the virtual environment and can be used directly in the following steps.
- Builds the Docker image and pushes it to your container registry.
- name: Build container image
  run: docker build -t registry.digitalocean.com/<registry-name>/<repository_name>:$(echo $GITHUB_SHA | head -c7) .

- name: Log in to DigitalOcean Container Registry with short-lived credentials
  run: doctl registry login --expiry-seconds 1200

- name: Push image to DigitalOcean Container Registry
  run: docker push registry.digitalocean.com/<registry-name>/<repository_name>:$(echo $GITHUB_SHA | head -c7)
We build the Docker image with the $GITHUB_SHA tag, which is another environment variable in the Action’s runtime environment. Its value is the SHA of the commit that triggered the workflow. To build and push your image, specify the name of your registry and repository in the commands.
Before we can push the tagged image, we log in to the container registry. We pass the --expiry-seconds flag to generate temporary, short-lived credentials that will be revoked when the job is complete. We then push the tagged image to the container registry.
- Deploys to your DigitalOcean Kubernetes cluster.
- name: Update deployment file
  run: TAG=$(echo $GITHUB_SHA | head -c7) && sed -i 's|<IMAGE>|registry.digitalocean.com/<registry-name>/<repository_name>:'${TAG}'|' $GITHUB_WORKSPACE/config/deployment.yml

- name: Save DigitalOcean kubeconfig with short-lived credentials
  run: doctl kubernetes cluster kubeconfig save --expiry-seconds 600 <cluster-name>

- name: Deploy to DigitalOcean Kubernetes
  run: kubectl apply -f $GITHUB_WORKSPACE/config/deployment.yml

- name: Verify deployment
  run: kubectl rollout status deployment/<deployment_name>
We provide a deployment.yml file that only has a placeholder for the Docker image, IMAGE, we want to deploy. Before we can deploy the image to the DigitalOcean Kubernetes cluster, we need to update it to point to the image we tagged and pushed to the container registry. To do this, we use the standard UNIX tools and sed to update the contents of our deployment file.
Then, we add the credentials for the cluster we integrated with the registry, <cluster-name>, as a prerequisite to a local kubeconfig file, deploy to the cluster and verify the deployment. <deployment_name> is the name of the deployment specified in the deployment.yml file.
To deploy to your cluster, specify the name of your registry, repository and cluster integrated with your registry in the commands.
Run Your Workflow
Once you complete configuring the steps for your workflow run in the workflow.yml file, add a commit message and commit the changes to your GitHub repository. This commit triggers the workflow. Each step runs in the order specified in the workflow.
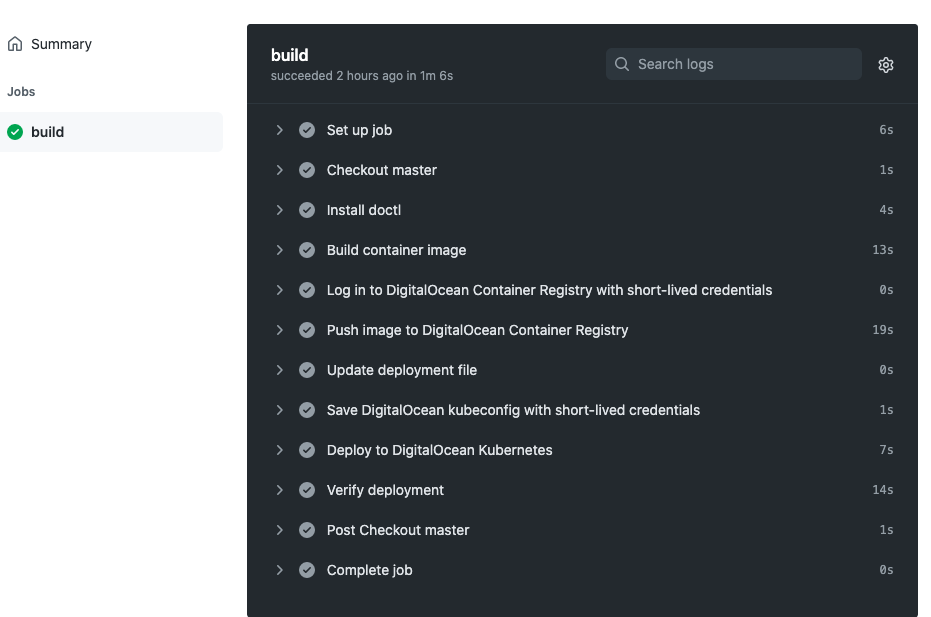
You can monitor the progress of the workflow run by clicking All workflows and selecting the name of the workflow in the Actions tab. Under Jobs, click build.
Click to expand a step and view the results of that step.

Once everything is green, your application is live at http://<external-endpoint>, where external-endpoint is the External Endpoint of the service that you can obtain from the Kubernetes dashboard of your cluster.
Next Steps
You can expose your deployment to the world by adding a load balancer as described in Add Load Balancers.
Any time you make a change to your app and push a commit to the main branch of your GitHub repository, the GitHub Actions workflow triggers and your changes get re-deployed.