WarpSpeed VPN
Generated on 31 May 2022 from the WarpSpeed VPN catalog page
WarpSpeed is a simple web-based VPN server powered by the open source WireGuard® protocol. WarpSpeed makes it easy for anyone to access their cloud infrastructure securely. It can also be used to enable remote workers to safely access the internet from anywhere.
FEATURES
- Simple web-based administration
- High performance WireGuard protocol
- Ultra low-latency connectivity
- Real-time Bandwidth Monitoring
- Security Audit Log
- Auto-generated Configs with QR Codes
- Supports official WireGuard clients
SINGLE SIGN-ON (SSO)
- Google G Suite
- Office365 / Azure Active Directory
- Okta
- SAML 2.0
FREE PERSONAL LICENSE
- 1 User
- 2 Devices
- 3 Day Connection History
- Community Support
- No credit card required
PAID BUSINESS LICENSE
- Unlimited Users
- Unlimited Devices
- Unlimited Connection History
- SSO using SAML 2.0
- Priority Support
- Cancel anytime
Software Included
| Package | Version | License |
|---|---|---|
| wireguard | 1.0.20200513-1~20.04.2 | GPL v3 |
| wireguard-tools | 1.0.20200513-1~20.04.2 | GPL v3 |
Creating an App using the Control Panel
Click the Deploy to DigitalOcean button to create a Droplet based on this 1-Click App. If you aren’t logged in, this link will prompt you to log in with your DigitalOcean account.

Creating an App using the API
In addition to creating a Droplet from the WarpSpeed VPN 1-Click App using the control panel, you can also use the DigitalOcean API. As an example, to create a 4GB WarpSpeed VPN Droplet in the SFO2 region, you can use the following curl command. You need to either save your API access token to an environment variable or substitute it in the command below.
curl -X POST -H 'Content-Type: application/json' \
         -H 'Authorization: Bearer '$TOKEN'' -d \
        '{"name":"choose_a_name","region":"sfo2","size":"s-2vcpu-4gb","image":"bunkercloudservi-warpspeedvpn-18-04"}' \
        "https://api.digitalocean.com/v2/droplets"
Getting Started After Deploying WarpSpeed VPN
1. Open required ports on your Digital Ocean firewall
Using Digital Ocean’s Firewalls feature, you will need to enable network access to your Droplet:
- Inbound TCP port 80 (Let’s Encrypt TLS certificate verification)
- Inbound TCP port 443 (encrypted web control panel traffic)
- Inbound UDP port 51820 (WireGuard VPN protocol)
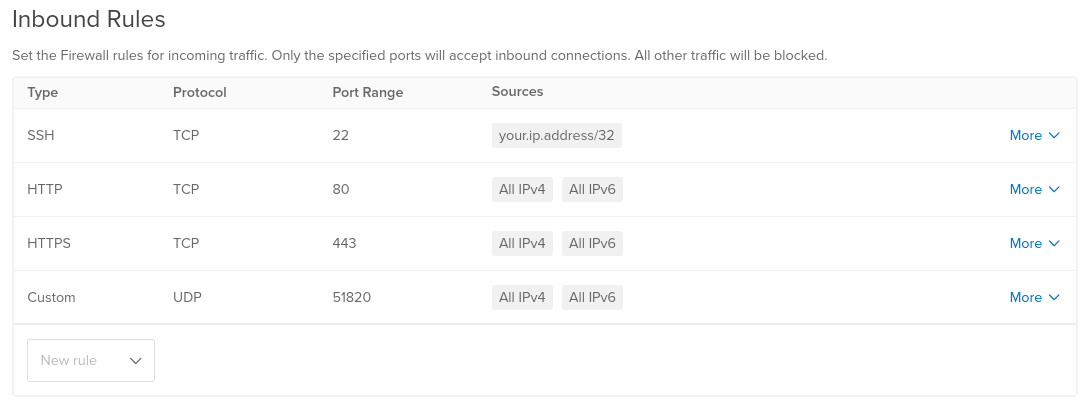
Link: https://cloud.digitalocean.com/networking/firewalls
NOTE: To enable VPN access to any private networks or servers, your VPN server itself must have access to those as well (e.g. be on the correct VPCs).
2. Connect to your WarpSpeed instance
SSH to your new WarpSpeed VPN instance:
ssh root@your_droplet_public_ipv4
IP Address: your_droplet_public_ipv4
Username: root
NOTE: If you can’t connect, you may need to open TCP port 22 from your IP address.
3. Run the install script
When prompted enter “Y” or type sudo warpspeed-installer.sh to run the install script.
You will be asked a few simple questions in order to complete the installation, which will only take a few seconds.
NOTE: If you get an error upon running the installer script, your instance may still be initializing. Wait a minute or two and try again.
Need Help?
If you require any assistance, please email [email protected] and we’ll be happy to help!
Install Screencast
