Paralus
Generated on 18 May 2023 from the Paralus catalog page
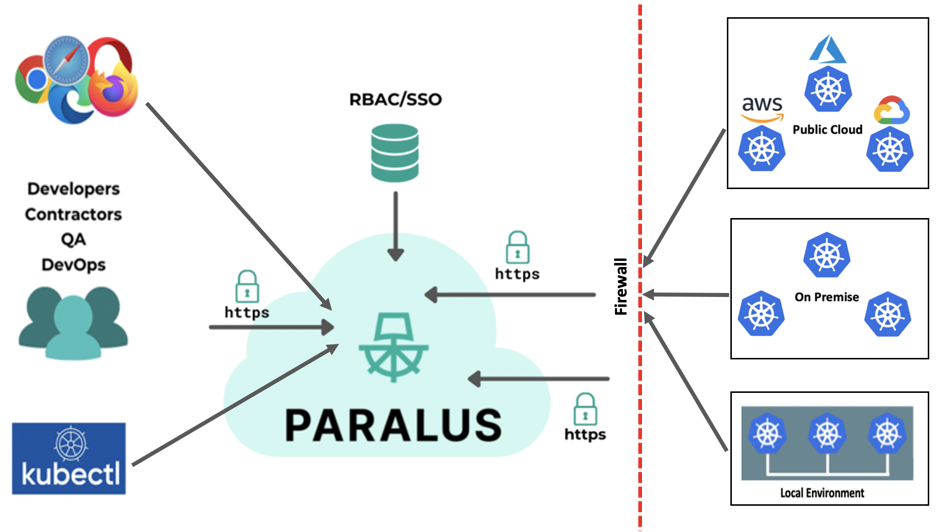
Paralus is a free, open source project that enables controlled, audited access to Kubernetes infrastructure for your users, user groups, and services that ships as a GUI, API, and CLI.
It offers access management for developers, architects, and CI/CD tools to remote K8s clusters by consolidating zero-trust access principles such as transaction-level authentication and authorization into a single open-source tool. It helps engineering and architecture teams streamline access control for their fleet of Kubernetes clusters spanning different operating environments, different public clouds and Kubernetes distributions, and on-premises data centers operating behind firewalls.
Paralus can be easily integrated with your pre-existing SSO providers, or Identity Providers (IdP) that support OIDC (OpenID Connect).
Features
- Creation of custom roles, users, and groups.
- Custom user role creation and revoking of permissions.
- Ability to control access via pre-configured roles across clusters, namespaces, projects, and more.
- Seamless integration with Identity Providers (IdPs) allowing the use of external authentication engines for users and group definitions, such as GitHub, Google, Azure AD, Okta, and others.
- Automatic logging of all user actions performed for audit and compliance purposes.
- Interact with Paralus either with a modern web GUI (default), a CLI tool called pctl, or Paralus API.
Read more about the components and how it works in the Paralus documentation.
You can contribute to Paralus too. Check out our Contribution guidelines.
Software Included
| Package | Version | License |
|---|---|---|
| Paralus | 0.2.3 | Apache License 2.0 |
Creating an App using the Control Panel
Click the Deploy to DigitalOcean button to install a Kubernetes 1-Click Application. If you aren’t logged in, this link will prompt you to log in with your DigitalOcean account.

Creating an App using the API
In addition to creating Paralus using the control panel, you can also use the DigitalOcean API. As an example, to create a 3 node DigitalOcean Kubernetes cluster made up of Basic Droplets in the SFO2 region, you can use the following doctl command. You need to authenticate with doctl with your API access token and replace the $CLUSTER_NAME variable with the chosen name for your cluster in the command below.
doctl kubernetes clusters create --size s-4vcpu-8gb $CLUSTER_NAME --1-clicks paralusGetting Started After Deploying Paralus
Getting Started:
Configure access to the Kubernetes cluster using doctl as mentioned in the doctl documentation.
Connect to your Kubernetes cluster and validate that Paralus is installed correctly by ensuring that all the pods are running
kubectl get pods -n paralus
Before you are able to use Paralus, there are a few things that you need to do.
You will not be able to access the Paralus dashboard if you skip any of the following steps.
- Updating The Domain Name
Paralus makes use of domain based routing and hence you need to have a domain name with you to be able to access the Paralus dashboard.
Once the installation is complete, run the following command to update the domain name with your domain name.
$ helm upgrade paralus paralus/ztka -n paralus --values https://raw.githubusercontent.com/paralus/helm-charts/main/examples/values.dev-generic.yaml --set fqdn.domain="yourdomain.com"Replace
yourdomain.comwith your actual domain name.
- Configuring DNS settings
To be able to access the Paralus dashboard, you also need to update the DNS settings of your domain to point to the IP address of the installation. Run the following command to fetch the IP address of the load balancer.
kubectl get svc paralus-contour-envoy -n paralus

NAME                      TYPE           CLUSTER-IP     EXTERNAL-IP      PORT(S)                      AGE
paralus-contour-envoy   LoadBalancer   10.245.58.69   138.68.122.180   80:32722/TCP,443:32656/TCP   2m32s
Navigate to your domain name’s DNS configuration page and create three CNAME records with the IP address of the load balancer you get in the above step.
| Type | Address | Resolves To | TTL |
|---|---|---|---|
| A | console.yourdomain.com | 138.68.122.180 | 1 Hour |
| A | *.core-connector.yourdomain.com | 138.68.122.180 | 1 Hour |
| A | *.user.yourdomain.com | 138.68.122.180 | 1 Hour |
- Reset Default Password
Paralus is installed with a default organization and an admin user. Hence, after installation, you need to set a password for the user.
To do so, execute the following command
kubectl logs -f --namespace paralus $(kubectl get pods --namespace paralus -l app.kubernetes.io/name='paralus' -o jsonpath='{ .items[0].metadata.name }') initialize | grep 'Org Admin signup URL:'

Org Admin signup URL:  http://console.yourdomain.com/self-service/recovery?flow=de34efa4-934e-4916-8d3f-a1c6ce65ba39&token=IYJFI5vbORhGnz81gCjK7kucDVoiuQ7j
The password reset URL is valid only for 10 minutes. In case you are unable to get the link, refer to our troubleshooting guide to regenerate the password reset URL.
Access the URL in a browser, and provide a new password.
- Access Paralus Dashboard
In a new browser window/tab navigate to http://console.yourdomain.com and log in with the following credentials:
username: [email protected] - or the one you specified in values.yml
password: the password you provided in the earlier step.
You’ll be taken to the default project page.
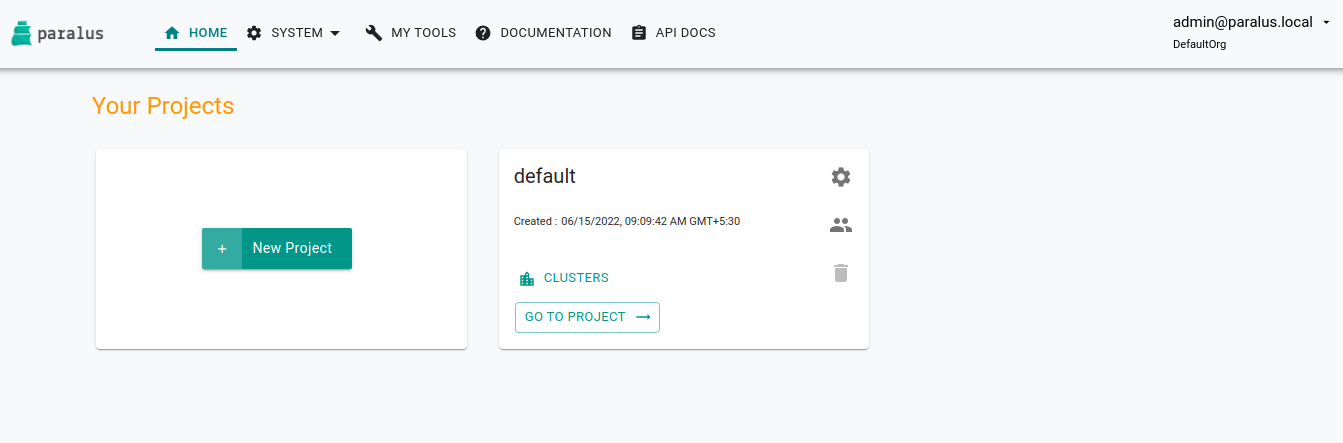
You’ve successfully deployed Paralus.
Refer to Paralus documentation and blog to know more about what you can do with Paralus.