OpenEBS NFS Provisioner
Generated on 11 Jun 2024 from the OpenEBS NFS Provisioner catalog page
OpenEBS NFS PV Provisioner helps developers easily deploy Kubernetes workloads that require fast and highly reliable shared NFS storage. It can be used to dynamically provision NFS Volumes using different kinds (local or network) of block storage available on the Kubernetes nodes. Using NFS Volumes, you can share volume data across the pods running on different node machines. You can easily create NFS Volumes using OpenEBS Dynamic NFS Provisioner and use it anywhere.
Under the hood, the NFS provisioner runs a NFS server pod for each shared storage volume. It uses DigitalOcean block storage (do-block-storage) as the backing volume for NFS.
Notes:
- This stack requires a minimum configuration of 2 Nodes at the $10/month plan (2GB memory / 1 vCPU).
- A 1GB block storage volume is required as well for testing the dynamic NFS provisioner.
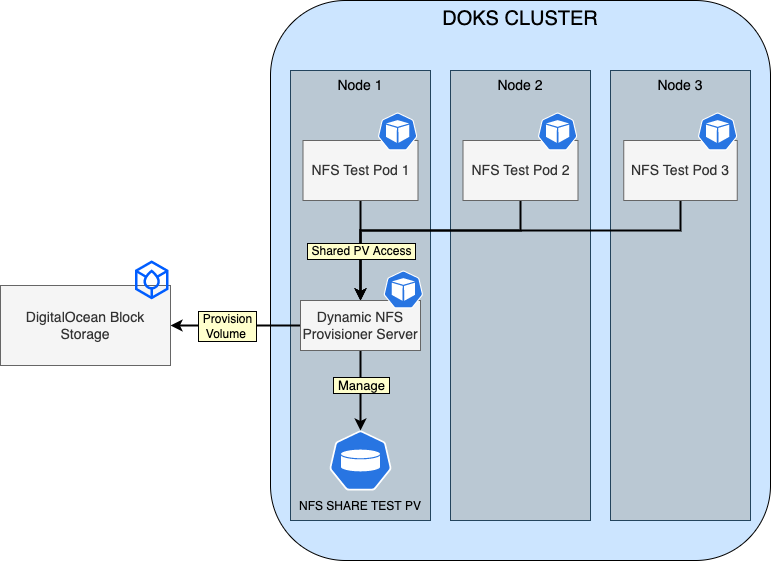
OpenEBS Dynamic NFS Provisioner Overview Diagram
The following diagram shows how OpenEBS Dynamic NFS Provisioner works on a Kubernetes cluster (based on the example used in the getting started section):
Software Included
| Package | Version | License |
|---|---|---|
| OpenEBS NFS Provisioner | 0.11.0 | Apache 2.0 |
Creating an App using the Control Panel
Click the Deploy to DigitalOcean button to install a Kubernetes 1-Click Application. If you aren’t logged in, this link will prompt you to log in with your DigitalOcean account.

Creating an App using the API
In addition to creating OpenEBS NFS Provisioner using the control panel, you can also use the DigitalOcean API. As an example, to create a 3 node DigitalOcean Kubernetes cluster made up of Basic Droplets in the SFO2 region, you can use the following doctl command. You need to authenticate with doctl with your API access token and replace the $CLUSTER_NAME variable with the chosen name for your cluster in the command below.
doctl kubernetes clusters create --size s-4vcpu-8gb $CLUSTER_NAME --1-clicks openebs-nfs-provisionerGetting Started After Deploying OpenEBS NFS Provisioner
Connecting to Your Cluster
You can connect to your DigitalOcean Kubernetes cluster by following our how-to guide.
For additional instructions on configuring a DigitalOcean Kubernetes cluster, see the following guide.
Confirming that OpenEBS NFS Provisioner is Running
First, verify that the Helm installation was successful by running following command:
helm ls -n openebs-nfs-provisionerIf the installation was successful, the STATUS column value in the output reads deployed:
NAME                    NAMESPACE               REVISION        UPDATED                                 STATUS          CHART                   APP VERSION
openebs-nfs-provisioner openebs-nfs-provisioner 1               2022-05-17 10:08:02.345252 +0300 EEST   deployed        nfs-provisioner-0.11.0   0.11.0
Next, verify that the openebs-nfs-provisioner pod is up and running with the following command:
kubectl get pods --all-namespaces -l name=openebs-nfs-provisionerIf it’s running, the pod listed in the output are in a READY state and the STATUS column reads Running:
NAMESPACE                 NAME                                       READY   STATUS    RESTARTS   AGE
openebs-nfs-provisioner   openebs-nfs-provisioner-5cfd76f4fc-5k7wf   1/1     Running   0          11m
Finally, verify if the read-write storage class nfs-rwx-storage is created.
kubectl get storageclass nfs-rwx-storageThis should result in an output as below:
NAME              PROVISIONER         RECLAIMPOLICY   VOLUMEBINDINGMODE   ALLOWVOLUMEEXPANSION   AGE
nfs-rwx-storage   openebs.io/nfsrwx   Delete          Immediate           false                  5d15h
Note that you can create your own storage class, and as many as you like. As a reference, here is the manifest for the nfs-rwx-storage class.
Testing RWX Access Mode for OpenEBS NFS Volumes
First, you will create a new PVC referencing the OpenEBS nfs-rwx-storage class:
apiVersion: v1
kind: PersistentVolumeClaim
metadata:
  name: nfs-pvc
spec:
  storageClassName: nfs-rwx-storage
  accessModes:
    - ReadWriteMany
  resources:
    requests:
      storage: 1Gi
Above manifest instructs Kubernetes to create a new PVC based on the nfs-rwx-storage class via spec.storageClassName, and sets access mode to ReadWriteMany (spec.accessModes). You can accomplish the above task by using the sample manifest provided in the marketplace GitHub repository:
kubectl apply -f https://raw.githubusercontent.com/digitalocean/marketplace-kubernetes/master/stacks/openebs-nfs-provisioner/assets/manifests/nfs-pvc.yamlNow, check if the nfs-pvc is healthy:
kubectl get pvc nfs-pvcThe output looks similar to:
NAME      STATUS   VOLUME                                     CAPACITY   ACCESS MODES   STORAGECLASS     AGE
nfs-pvc   Bound    pvc-776fd89f-c7aa-4e57-a8f5-914ab77f71d5   1Gi        RWX            nfs-rwx-storage  1m
The NFS PVC should be in a Bound state, and access mode set to RWX (ReadWriteMany). Storage class should display nfs-rwx-storage, and a capacity of 1Gi should be provisioned.
Next, create the nfs-share-test deployment provided in the marketplace GitHub repository:
kubectl apply -f https://raw.githubusercontent.com/digitalocean/marketplace-kubernetes/master/stacks/openebs-nfs-provisioner/assets/manifests/nfs-share-test.yamlAbove manifest will create the nfs-share-test deployment with a replica count of 3, and mounts same volume (nfs-share-test) for all pods to consume. Then, the Kubernetes Downward API is used to read each Pod metadata (such as Node name, Pod Name/IP), and write the details in a single log file from the NFS share (/mnt/nfs-test/nfs-rwx.log).
Now, inspect nfs-share-test deployment Pods status:
kubectl get pods -l test=nfs-shareThe output looks similar to:
NAME                              READY   STATUS    RESTARTS   AGE
nfs-share-test-67bf984f88-4flq2   1/1     Running   0          98s
nfs-share-test-67bf984f88-9hmfz   1/1     Running   0          98s
nfs-share-test-67bf984f88-tnz8q   1/1     Running   0          98s
All pods should be healthy and in a running state.
Finally, check nfs-share-test deployment logs:
kubectl exec -it deployments/nfs-share-test -- tail -f /mnt/nfs-test/nfs-rwx.logThe output looks similar to:
...
[2022-05-31 11:09:04][NFS-RWX-TEST] NODE=basicnp-cajb7 POD=nfs-share-test-67bf984f88-9hmfz POD_IP=10.244.0.229
[2022-05-31 11:09:04][NFS-RWX-TEST] NODE=basicnp-cajbm POD=nfs-share-test-67bf984f88-4flq2 POD_IP=10.244.0.112
[2022-05-31 11:09:14][NFS-RWX-TEST] NODE=basicnp-cajb7 POD=nfs-share-test-67bf984f88-tnz8q POD_IP=10.244.0.243
[2022-05-31 11:09:14][NFS-RWX-TEST] NODE=basicnp-cajb7 POD=nfs-share-test-67bf984f88-9hmfz POD_IP=10.244.0.229
[2022-05-31 11:09:14][NFS-RWX-TEST] NODE=basicnp-cajbm POD=nfs-share-test-67bf984f88-4flq2 POD_IP=10.244.0.112
[2022-05-31 11:09:24][NFS-RWX-TEST] NODE=basicnp-cajb7 POD=nfs-share-test-67bf984f88-tnz8q POD_IP=10.244.0.243
...
Each pod should be able to write to the same log file (nfs-rwx.log), and publish its metadata each 10 seconds. This confirms that NFS storage is working.
To delete the test application, use the following. However, keep the applications running if you want to further explore the failure cases in the section below.
kubectl delete -f https://raw.githubusercontent.com/digitalocean/marketplace-kubernetes/master/stacks/openebs-nfs-provisioner/assets/manifests/nfs-share-test.yaml
kubectl delete -f https://raw.githubusercontent.com/digitalocean/marketplace-kubernetes/master/stacks/openebs-nfs-provisioner/assets/manifests/nfs-pvc.yaml
Failure Cases for NFS Provisioner
Note the nfs-pvc-* pod name in openebs-nfs-provisioner namespace. This pod is running the NFS server, which is sharing the nfs-pvc volume.
~ kubectl get pods -n openebs-nfs-provisioner -o wide
NAME                                                            READY   STATUS    RESTARTS     AGE    IP             NODE                   NOMINATED NODE   READINESS GATES
nfs-pvc-509d7613-b141-4edd-b0d5-59ae9f2a0eb3-5c49b6d9f6-7rhw2   1/1     Running   0            153m   10.244.0.109   pool-vc6axdi2c-ct7j3   <none>           <none>
openebs-nfs-provisioner-5cfd76f4fc-47xls                        1/1     Running   1 (8h ago)   8h     10.244.1.157   pool-vc6axdi2c-ct7x4   <none>           <none>
You can see how this is a single point of failure. Two obvious failure scenarios are:
- The nfs-pvc-* pod itself is terminated unexpectedly.
- The underlying node of nfs-pvc-* pod is terminated. Note that if the underlying node is drained, then the nfs server pod will have a chance to reschedule, hence minimizing the impact.
How do we determine the NFS server outage when any of the above happen? We can use the same application from the above section, and watch the time gap in the logs because of the incident. In the normal scenario, data is read and logs are written for every pod in 10 sec interval:
~ kubectl exec -it deployments/nfs-share-test -- tail -f /mnt/nfs-test/nfs-rwx.log

[2022-06-01 08:36:16][NFS-RWX-TEST] NODE=pool-vc6axdi2c-ct7x4 POD=nfs-share-test-67bf984f88-2qw6q POD_IP=10.244.1.247
[2022-06-01 08:36:19][NFS-RWX-TEST] NODE=pool-vc6axdi2c-ct7j3 POD=nfs-share-test-67bf984f88-nxbrg POD_IP=10.244.0.82
[2022-06-01 08:36:25][NFS-RWX-TEST] NODE=pool-vc6axdi2c-cezr9 POD=nfs-share-test-67bf984f88-56sxz POD_IP=10.244.1.120
[2022-06-01 08:36:26][NFS-RWX-TEST] NODE=pool-vc6axdi2c-ct7x4 POD=nfs-share-test-67bf984f88-2qw6q POD_IP=10.244.1.247
[2022-06-01 08:36:29][NFS-RWX-TEST] NODE=pool-vc6axdi2c-ct7j3 POD=nfs-share-test-67bf984f88-nxbrg POD_IP=10.244.0.82
[2022-06-01 08:36:35][NFS-RWX-TEST] NODE=pool-vc6axdi2c-cezr9 POD=nfs-share-test-67bf984f88-56sxz POD_IP=10.244.1.120
[2022-06-01 08:36:36][NFS-RWX-TEST] NODE=pool-vc6axdi2c-ct7x4 POD=nfs-share-test-67bf984f88-2qw6q POD_IP=10.244.1.247
[2022-06-01 08:36:39][NFS-RWX-TEST] NODE=pool-vc6axdi2c-ct7j3 POD=nfs-share-test-67bf984f88-nxbrg POD_IP=10.244.0.82
[2022-06-01 08:36:45][NFS-RWX-TEST] NODE=pool-vc6axdi2c-cezr9 POD=nfs-share-test-67bf984f88-56sxz POD_IP=10.244.1.120
Now, kill the nfs-pvc-* pod, and watch the gap in the logs. In this particular test, you can see ~90 seconds of delay for NFS server to be fully functional after getting killed:
[2022-06-01 08:37:56][NFS-RWX-TEST] NODE=pool-vc6axdi2c-ct7x4 POD=nfs-share-test-67bf984f88-2qw6q POD_IP=10.244.1.247
[2022-06-01 08:37:59][NFS-RWX-TEST] NODE=pool-vc6axdi2c-ct7j3 POD=nfs-share-test-67bf984f88-nxbrg POD_IP=10.244.0.82
[2022-06-01 08:38:05][NFS-RWX-TEST] NODE=pool-vc6axdi2c-cezr9 POD=nfs-share-test-67bf984f88-56sxz POD_IP=10.244.1.120
[2022-06-01 08:38:06][NFS-RWX-TEST] NODE=pool-vc6axdi2c-ct7x4 POD=nfs-share-test-67bf984f88-2qw6q POD_IP=10.244.1.247
[2022-06-01 08:38:09][NFS-RWX-TEST] NODE=pool-vc6axdi2c-ct7j3 POD=nfs-share-test-67bf984f88-nxbrg POD_IP=10.244.0.82
[2022-06-01 08:38:15][NFS-RWX-TEST] NODE=pool-vc6axdi2c-cezr9 POD=nfs-share-test-67bf984f88-56sxz POD_IP=10.244.1.120
[2022-06-01 08:38:25][NFS-RWX-TEST] NODE=pool-vc6axdi2c-cezr9 POD=nfs-share-test-67bf984f88-56sxz POD_IP=10.244.1.120
[2022-06-01 08:40:11][NFS-RWX-TEST] NODE=pool-vc6axdi2c-ct7j3 POD=nfs-share-test-67bf984f88-nxbrg POD_IP=10.244.0.82
[2022-06-01 08:40:14][NFS-RWX-TEST] NODE=pool-vc6axdi2c-cezr9 POD=nfs-share-test-67bf984f88-56sxz POD_IP=10.244.1.120
Now, kill the underlying node (go to droplet page in your cloud console and kill the droplet directly). Around 4-7 minutes of downtime is expected in this failure scenario. In one particular test, the NFS server has to be restarted as well, as it kept waiting for the volume to be available.
[2022-06-01 08:47:04][NFS-RWX-TEST] NODE=pool-vc6axdi2c-cezr9 POD=nfs-share-test-67bf984f88-56sxz POD_IP=10
[2022-06-01 08:47:14][NFS-RWX-TEST] NODE=pool-vc6axdi2c-cezr9 POD=nfs-share-test-67bf984f88-56sxz POD_IP=10
[2022-06-01 08:47:23][NFS-RWX-TEST] NODE=pool-vc6axdi2c-ct7x4 POD=nfs-share-test-67bf984f88-2qw6q POD_IP=10
[2022-06-01 08:54:56][NFS-RWX-TEST] NODE=pool-vc6axdi2c-ct7x4 POD=nfs-share-test-67bf984f88-jlstx POD_IP=10
[2022-06-01 08:56:47][NFS-RWX-TEST] NODE=pool-vc6axdi2c-cezr9 POD=nfs-share-test-67bf984f88-56sxz POD_IP=10
[2022-06-01 08:56:47][NFS-RWX-TEST] NODE=pool-vc6axdi2c-ct7x4 POD=nfs-share-test-67bf984f88-2qw6q POD_IP=10
[2022-06-01 08:56:48][NFS-RWX-TEST] NODE=pool-vc6axdi2c-ct7x4 POD=nfs-share-test-67bf984f88-jlstx POD_IP=10
[2022-06-01 08:56:57][NFS-RWX-TEST] NODE=pool-vc6axdi2c-cezr9 POD=nfs-share-test-67bf984f88-56sxz POD_IP=10
It is very important to be aware of the the service impact due to these unexpected events, and design your application accordingly.
Benchmarking OpenEBS NFS Performance
Benchmarking is subjective (iops, throughput, and latency for different configurations) and dependent on your specific needs. For example, if you are storing 2MB+ size files on your NFS server, then benchmarking for 4K sized blocks is not appropriate. Saying this, a good starter benchmark would be to do a basic measurement and be aware of the limits. A well-known tool is fio. Kubestr provides a CLI-based wrapper for using fio on Kubernetes. Download kubestr to your laptop, and you can benchmark any storage class with just one command with the default fio configuration:
~ kubestr fio -s rwx-storage -z 50Gi
PVC created kubestr-fio-pvc-87mg8
Pod created kubestr-fio-pod-wjtnn
Running FIO test (default-fio) on StorageClass (rwx-storage) with a PVC of Size (50Gi)
Elapsed time- 2m1.099989659s
FIO test results:

FIO version - fio-3.20
Global options - ioengine=libaio verify=0 direct=1 gtod_reduce=1

JobName: read_iops
  blocksize=4K filesize=2G iodepth=64 rw=randread
read:
  IOPS=1086.609985 BW(KiB/s)=4363
  iops: min=554 max=1934 avg=1090.666626
  bw(KiB/s): min=2216 max=7736 avg=4362.666504

JobName: write_iops
  blocksize=4K filesize=2G iodepth=64 rw=randwrite
write:
  IOPS=1085.600220 BW(KiB/s)=4359
  iops: min=554 max=1938 avg=1088.033325
  bw(KiB/s): min=2216 max=7752 avg=4352.133301

JobName: read_bw
  blocksize=128K filesize=2G iodepth=64 rw=randread
read:
  IOPS=1086.641846 BW(KiB/s)=139625
  iops: min=554 max=1940 avg=1090.833374
  bw(KiB/s): min=70912 max=248320 avg=139626.671875

JobName: write_bw
  blocksize=128k filesize=2G iodepth=64 rw=randwrite
write:
  IOPS=1087.179199 BW(KiB/s)=139695
  iops: min=552 max=1936 avg=1089.833374
  bw(KiB/s): min=70656 max=247808 avg=139501.406250

Disk stats (read/write):
  -  OK
~
You can repeat similar command for do-block-storage.
Tweaking Helm Values
The OpenEBS dynamic NFS provisioner stack provides some custom values to start with. Please have a look at the values file from the main GitHub repository.
You can always inspect all the available options, as well as the default values for the OpenEBS dynamic NFS provisioner Helm chart by running below command:
helm show values openebs-nfs/nfs-provisioner --version 0.11.0 --version 0.11.0After tweaking the Helm values file (values.yml) according to your needs, you can always apply the changes via helm upgrade command, as shown below:
helm upgrade openebs-nfs-provisioner openebs-nfs/nfs-provisioner --version 0.11.0 \
  --namespace openebs-nfs-provisioner \
  --values values.yml
Upgrading the OpenEBS Dynamic NFS Provisioner Chart
You can check what versions are available to upgrade by navigating to the openebs/dynamic-nfs-provisioner official releases page from GitHub.
To upgrade the stack to a newer version, run the following command, replacing the &amp;amp;amp;lt;&amp;amp;amp;gt; placeholders with their corresponding information:
helm upgrade openebs-nfs-provisioner openebs-nfs/nfs-provisioner \
  --version <OPENEBS_DYNAMIC_NFS_PROVISIONER_STACK_NEW_VERSION> \
  --namespace openebs-nfs-provisioner \
  --values <YOUR_HELM_VALUES_FILE>
See helm upgrade for command documentation.
Uninstalling OpenEBS NFS Provisioner Stack
To delete your installation of openebs-nfs-provisioner,, run the following command:
helm uninstall openebs-nfs-provisioner -n openebs-nfs-provisionerNote:
-
The Helm uninstall command will delete all the associated Kubernetes resources installed by the
openebs-nfs-provisionerHelm chart, except the namespace itself. To delete theopenebs-nfs-provisioner namespaceas well, run the following command:kubectl delete ns openebs-nfs-provisioner -
You have to manually delete the DO block storage volume created by the NFS PVC used for testing, if no longer needed. You can do this either via the DigitalOcean volumes web panel, or
doctl:$ doctl compute volume list --format ID,Name,Size ID Name Size c1c46cab-e30b-11ec-932d-0a58ac14c29b pvc-150c7961-18ec-497f-8a3e-bb5e0d29299c 5 GiB f3c4cc73-e30b-11ec-99e3-0a58ac14c1da pvc-dec8c104-4542-4657-a5ae-661a5476dee2 1 GiBThen, delete the corresponding volume by ID. Please bear in mind that your volume ID might differ in the listing, so make sure to pick the right one and replace the
&amp;lt;&amp;gt;placeholders accordingly:doctl compute volume delete <YOUR_NFS_VOLUME_ID>