Apache Pulsar
Generated on 29 Jan 2024 from the Apache Pulsar catalog page
Apache Pulsar is a distributed, open source pub-sub messaging and streaming platform for real-time workloads, managing hundreds of billions of events per day.
Apache Pulsar offers many features, most notable being:
- Native support for multiple clusters in a Pulsar instance, with seamless geo-replication of messages across clusters.
- Very low publish and end-to-end latency.
- Seamless scalability to over a million topics.
- A simple client API with bindings for Java, Go, Python and C++.
- Multiple subscription types (exclusive, shared, and failover) for topics.
- Guaranteed message delivery with persistent message storage provided by Apache BookKeeper.
- A serverless light-weight computing framework Pulsar Functions offers the capability for stream-native data processing.
- A serverless connector framework Pulsar IO, which is built on Pulsar Functions, makes it easier to move data in and out of Apache Pulsar.
- Tiered Storage offloads data from hot/warm storage to cold/longterm storage (such as S3 and GCS) when the data is aging out.
On top of that, Apache Pulsar offers Prometheus Monitoring support for metrics related to the usage of topics, and the overall health of the individual components of the cluster.
Apache Pulsar Architecture Overview
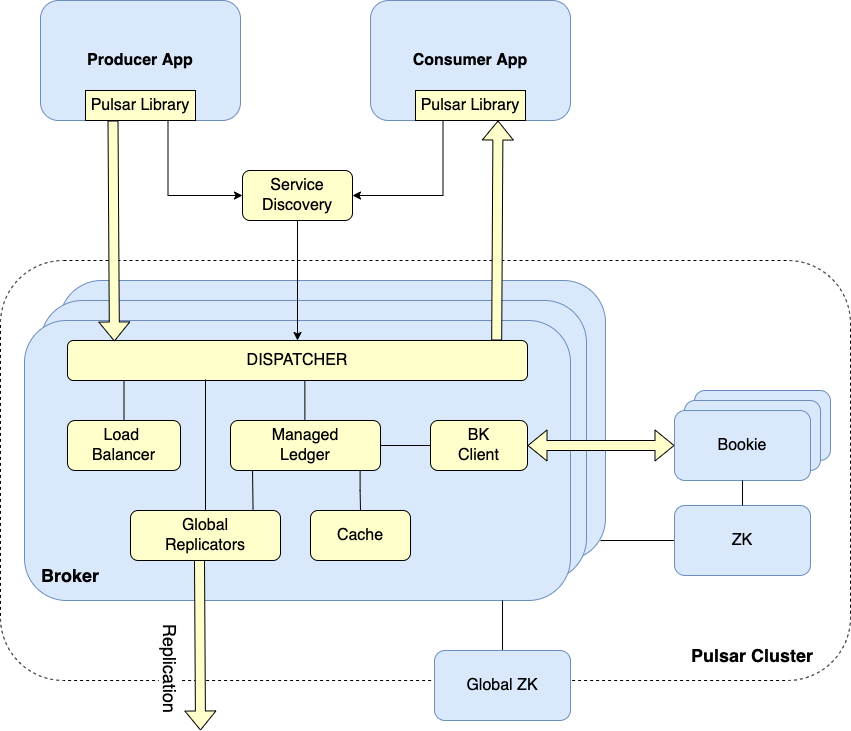
At the highest level, a Pulsar instance is composed of one or more Pulsar clusters. Clusters within an instance can replicate data amongst themselves.
Each Pulsar cluster is composed of:
- One or more brokers used to route messages between producers and consumers. Message brokers are also load balanced.
- A BookKeeper instance (called a Bookie) to handle messages persistence.
- A Zookeeper instance to handle coordination tasks between clusters.
Please visit the official documentation page for more information about Apache Pulsar clusters architecture and all involved components.
Below diagram illustrates the basic architecture of each Apache Pulsar cluster:
Notes:
- This stack requires a minimum configuration of 2 Nodes at the $20/month plan (4GB memory / 2 vCPU).
- A total of 70Gi block storage (split across 7 PVs) is required for topics persistence and Pulsar cluster metadata.
- This stack also includes a $10/month DigitalOcean Load Balancer to ensure that traffic is distributed across all proxy instances of your Pulsar clusters.
- DigitalOcean uses Helm v3 to deploy Apache Pulsar to your DOKS cluster.
Software Included
| Package | Version | License |
|---|---|---|
| Apache Pulsar | 3.0.2 | Apache 2.0 |
Creating an App using the Control Panel
Click the Deploy to DigitalOcean button to install a Kubernetes 1-Click Application. If you aren’t logged in, this link will prompt you to log in with your DigitalOcean account.

Creating an App using the API
In addition to creating Apache Pulsar using the control panel, you can also use the DigitalOcean API. As an example, to create a 3 node DigitalOcean Kubernetes cluster made up of Basic Droplets in the SFO2 region, you can use the following doctl command. You need to authenticate with doctl with your API access token) and replace the $CLUSTER_NAME variable with the chosen name for your cluster in the command below.
doctl kubernetes clusters create --size s-4vcpu-8gb $CLUSTER_NAME --1-clicks apache-pulsarGetting Started After Deploying Apache Pulsar
How to Connect to Your Cluster
Follow these instructions to connect to your cluster with kubectl and doctl.
Confirming that Apache Pulsar is Running
First, check if the Helm installation was successful by running the command below:
helm ls -n pulsarThe output looks similar to the following:
NAME            NAMESPACE       REVISION        UPDATED                                 STATUS          CHART           APP VERSION
apache-pulsar   pulsar          1               2023-06-15 07:03:30.307164 +0300 EEST   deployed        pulsar-3.1.0    3.1.0
The STATUS column value should be deployed.
Next, verify if Apache Pulsar pods are up and running:
kubectl get pods -n pulsarThe output looks similar to the following:
NAME                                            READY   STATUS      RESTARTS        AGE
apache-pulsar-bookie-0                          1/1     Running     0               8m31s
apache-pulsar-bookie-1                          1/1     Running     0               8m31s
apache-pulsar-bookie-init--1-v2plh              0/1     Completed   0               8m31s
apache-pulsar-broker-0                          1/1     Running     1 (4m42s ago)   8m32s
apache-pulsar-broker-1                          1/1     Running     0               8m32s
apache-pulsar-proxy-0                           1/1     Running     0               8m32s
apache-pulsar-proxy-1                           1/1     Running     0               8m31s
apache-pulsar-pulsar-manager-5dcf97f85f-tbvbf   1/1     Running     0               8m31s
apache-pulsar-pulsar-init--1-8zn69              0/1     Completed   0               8m31s
apache-pulsar-recovery-0                        1/1     Running     0               8m32s
apache-pulsar-toolset-0                         1/1     Running     0               8m32s
apache-pulsar-zookeeper-0                       1/1     Running     0               8m31s
apache-pulsar-zookeeper-1                       1/1     Running     0               8m31s
apache-pulsar-zookeeper-2                       1/1     Running     0               8m31s
All important pods such as Bookies, Brokers, Proxies and Zookeeper should be in a READY state with a STATUS of Running.
Tweaking Helm Chart Values
The Apache Pulsar stack provides some custom values to start with. See the values file from the main GitHub repository for more information.
You can inspect all the available options, as well as the default values for the Apache Pulsar Helm chart by running the following command:
helm show values apache/pulsar --version 3.1.0After customizing the Helm values file (values.yml), you can apply the changes via the helm upgrade command, as shown below:
helm upgrade apache-pulsar apache/pulsar --version 3.1.0 \
  --namespace pulsar \
  --values values.yml
Verifying the Apache Pulsar Setup
The Helm chart provided by the Apache Pulsar 1-click app deploys a toolset pod containing various utilities (e.g. pulsar-admin, pulsar-client). You can use the pulsar CLI tools to administer various resources such as tenants, namespaces and topics. Also, you can create consumers and producers to test pub/sub functionality.
For demonstration purposes you will learn how to create a tenant (called apache). Then, you will create the associated resources such as a dedicated namespace named pulsar, and a partitioned pub/sub topic named test-topic.
First, you will use the pulsar-admin CLI from the toolset container to create the apache tenant:
kubectl exec -it -n pulsar apache-pulsar-toolset-0 -- bin/pulsar-admin tenants create apacheThen, list all tenants to see if it was created successfully:
kubectl exec -it -n pulsar apache-pulsar-toolset-0 -- bin/pulsar-admin tenants listThe output looks similar to:
"apache"
"public"
"pulsar"
The apache tenant should be present in the listing.
Next, you will create a dedicated namespace named pulsar in the apache tenant to hold resources (such as pub/sub topics):
kubectl exec -it -n pulsar apache-pulsar-toolset-0 -- bin/pulsar-admin namespaces create apache/pulsarNow, check if the pulsar namespace was created in the tenant apache:
kubectl exec -it -n pulsar apache-pulsar-toolset-0 -- bin/pulsar-admin namespaces list apacheThe output looks similar to:
"apache/pulsar"The apache/pulsar value should be present in the output listing.
Now, you will learn how to create a partitioned pub/sub topic to send and read messages from. By default, Pulsar topics are served by a single broker. Partitioned topics are a special type of topic that can be handled by multiple brokers leading to much higher throughput.
You can use the pulsar-admin CLI tool, and create a 2 partition (-p 2) topic named test-topic in the apache/pulsar namespace:
kubectl exec -it -n pulsar apache-pulsar-toolset-0 -- bin/pulsar-admin topics create-partitioned-topic apache/pulsar/test-topic -p 2Next, list the available topics from the apache/pulsar namespace:
kubectl exec -it -n pulsar apache-pulsar-toolset-0 -- bin/pulsar-admin topics list-partitioned-topics apache/pulsarThe output looks similar to:
"persistent://apache/pulsar/test-topic"The test-topic should be present in the output listing. You can also notice that the test-topic data is persisted (denoted by the persistent prefix).
Finally, you can test the setup by setting a producer on one side, and a consumer on the other end. The toolset Pod provided by Pulsar contains a small utility to help you achieve this task called pulsar-client.
First, open a new terminal and set the consumer for the apache/pulsar/test-topic topic on one end:
kubectl exec -it -n pulsar apache-pulsar-toolset-0 -- bin/pulsar-client consume -s sub apache/pulsar/test-topic -n 0You will notice some debugging information dumped in the terminal before the client (or the consumer) is set up. The output looks similar to:
...
2022-06-15T08:35:52,936+0000 [pulsar-client-io-1-1] INFO  org.apache.pulsar.client.impl.MultiTopicsConsumerImpl - [apache/pulsar/test-topic] [sub] Success subscribe new topic persistent://apache/pulsar/test-topic in topics consumer, partitions: 2, allTopicPartitionsNumber: 2
Looking at the last line from the output, you can notice that the client successfully subscribed to the persistent://apache/pulsar/test-topic topic.
As a final step, open another terminal and create a producer to publish the hello apache pulsar message 10 times (-n 10 flag), using the apache/pulsar/test-topic topic:
kubectl exec -it -n pulsar apache-pulsar-toolset-0 -- bin/pulsar-client produce apache/pulsar/test-topic -m "---------hello apache pulsar-------" -n 10Check the consumer terminal - you should see the hello apache pulsar message published exactly 10 times:
----- got message -----
key:[null], properties:[], content:---------hello apache pulsar-------
----- got message -----
key:[null], properties:[], content:---------hello apache pulsar-------
----- got message -----
key:[null], properties:[], content:---------hello apache pulsar-------
----- got message -----
key:[null], properties:[], content:---------hello apache pulsar-------
----- got message -----
key:[null], properties:[], content:---------hello apache pulsar-------
----- got message -----
key:[null], properties:[], content:---------hello apache pulsar-------
----- got message -----
key:[null], properties:[], content:---------hello apache pulsar-------
----- got message -----
key:[null], properties:[], content:---------hello apache pulsar-------
----- got message -----
key:[null], properties:[], content:---------hello apache pulsar-------
----- got message -----
key:[null], properties:[], content:---------hello apache pulsar-------
If the output looks similar to above, then you configured Apache Pulsar correctly.
You can also configure external consumers or producers to use your Apache Pulsar cluster by pointing to the apache-pulsar-proxy service endpoint. Below command will print information about the apache-pulsar-proxy endpoint:
kubectl get svc/apache-pulsar-proxy -n pulsarThe output looks similar to:
NAME                  TYPE           CLUSTER-IP       EXTERNAL-IP      PORT(S)                       AGE
apache-pulsar-proxy   LoadBalancer   10.245.234.115   138.197.229.41   80:30742/TCP,6650:30318/TCP   4h49m
In the above output the Apache Pulsar proxy endpoint listens on port 6650, and uses the 138.197.229.41 public IP.
For securing Apache Pulsar public facing components (e.g. proxies), such as setting up TLS certificates and authorization, please visit the TLS setup, Authentication, and Authorization sections from the Apache Pulsar Helm installation documentation page.
Upgrading Apache Pulsar Stack
You can check what versions are available to upgrade, by navigating to the pulsar-helm-chart releases page on GitHub.
Then, to upgrade the Apache Pulsar stack to a newer version, please run the following command, replacing the <> placeholders:
helm upgrade apache-pulsar apache/pulsar \
  --version <APACHE_PULSAR_NEW_VERSION> \
  --namespace pulsar \
  --values <YOUR_APACHE_PULSAR_HELM_VALUES_FILE>
See helm upgrade for more information about the command. Also, please make sure the read the Upgrade guidelines from the Apache Pulsar official documentation page.
Uninstalling Apache Pulsar Stack
To delete your installation of apache-pulsar, run the following command:
helm uninstall apache-pulsar -n pulsarNote:
The command will delete all the associated Kubernetes resources installed by the apache-pulsar Helm chart, except the namespace itself. To delete the pulsar namespace as well, run the following command:
kubectl delete ns pulsarATTENTION: Deleting the pulsar namespace, will also remove all volumes created by the setup. It means, Bookkeeper and Zookeeper data will be gone. So, make sure to backup your data first !!!
Additional Resources
To study more about Apache Pulsar, you can visit the following topics: