DigitalOcean Launchpad Starter Kits
Last verified 17 Jun 2026
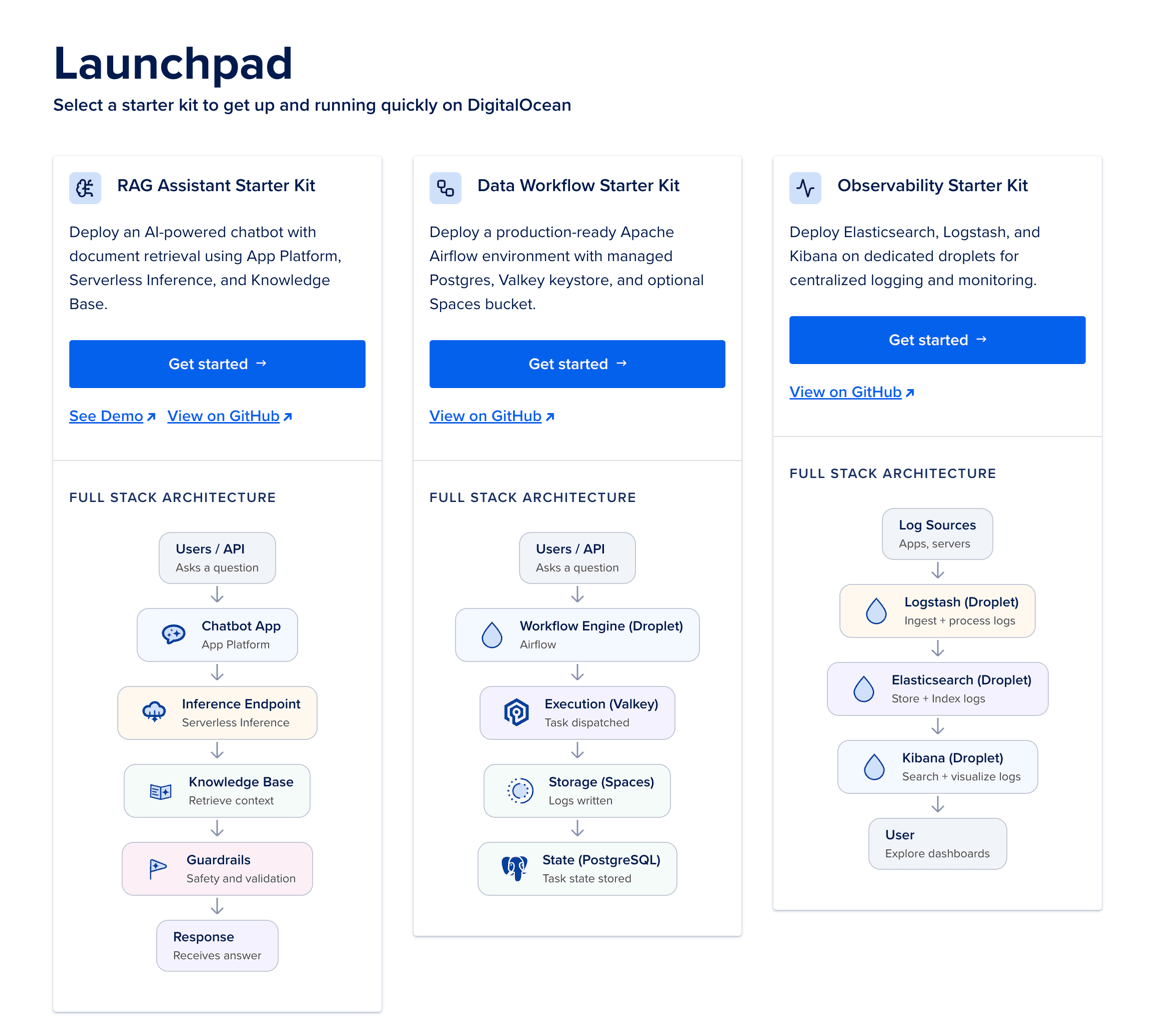
DigitalOcean Launchpad lets you deploy production-ready applications with minimal configuration. Choose a starter kit to deploy real infrastructure that you can extend as your needs grow.
Starter kits let you deploy preconfigured application stacks built on DigitalOcean resources you can manage, customize, or scale using GitHub or Terraform.
Starter kits combine several DigitalOcean products. Depending on the kit, the deployment may use App Platform, Inference, Agent Platform, Managed Databases, and Droplets.
You can deploy the following starter kits: RAG Assistant, Data Workflow, and Observability.
RAG Assistant
The RAG Assistant starter kit deploys a chat application backed by a knowledge base and an inference endpoint.
When a user sends a message, the application checks input guardrails, retrieves relevant document context, assembles a prompt, calls the inference model, optionally applies output guardrails, and returns an answer with citations.
What It Deploys
| Component | Role |
|---|---|
| App Platform | Hosts the chat UI and API that orchestrate retrieval and inference |
| Agent Platform | Runs the selected language model preset |
| Knowledge Base (KBaaS) | Stores embeddings and serves retrieval for your documents |
| Guardrails | Includes PII filtering, toxicity, and jailbreak checks |
| HTTPS | Managed TLS using App Platform |
Data Workflow
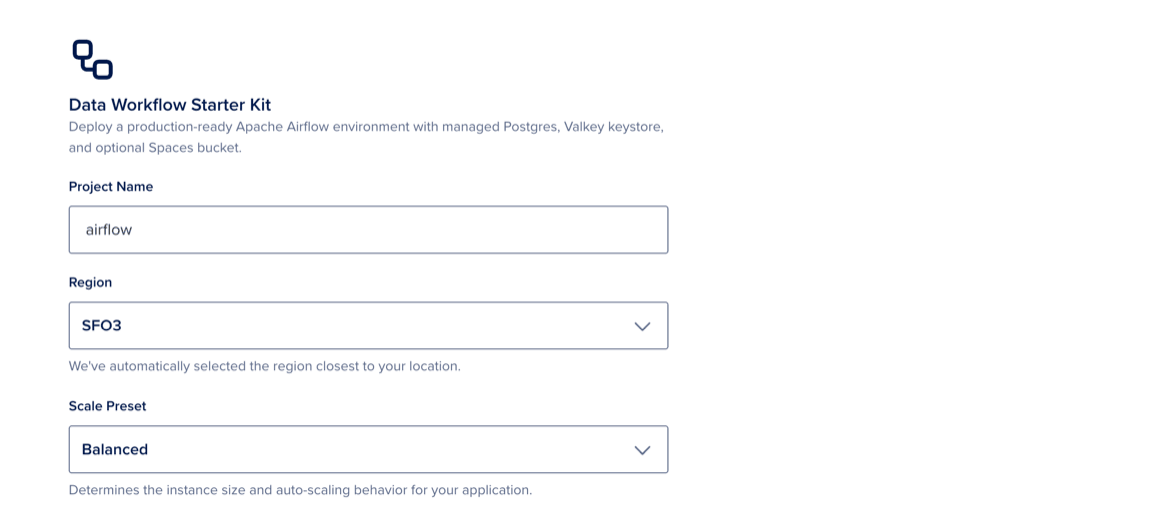
The Data Workflow starter kit provides a ready-to-use Apache Airflow environment backed by managed data services and object storage.
What It Deploys
| Component | Role | DigitalOcean resource |
|---|---|---|
| Airflow | Orchestration | Droplet |
| Airflow internal DB | Metadata database | Managed PostgreSQL |
| Celery broker | Task broker | Managed Valkey |
Observability
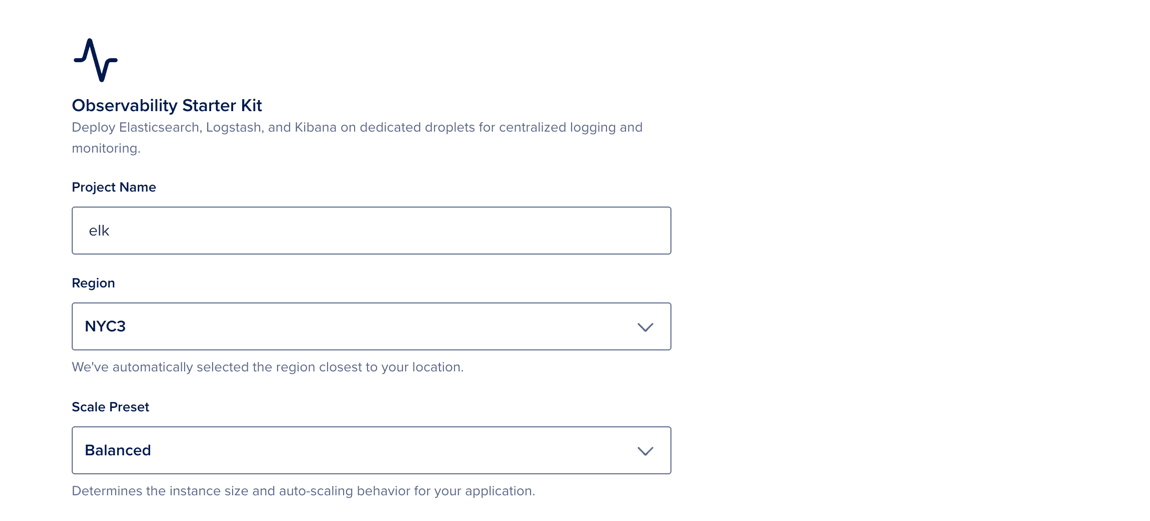
The Observability starter kit deploys a three-node pattern: Elasticsearch for storage and search, Logstash for ingestion and processing, and Kibana for visualization. Each runs on its own Droplet with kit-defined sizing.
What It Deploys
| Component | Role | DigitalOcean resource |
|---|---|---|
| Elasticsearch | Indexing and search | Droplet |
| Logstash | Log ingestion and processing | Droplet |
| Kibana | Visualization and dashboards | Droplet |
Overview
Pricing
Launchpad does not have additional costs beyond standard pricing for the resources each kit provisions. Estimated monthly infrastructure costs are shown on the configuration page before you deploy.
Inference usage for the RAG Assistant kit is consumption-based and may vary beyond the infrastructure estimate.
Features
- Console-first deployment with opinionated defaults and minimal configuration.
- Terraform-based provisioning runs in the background.
- Each deployment creates a dedicated DigitalOcean project that groups all provisioned resources.
- Post-deploy customization through a GitHub fork-and-reconnect workflow (RAG Assistant only).
- Kit repositories include Terraform configuration for CLI-driven deployments.
Availability
Launchpad is available in NYC3, SFO3, and AMS3. Region availability may vary by kit.
Feedback and Support
Our terms of service govern your use of DigitalOcean and cover details of eligibility, content, use, payments and billing, and warranties.
Prerequisites
To deploy a starter kit, you need:
- The Owner or Member role on the team. Modifier and Resource Viewer roles can view starter kits but cannot deploy them.
- Permission to create projects and to provision the resources the kit uses, such as App Platform apps, Managed Databases, Managed Valkey, Droplets, and Agent Platform agents, knowledge bases, and guardrails.
- Sufficient account limits for the resources the kit provisions. If your account is subject to limits, request a limit increase before deploying.
How to Deploy a Starter Kit
Go to the Launchpad page in the DigitalOcean Control Panel. Click Get started in the starter kit you want to create: RAG Assistant, Data Workflow, or Observability.
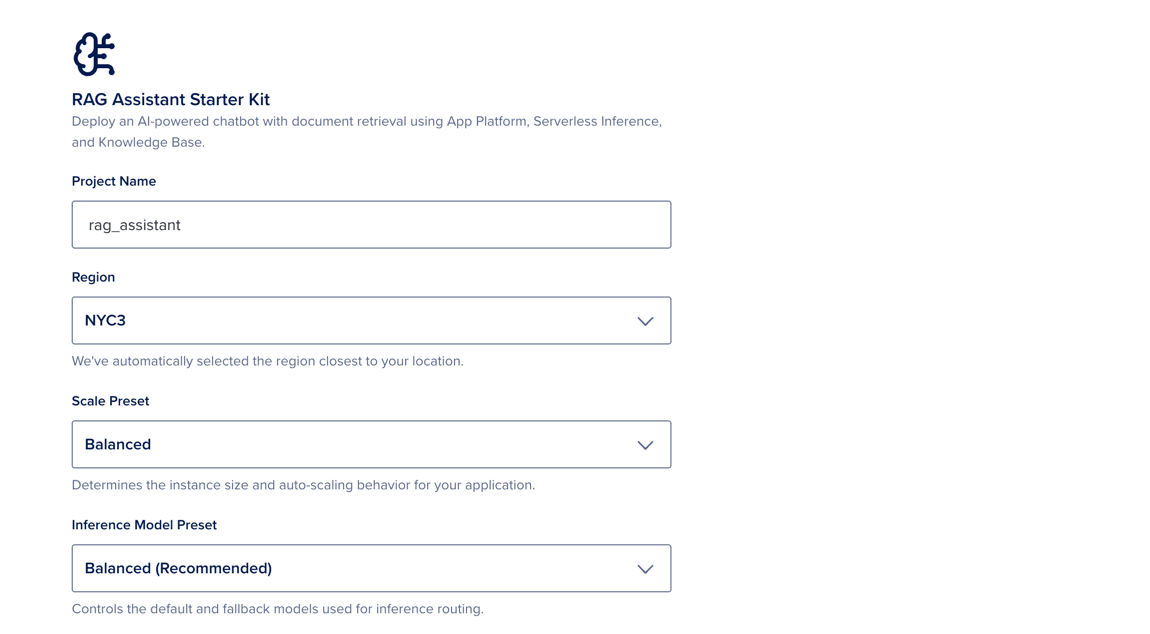
On the Customize Starter Kit Resources page, set the following:
- Project Name: A name for the project that organizes the starter kit’s deployed resources.
- Application Name: A name for the deployed application, such as
docs-chat,support-assistant, orproduct-faq. - Region: The datacenter region for all deployed resources. The region closest to your location is selected by default.
- Scale Preset: Determines the instance size and auto-scaling behavior for your application. Choose Lowest Cost, Balanced, or Highest Performance.
- Inference Model Preset: Sets the model for the kit. Options are Balanced (Recommended), Fast & Cost Efficient, or High Accuracy & Complex Reasoning.
Review the monthly cost of the application shown in the Summary section. When finished, click Deploy.
When the deployment completes, click Open Application or copy the URL displayed. Click Go to Project to view and manage the application’s resources in the project created for the starter kit.
Under Next Steps:
- To add content to the knowledge base, click Upload Data. Adding your own data improves the relevance of the assistant’s responses.
- To view or modify the underlying infrastructure configuration, click View in Terraform. For the command-line workflow, see Deploy with Terraform.
On the Customize Starter Kit Resources page, set the following:
- Project Name: A name for the project that organizes the starter kit’s deployed resources.
- Region: The datacenter region for all deployed resources. The region closest to your location is selected by default.
- Scale Preset: Determines the size of the compute resources for your application. Choose Lowest Cost, Balanced, or Highest Performance.
In the SSH keys section, click Add SSH Key. In the Add a public SSH key window, paste an existing public SSH key into the SSH Key content field or follow the steps to generate an SSH key. Enter a name for the key, then click Add SSH Key.
Review the monthly cost of the application shown in the Summary section. When finished, click Deploy.
When the deployment completes, click Open Application or copy the URL displayed. You can view and manage the application’s resources by selecting the project created for the starter kit.
To work with the kit’s code, click Customize App to open the repository on GitHub, or see Customize Data Workflow or Observability for SSH and Terraform customization.
On the Customize Starter Kit Resources page, set the following:
- Project Name: A name for the project that organizes the starter kit’s deployed resources.
- Region: The datacenter region for all deployed resources. The region closest to your location is selected by default.
- Scale Preset: Determines the size of the compute resources for your application. Choose Lowest Cost, Balanced, or Highest Performance.
In the SSH keys section, click Add SSH Key. In the Add a public SSH key window, paste an existing public SSH key into the SSH Key content field or follow the steps to generate an SSH key. Enter a name for the key, then click Add SSH Key.
Review the monthly cost of the application shown in the Summary section. When finished, click Deploy.
When the deployment completes, click Go to Project to view or manage the deployed resources.
To work with the kit’s code, click Customize App to open the repository on GitHub, or see Customize Data Workflow or Observability for SSH and Terraform customization.
Use a Starter Kit
After deployment, allow 2-3 minutes for the knowledge base to finish indexing and the App Platform build to complete.
The kit creates the knowledge base with a placeholder data source so it can be provisioned. Indexing the placeholder counts toward standard knowledge base usage. Replace it with your own data as soon as possible to avoid unnecessary indexing charges.
-
To open the chat UI, click Open Application on the deploy completion page or copy the displayed URL. The chat interface lets you ask questions and receive answers grounded in the knowledge base.
-
The knowledge base is seeded with a placeholder document. To add your own:
- In the Control Panel, click Agent Platform in the left menu, then go to the Knowledge Bases tab.
- Select the knowledge base the kit created. Its name uses the pattern
<basename>-<suffix>-kb. - Add documents. See Create and Manage Agent Knowledge Bases for supported data sources and details.
- Wait for indexing to complete.
-
In the chat UI, ask questions about your documents. The assistant returns grounded answers, with citations when available.
After deployment, allow a few minutes for Airflow to finish initializing.
- To open the Airflow dashboard, navigate to
http://<airflow-droplet-ip>in your browser. The Droplet’s IP address is shown on the deploy completion page and in the project created for the kit. - To retrieve the Airflow login credentials, connect to the Airflow Droplet using SSH. The default user is
admin. The password is printed in the Droplet’s message of the day on first SSH login, and is also saved on the Droplet at/root/.digitalocean_passwords. - Log in to Airflow as the
adminuser. After login, the dashboard lists preinstalled example DAGs that demonstrate the kit’s connections. - To view configured connection details, go to Admin > Connections.
Airflow runs as a systemd service on the Droplet, with Managed PostgreSQL as the metadata database and Managed Valkey as the Celery broker. To enable HTTPS, run the preinstalled Certbot on the Droplet. See the Apache Airflow security documentation for additional hardening guidance.
For the full setup walkthrough, see the Apache Airflow Blueprint listing on the DigitalOcean Marketplace.
After deployment, allow 5-6 minutes for the Elasticsearch, Logstash, and Kibana Droplets to finish self-configuring.
-
To open Kibana, navigate to
http://<kibana-droplet-ip>:5601in your browser. The Kibana Droplet’s IP address is shown on the deploy completion page and in the project created for the kit.If Kibana shows
Kibana server is not ready yet., wait a moment. Elasticsearch is still applying its security configuration. -
To retrieve the Kibana login credentials, connect to the Elasticsearch Droplet using SSH. The Elastic, Kibana, and Logstash user passwords are stored in
/root/.digitalocean_passwords. -
Log in to Kibana as the
elasticuser.
Logstash is preconfigured with syslog inputs on 1514/UDP and 10514/TCP. Logs are written to the logstash-syslog index in Elasticsearch. The Logstash Droplet uses the logstash user with the logstash_writer role for write access to logstash-* indices.
The kit enables X-Pack basic security and does not include an Elastic license. If your use case requires a paid license, see Elastic licensing.
For the full setup walkthrough, see the ELK Blueprint listing on the DigitalOcean Marketplace.
Customize After Deploy
Customize RAG Assistant
The RAG Assistant is an App Platform app. To customize the application code:
- Fork the
rag-assistantblueprint into your GitHub account or organization, and make your changes. - Update the App Platform app to point at your fork by following Manage an App’s Source Repository.
After App Platform reconnects to your fork, future pushes to the configured branch automatically trigger a redeploy.
Customize Data Workflow or Observability
The Data Workflow and Observability kits run on Droplets. To customize them, connect to the Droplets using SSH, or use Terraform to change the infrastructure configuration.
Deploy with Terraform
Each starter kit’s GitHub repository includes Terraform configuration. You can clone a kit repo, set variables, and run terraform apply locally with a DigitalOcean API token.
Prerequisites
- Terraform installed locally
- A DigitalOcean personal access token with scopes sufficient for the resources the kit creates
gitto clone the repository
Clone the Kit Repository
The starter kits live in the marketplace-blueprints repository. Clone the repository and change into the kit’s directory:
git clone https://github.com/digitalocean/marketplace-blueprints.git
cd marketplace-blueprints/blueprints/<kit>
The kits live at:
blueprints/rag-assistant(RAG Assistant)blueprints/airflow(Data Workflow)blueprints/elk(Observability)
Authenticate Terraform with DigitalOcean
Each kit defines a do_token Terraform variable. Pass your DigitalOcean API token to Terraform using either of these methods:
-
Export the token as
TF_VAR_do_tokenin the shell where you run Terraform:export TF_VAR_do_token=<your-token> -
Or set the
do_tokendefault in the kit’svariables.tf.
Configure Variables
Open variables.tf and set values appropriate for your deployment:
region: The DigitalOcean region for the kit’s resources. Defaults vary by kit.- For the Data Workflow and Observability kits, set
ssh_key_idsto the SSH key IDs you want installed on the Droplets. To find your key IDs, install doctl and rundoctl compute ssh-key list. - Other variables (sizes, model selections, agent configuration) are documented in the file’s comments and in the kit’s README.
Keep defaults unless you understand the impact on cost and behavior.
Initialize and Apply
From the repository root:
terraform init
terraform apply
Review the planned resources. When prompted, confirm to create infrastructure.
On success, Terraform outputs should include URLs or hostnames documented in the kit README (for example an App Platform URL or load balancer hostname).
Update the Stack
Change variables or module inputs, then run:
terraform applyTerraform performs in-place updates where the provider supports them. Destructive changes depend on the module design.
Limitations and Known Issues
- Real-time per-resource deployment status is not available. The Control Panel shows overall progress.
- Post-deploy code customization of the RAG Assistant requires a manual GitHub fork workflow. Automated forking is not supported in this release.
doctlCLI integration is not available. Use Terraform for command-line deployments.- Infrastructure configuration options are limited. Each component exposes three or fewer editable fields. Use Terraform for advanced configuration.
- Deployed applications may be publicly accessible by default. Authentication and access control within the application are handled by the kit template, not the platform.