Automatic garbage collection is available in public preview. When enabled, your registry automatically cleans up unreferenced layers without read-only downtime. To opt in, go to your container registry in the Control Panel and click Enroll in Public Preview.
How to Free Up Space in Your Container Registry
Last verified 7 Apr 2026
The DigitalOcean Container Registry (DOCR) is a private Docker image registry that lets you store and manage private container images. DOCR integrates natively with Docker environments and DigitalOcean Kubernetes clusters.
Manage Images and Tags
To manually delete images and tags in your registry:
-
Go to Container Registry in the Control Panel.
If you have a live registry and you have pushed images to it, the images are listed here.
-
Click the plus, +, next to a repository to see its image versions and each version’s tags. You can also see untagged images here, which we recommend deleting manually or through garbage collection.
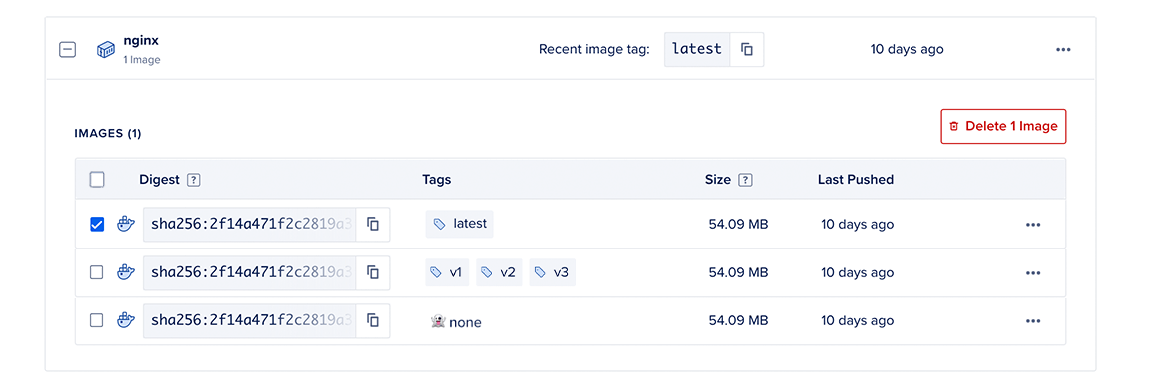
-
Choose whether to delete digests or tags:
-
To delete a digest, click the checkbox next to the image digest you want to delete, or click the checkbox to the left of the table’s header to select all digests. Then, click Delete image(s) at the top right of the table. In the Delete digest(s) window, enter your registry name in the Registry name field, and click Destroy.
You can also delete the digest by clicking the … menu to the right of an image version and selecting Delete Digest. Enter your registry name in the Registry name field, and click Destroy.
Deleting digests also deletes their associated tags.
-
To delete a tag, click the … menu to the right of an image version and select Delete Tags to open the Delete tag(s) window. If you want to also remove untagged images, select the Delete this digest from the image history checkbox. Enter your registry name in the Registry name field and click Destroy.
-
Run Garbage Collection
When you manually delete an image manifest from the DigitalOcean Container Registry (DOCR), it may leave layer data that is no longer referenced by any manifest in your registry. These unused layers occupy space in your registry. You can check the amount of space being used in your registry in the control panel. Use garbage collection to clean up the unused image layers and free up storage in your registry.
Considerations
-
Your registry is temporarily put into a read-only mode while garbage collection is running.
-
After entering read-only mode, DOCR must wait for any previous authentication for write operations to expire before starting garbage collection. This can take up to 15 minutes, depending on when the last write operation started.
Run Garbage Collection in the Control Panel
In the control panel, you can monitor how much unused data your repository currently has and start garbage collection.
Go to the registry page in the control panel. In the Repositories tab, the Garbage Collection section displays how much unused data is currently being stored in your repository.
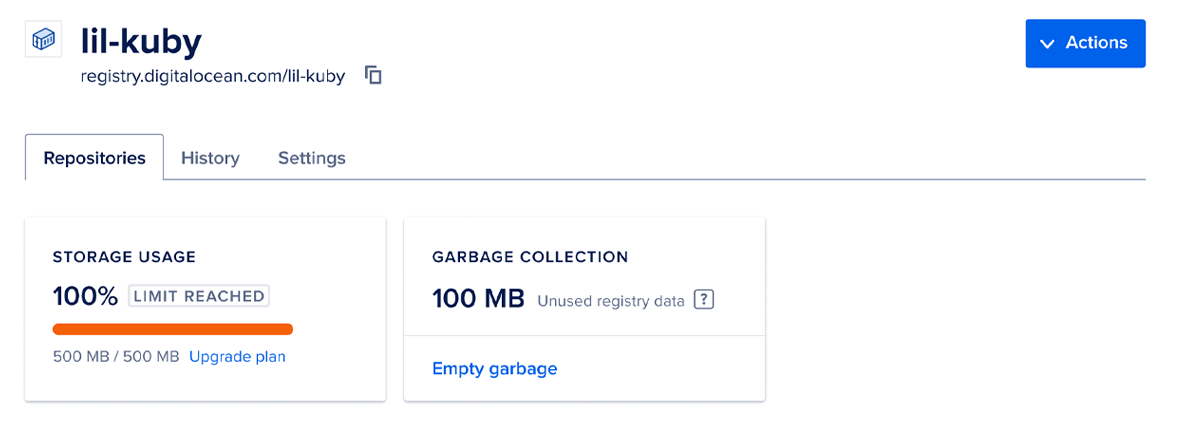
If there is any unused data displayed, click Empty garbage to open the Run garbage collection window. If the repository is storing untagged image manifests, you can delete them during garbage collection by checking Delete untagged manifests. We recommend this option to free up even more storage in your repositories, as untagged image manifests are conventionally outdated and unused.
When you’re ready, click Empty Garbage to remove unused data from the repository.
The Repositories tab displays when the garbage collection process is underway. You can cancel garbage collection before it completes by clicking Cancel Garbage Collection. If you cancel garbage collection, the Repositories tab displays how many blobs have already been deleted up to that point and how much space has been freed, and provides a link to view more details.
Once the garbage collection finishes, the Garbage Collection section displays that you have no unused registry data.
You can view all of a registry’s previous garbage collections in the History tab’s expandable list of registry events.
Run Garbage Collection in the Command Line
You can manually start garbage collection using the command line and the API.
Run the garbage-collection command to start garbage collection on your container registry:
doctl registries garbage-collection start [--include-untagged-manifests] [<your-registry-name>]The command initiates garbage collection and warns you that the registry is changed to read-only mode. The garbage collection starts once you confirm to proceed. The command also provides the UUID of the garbage collection. We recommend including the --include-untagged-manifests option since this ensures that untagged manifests are also deleted, thereby maximizing the amount of space freed by the garbage collection.
To retrieve information about the currently-running garbage collection, run the following command:
doctl registries garbage-collection get-active [<your-registry-name>]To cancel any currently-active garbage collections for your registry, run the following command:
doctl registries garbage-collection cancel [<your-registry-name>] <gc-uuid>To view a registry’s previous garbage collections, run the following command:
doctl registries garbage-collection list [<your-registry-name>]