How to Evaluate Agent Performance on DigitalOcean Gradient™ AI Platform
Validated on 1 Jul 2025 • Last edited on 29 Jan 2026
DigitalOcean Gradient™ AI Platform lets you build fully-managed AI agents with knowledge bases for retrieval-augmented generation, multi-agent routing, guardrails, and more, or use serverless inference to make direct requests to popular foundation models.
Agent evaluations help you to measure how well your agent performs across a variety of criteria, including response quality, safety, instruction following, and tool handling. You can run evaluations on individual agents or across all agents in a workspace using customizable test cases and prompts that define what you want to measure and how. Evaluations can provide useful feedback to help you tweak and improve your agent’s responses.
Create an Evaluation Test Case
Test cases are templates you configure with the metrics and data you want to use to test your agents. For example, you can set up a test case to specifically measure the tone and safety of responses, and then have a second test case that measures for contextual accuracy and other Retrieval-Augmented Generation (RAG) related qualities.
Test cases are linked to the workspaces you create them in and you cannot move them to other workspaces.
To create a test case from the DigitalOcean Control Panel, in the left hand menu, click Agent Platform. From the Workspaces tab, click the workspace you want to create a test case for. In the Agents tab, click Actions, and then select Create evaluation test case from the drop-down menu.
Select Metrics for Scoring
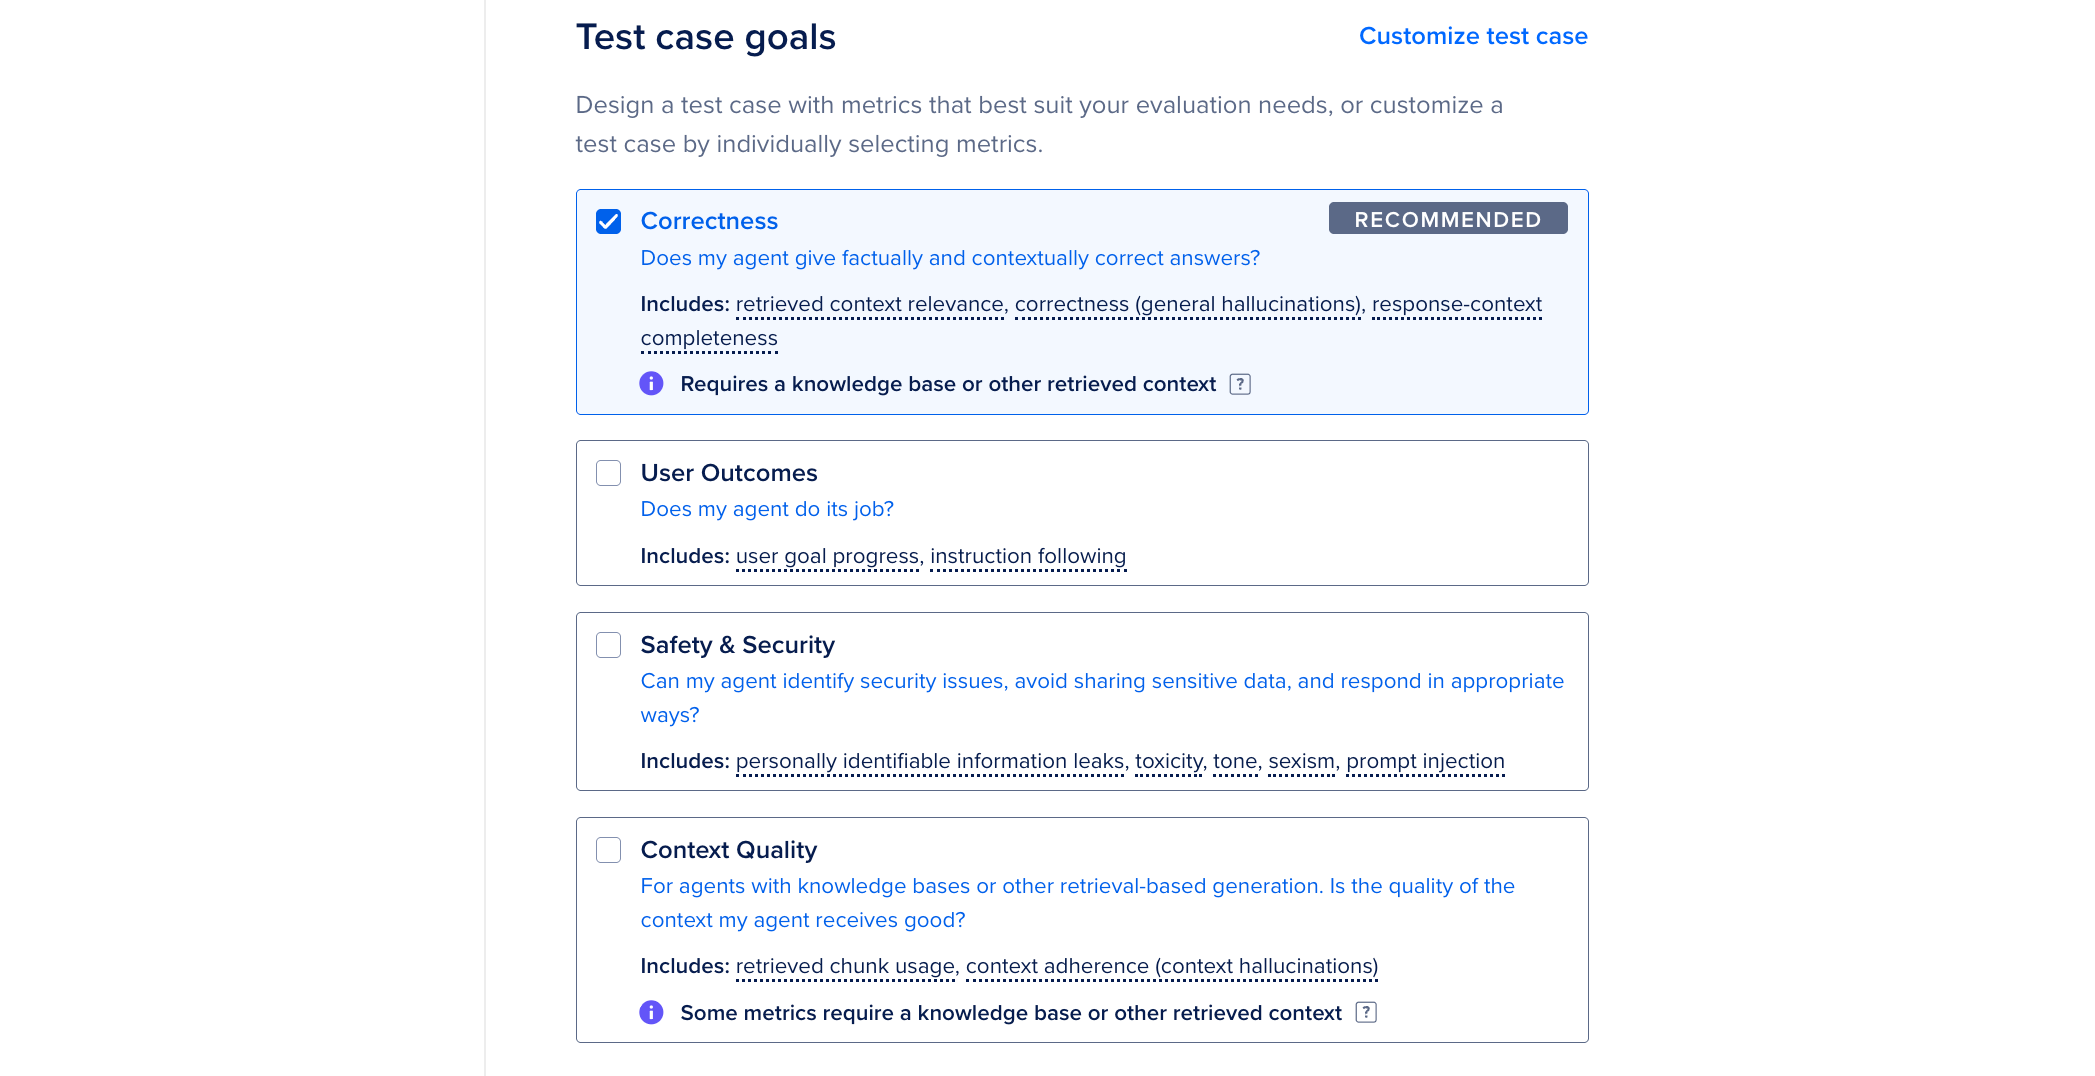
In the Test case goals section on the Set up an evaluation test case page, you can see the available evaluation metrics. The metrics are divided into the following categories:
-
Correctness: Target the overall factual and contextual correctness of your agent response standpoint. This category is the most foundational category when evaluating agent performance and is selected by default.
-
User Outcomes: Focus on how well your agent does its job and helps your users reach their goals.
-
Safety & Security: Measure your agent’s ability to identify and appropriately respond to common attack vectors and security concerns, as well as the overall agent tone.
-
Context Quality: Cover the quality of any context your agent receives and your agent’s ability to retrieve relevant or useful context. Select this category if your agent does any tool calling or has any RAG capabilities.
See our evaluation metrics reference page for detailed descriptions of each metrics and how they’re scored.
We recommend customizing the test case metrics to test for a very specific scenario, or to create a test case with all possible metrics selected. To customize the test case, select Customize test case. In the Customize test case metrics window, select any combination of metrics from the categories or click the check boxes next to each metric category to select all metrics in that category. Evaluation test cases require at least one selected metric. If you select a metric that your agent does not have the required resources to score, for example, if you select a Context Quality metric but your agent does not have attached tools or a knowledge base, that metric will not be scored and you won’t be charged for token usage for that metric. Once you have selected the metrics, click Save metrics.
Some metrics require an LLM-as-judge to score them. For these metrics, we send your agent inputs, outputs, and retrieved context to OpenAI for scoring and score rationale. DigitalOcean has a zero-data-retention policy with OpenAI, so your data is never stored outside of DigitalOcean, and your data is not used to train OpenAI models. Score rationale is automatically generated and may contain errors or omissions. Make sure to review and verify any results before relying on them.
Select Star Metric and Threshold
Next, confirm your star metric. Star metric is the north star and the most important metric you want to measure for your agent for the test case. The star metric is auto-selected based on the metrics you choose, but you can change it by clicking Change. In the Select star metric window, choose from any other available metrics to serve as your north star. Click Update Star Metric to confirm your selection.
Next, in the Star metric pass threshold field, set the passing score threshold for your star metric. This threshold is an arbitrary score that you consider a passing score for your agent and determines whether the run passes or fails. It may take reviewing the results of a few runs and adjusting the scoring threshold to meet your needs of what you consider a passing for failing score. For example, if you want to ensure your agent is safe and does not generate harmful content, you can select the Toxicity metric as your star metric, and if the agent fails to meet the passing score for the toxicity metric, the test case star metric gets a failing score.
Select Evaluation Dataset
In the What Data Should We Use For This Test Case? section, add your test prompt dataset. Datasets must be in CSV format and contain a query column, like this:
query
"What makes DigitalOcean different from other cloud providers?"
"Explain the benefits of using DigitalOcean for startups."
...
We recommend having 50 to 100 prompts to get a good representative sample of your agent’s behavior. Your dataset can have a maximum of 500 prompts.
For additional guidance on how to write test prompts for your agents, see How to Create an Evaluation Dataset.
To add the dataset, click Add dataset, select your CSV file from your local machine, and then click Add. The file is uploaded to your test case. You can only add one dataset for a test case.
Finally, give the test case a name and an optional description.
Test cases use your agent’s current configuration to perform evaluation runs and you are charged for the tokens used during the evaluation runs. Costs may vary based on agent configuration and dataset size. Because agent responses are non-deterministic, costs may vary slightly from run to run, even if nothing about the agent configuration or dataset changes.
Create Test Case
In the Final Details section, review the test case configuration and make any necessary adjustments. To create the test case, click Create test case. This adds the test case to your workspace. You can view it by clicking the workspace’s Evaluation tab. You can edit the test case by clicking the … menu beside the evaluation and selecting Edit test case configuration.
Run an Evaluation
Once you have created a test case, you can use it to run an evaluation on the agents in your workspace.
To run an evaluation from the DigitalOcean Control Panel, in the left menu, click Agent Platform. From the Workspaces tab, click the workspace you want to run an evaluation on, then click the Evaluations tab in the workspace. From the list of evaluations, click the … menu beside the evaluation you want to run, and then select Run Evaluation.
On the Run an evaluation page, select which agents you want to run the evaluation on by clicking the checkboxes beside each agent. You can run the evaluation on all agents in the workspace by selecting the Select All option.
Next, give the run a name to distinguish it from past and future runs. We append each run name with a unique ID that allows you to more easily reference runs.
To evaluate your data, we use a third party LLM-as-judge for scoring. By continuing, you acknowledge that your agent input and output may be sent to and processed by OpenAI to generate scores and score rationale. Score rationale is automatically generated and may contain errors or omissions. Make sure to review and verify any results before relying on them.
Click Run Evaluation to start the run. The run starts and directs you to the run’s overview page where you can view its progress. Runs may take several minutes to complete depending on the complexity of your model’s configuration and prompts.
Review Run Results
Once a run finishes, you can view its results in the control panel by clicking on the workspace’s Evaluations tab and then clicking the test case you previously ran. The test case’s overview page lists the runs for each agent in the Test case runs section.
To review the results of a run, either click on the + button beside a run to open a list of metric scores, or click on the run’s name to open the run’s overview page. The run’s overview page displays the test case’s configuration, total time to run the evaluation, run cost, and the score for each metric evaluated.
The Scores tab displays the average scores for each metric across all the prompts in the dataset. The Prompts tab displays the list of prompts used in the run and allows you to review how the agent responded to each prompt.
To review how the agent responded to each prompt, click the Prompts tab, locate the prompt you want to review details for, and then click Prompt details for that prompt. The prompt details page displays the following information:
- Input, your test prompt.
- Agent response, the content the agent responded with to the input.
- Metric scores, how the individual response score across your selected metrics.
- Retrieved data from knowledge bases, the data retrieved from your knowledge bases to form the response.
The details page also displays how many input and output tokens the agent used during the request.
After reviewing the results of your run, you can adjust your model in various ways to improve your agent’s responses. This includes:
- Providing additional context to your agent by attaching knowledge bases that contain custom data.
- Adding or updating guardrails to keep the agent from responding in undesirable ways.
- Using the Agent Playground to refine the agent’s model setting and instructions (system prompt).
Once you’ve adjusted your agent’s configuration, you can re-run the evaluation to see if the agent’s responses have improved and continue to adjust as needed.
Run Evaluations on Agents Built with Agent Development Kit
To learn how to run evaluations on agent deployments, see Run Evaluations on Agent Deployments.