
Deploy an App Using Websockets to App Platform
Websockets allow you to expose real-time data from your application. Websockets operate as a bidirectional communications channel using HTTP through a TCP connection. Examples of software that use websockets includes financial tickers, live updates for sports scores, location-based apps, and collaborative text editors. In all of these use cases, it’s useful for the client and server to have an open connection, over which they freely communicate in real time.
In this tutorial, you will build a Node.js app using Express and make the app available to internet traffic via Node’s websocket package.
Prerequisites
To complete this tutorial, you’ll need:
- A GitHub account to host the app’s codebase.
- A local development environment for Node.js to run the Node app in this tutorial. Follow How to Install Node.js and Create a Local Development Environment.
- A text editor to write code in for this Node project. You can use Visual Studio Code or your favorite text editor.
Step 1: Create an Express Web Server
In this step, you’ll install the Express and Websocket packages using the npm package manager and then add the boilerplate code to set up an Express server. The Express server will host the app.
First, open a terminal window and create a new project directory and then navigate to the new directory.
$ mkdir sample-websocket
$ cd sample-websocket
At this point, you can initialize a new npm project. This creates a package.json for your Node.js project:
$ npm init -y
Next, install the express and ws packages. Express is a web application framework for Node.js that you will use to start a web server. ws is a Node.js websocket library. Run the following command to add express and ws to your package.json file’s list of dependencies:
$ npm install express ws
You’re now ready to start building the Express web server. Create an index.js file in the root directory of your project and add the following code to it. This file creates and configures a new websocket server using the websocket (ws) Node.js package. When a connection is established with the server, this code sends the process’ memory usage to the client.
'use strict';

const express = require('express');
const path = require('path');
const { createServer } = require('http');

const WebSocket = require('ws');

const app = express();
app.use(express.static(path.join(__dirname, '/public')));

const server = createServer(app);
const wss = new WebSocket.Server({ server });

wss.on('connection', function (ws) {
  const id = setInterval(function () {
    ws.send(JSON.stringify(process.memoryUsage()), function () {
      //
      // Ignoring errors.
      //
    });
  }, 100);
  console.log('started client interval');

  ws.on('close', function () {
    console.log('stopping client interval');
    clearInterval(id);
  });
});

server.listen(8080, function () {
  console.log('Listening on http://0.0.0.0:8080');
});
Step 2: Create Content to Serve
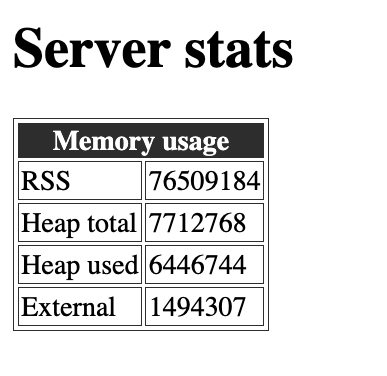
Now that you’ve created a web server, it is time to create content for it to serve. The code in the prior step configures the app to serve the app’s current memory usage. Because you are using websockets, the app can update the memory usage in real-time. In this step, you will create a /public directory that contains an index.html file that will display the app’s memory usage in a table.
In the app’s root directory, create a folder directory public. Then create an index.html file and add the following HTML code to it. By default, Node.js looks for an index.html to serve.
<!DOCTYPE html>
<html lang="en">
  <head>
    <meta charset="utf-8">
    <title>Server stats</title>
    <style>
      table, td {
        border: 1px solid #333;
      }

      thead {
        background-color: #333;
        color: #fff;
      }
    </style>
  </head>
  <body>
    <h1>Server stats</h1>
    <table>
      <thead>
        <tr>
          <th colspan="2">Memory usage</th>
        </tr>
      </thead>
      <tbody>
        <tr>
          <td>RSS</td>
          <td id="rss"></td>
        </tr>
        <tr>
          <td>Heap total</td>
          <td id="heapTotal"></td>
        </tr>
        <tr>
          <td>Heap used</td>
          <td id="heapUsed"></td>
        </tr>
        <tr>
          <td>External</td>
          <td id="external"></td>
        </tr>
      </tbody>
    </table>
    <script>
      (function() {
        const rss = document.getElementById('rss');
        const heapTotal = document.getElementById('heapTotal');
        const heapUsed = document.getElementById('heapUsed');
        const external = document.getElementById('external');

        // will not use tls if the connection is not made over https
        const protocol = window.location.protocol.includes('https') ? 'wss': 'ws'
        const ws = new WebSocket(`${protocol}://${location.host}`);


        ws.onmessage = function(event) {
          const data = JSON.parse(event.data);

          rss.textContent = data.rss;
          heapTotal.textContent = data.heapTotal;
          heapUsed.textContent = data.heapUsed;
          external.textContent = data.external;
        };
      })();
    </script>
  </body>
</html>
Step 3: Create a Start Command
Now that you have set up the server and content to serve, you will configure the server’s start command. This tells Node.js to start the server with the index.js file you created in the prior steps.
Open the app’s package.json file and replace the value of the scripts field with the following start script.
{
  "name": "sample-websocket",
  "version": "1.0.0",
  "description": "",
  "main": "index.js",
  "scripts": {
    "start": "node index.js"
  },
  "keywords": [],
  "author": "",
  "dependencies": {
    "express": "^4.17.3",
    "ws": "^8.5.0"
  }
}
Step 4: Run the App Locally
Once you create a start command, you’re ready to run the app and start making websocket connections locally. In this step, you will run the app on your computer and validate that a websocket connection is being made.
Start the app by running the npm start command you’ve added to the package.json. The command returns a message stating that the server is listening on port 8080.
$ npm start

> [email protected] start
> node index.js

Listening on http://0.0.0.0:8080
Now that the app is running locally, validate that you can connect to it by opening a web browser and navigating to http://0.0.0.0:8080.
Step 5: Add a .gitignore File
Before you push this code to GitHub, create a .gitignore file to prevent git from uploading the app’s Node.js modules to the app’s repo. This helps to keep the app’s repo more organized and lightweight by removing dependencies that future users can install on their own using the package.json file.
To create a .gitignore file at the root of your project, open a blank document in your preferred text editor and add node_modules directory to the file like this:
node_modules/
Then save the file with the file name .gitignore.
Step 6: Push the Site to GitHub
DigitalOcean’s App Platform allows you to deploy your code directly from GitHub repositories. In this step, you will initialize the app’s directory as a GitHub repo, commit the app’s files to the repo, then push the contents of the repo up to a remote repo in your GitHub account.
To do this, initialize your project directory containing the app’s files as a git repository:
$ git init
Now stage the files for commit using the git add command. The period ( . ) tells git to stage only new and modified files in the directory.
$ git add .
After you have staged the files, commit them to the repo:
$ git commit -m "Initial Websocket App"
git commits all of the files in the repository with the exception of any files specified in the .gitignore file. The command returns output that looks like this:
[secondary_label Output]
[master (root-commit) 3399f07] Initial Websocket App
 5 files changed, 1016 insertions(+)
 create mode 100644 .gitignore
 create mode 100644 index.js
 create mode 100644 package-lock.json
 create mode 100644 package.json
 create mode 100644 public/index.html
Open your browser and navigate to GitHub. Log in to your account and create a new, empty repository called sample-websocket.
Once you’ve created the repository, return to the terminal and prepare to push the app’s local files to GitHub.
To push the local files to the GitHub repo, link the new created remote repo to the app’s local repo on your machine:
git remote add origin https://github.com/your_username/sample-websocket
Next, rename the default branch to main, to match what GitHub expects:
git branch -M main
Finally, push your main branch to the remote repo’s main branch:
git push -u origin main
The push command returns the following output:
[secondary_label Output]
Enumerating objects: 8, done.
Counting objects: 100% (8/8), done.
Delta compression using up to 12 threads
Compressing objects: 100% (6/6), done.
Writing objects: 100% (8/8), 6.73 KiB | 2.24 MiB/s, done.
Total 8 (delta 0), reused 0 (delta 0), pack-reused 0
remote: This repository moved. Please use the new location:
remote:   [email protected]:digitalocean/sample-websocket.git
To github.com:digitalocean/sample-websocket
 * [new branch]      main -> main
Branch 'main' set up to track remote branch 'main' from 'origin'.
Enter your GitHub credentials when prompted to push your code.
In your web browser, open the remote repo to ensure that the code was pushed up to GitHub.
After you’ve verified that the code has been pushed, the app’s code is now on GitHub and you are ready to deploy it to DigitalOcean’s App Platform.
Step 7: Deploy to DigitalOcean with App Platform
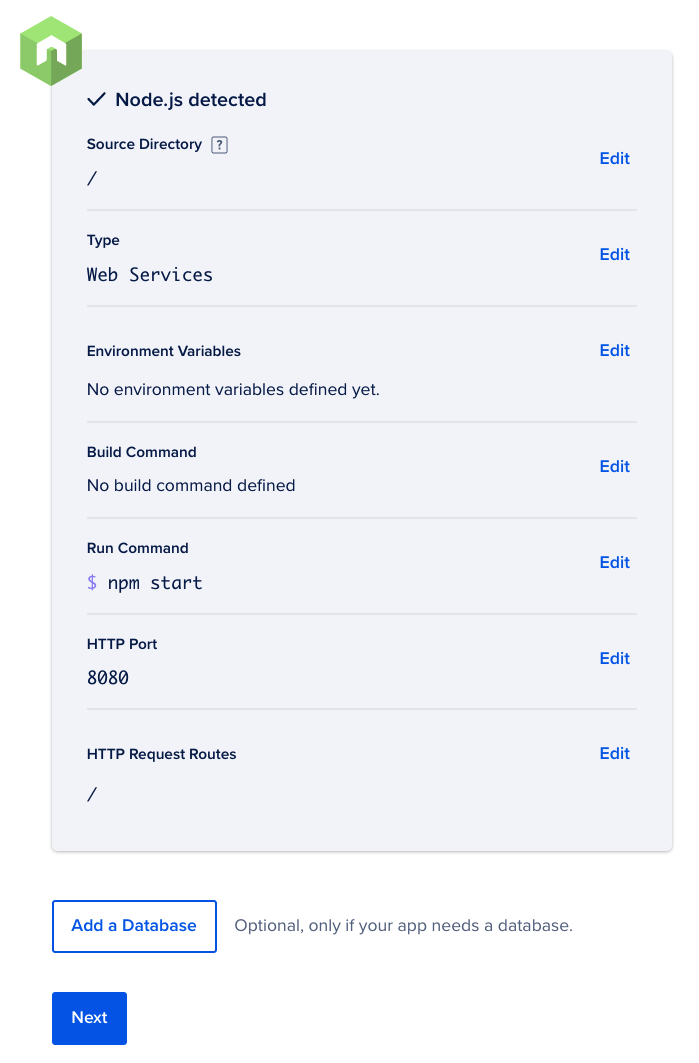
In this step, you will deploy the Node.js app to DigitalOcean’s App Platform. App Platform will automatically detect that the app’s runtime is Node.js and run the app in a hosted environment. After you deploy the app, you will get a URL to access the app from anywhere.
After pushing the code to GutHub, log in to your DigitalOcean account and navigate to the App Platform page. From the App Platform page, click Launch Your App. A prompt requests that you connect your GitHub account.
Connect your account and allow DigitalOcean to access your repositories. You can choose to let DigitalOcean access all of your repositories or just to the ones you wish to deploy.
Click Install and Authorize. GitHub returns you to the DigitalOcean dashboard.
Once you’ve connected your GitHub account, select the your_account/sample-websocket repository and click Next.
Next, provide your app’s name, choose a region, and ensure the main branch is selected. Then ensure that Autodeploy code changes option is checked. Click Next to continue.
DigitalOcean detects that your project is a Node.js app and automatically populates a Run command. Click Next.
On the Finalize and Launch screen, choose a plan. Be sure to select the plan that fits your needs, whether in Basic App or Professional App. Once you’ve selected a plan, click Launch App at the bottom. Your app builds and deploys.
Step 8: Validate the App’s Deployment
Now that you have deployed a websocket based app, you’ll want to validate not only that the app is running but also that it accepts and handles websocket connections.
To validate that the site is accessible, click on the App’s URL on the App Overview page. After navigating to the website, you should see the app’s process memory stats being updated in realtime.
Now that you have validated the app is accessible, validate that the app is able to make websocket connections. To do this, use ws package to handle establishing websocket connections. Websocket libraries will do a few things in order to get websockets to work:
- They add a
Connection: Upgradeheader to the client request, which indicates that the client wants to keep the connection open and use it for non-HTTP protocols. - They add an
Upgrade: websocketheader to the client request. Since websockets run on top of HTTP connections, this header is used by clients to ask the server to switch to a different protocol. In this case, we are asking to upgrade to the websocket protocol. - They add a
Sec-WebSocket-Key: h7CoJ6IxyTtOI2YrsD+tpQ==header to the client request. This is a unique base64-encoded key for your request. - They add a
Sec-WebSocket-Version: 13header to the client request. This indicates the websocket protocol version to use.
To validate that these headers exist, we recommend generating a HAR file. To generate a HAR file, use a browser to reach your app and follow these instructions.
There are several tools to analyze HAR files, including Google’s HAR analyzer. Upload your HAR file here to see the headers coming from your client. If you do not see the headers mentioned in this section, it is recommended to debug your code to better understand why these are not being added.
Troubleshooting
If you’re having trouble getting your websocket app to work, review the following things to troubleshoot the app.
Websocket Scheme
The code for this app included a conditional statement that checked whether the client was connecting over HTTPS. If it was, the server would attempt to use the wss protocol to make a connection. Otherwise, it would attempt to use the ws protocol.
const protocol = window.location.protocol.includes('https') ? 'wss': 'ws'
const ws = new WebSocket(`${protocol}://${location.host}`);
When you ran this app locally, the app was not using SSL, and therefore used the ws protocol. On App Platform, apps will always run over HTTPS with SSL. Please verify that the app is able to use wss when deploying a new websocket app to app platform.
Externally Expose Your Service and Check that the Port is Correct
Please make sure that your service is exposed externally. If your code only exposes localhost or if you are using an App Platform worker instead of a service, you will not be able to reach your application externally. In this tutorial, the app is exposed on port 8080. If you’re having trouble accessing the app, ensure that the app’s HTTP port is set to 8080 in the App’s spec.
Summary
In this tutorial, you:
- Created a simple Express-based websocket app.
- Ran the app locally.
- Deployed the app to App Platform.
- Saw your app’s usage being updated in real-time via websocket.
Any changes you commit and push to your repository will trigger a new deployment. This means you can spend more time focusing on your code and expanding your application.
You can find the example code for this tutorial in the DigitalOcean Sample Images Repository.
What’s Next?
Once you have deployed the Express app and used it, you can delete the application or deploy other sample applications.