
Deploy a Django App on App Platform
Django is a powerful web framework that allows you to deploy your Python applications or websites. Django includes many features such as authentication, a custom database ORM (Object-Relational Mapper), and an extensible plugin architecture. Django simplifies the complexities of web development, allowing you to focus on writing code.
In this tutorial, you’ll configure a Django project and deploy it to DigitalOcean’s App Platform using GitHub.
Prerequisites
To complete this tutorial, you’ll need:
- A GitHub account.
- Python3 installed on your local machine. You can follow the following tutorials for installing Python on Windows, Mac, or Linux.
- A text editor. You can use Visual Studio Code or your favorite text editor.
Step 1: Creating a Python Virtual Environment for your Project
Before you get started, you need to set up our Python developer environment. You will install your Python requirements within a virtual environment for easier management.
First, create a directory in your home directory that you can use to store all of your virtual environments:
mkdir ~/.venvs
Now create your virtual environment using Python:
python3 -m venv ~/.venvs/django
This will create a directory called django within your .venvs directory. Inside, it will install a local version of Python and a local version of pip. You can use this to install and configure an isolated Python environment for your project.
Before you install your project’s Python requirements, you need to activate the virtual environment. You can do that by typing:
source ~/.venvs/django/bin/activate
Your prompt should change to indicate that you are now operating within a Python virtual environment. It will look something like this: (django)user@host:~$.
With your virtual environment active, install Django, Gunicorn, dj-database-url, and the psycopg2 PostgreSQL adaptor with the local instance of pip:
pip install django gunicorn psycopg2-binary dj-database-url
(django) preceding it), use pip instead of pip3, even if you are using Python 3. The virtual environment’s copy of the tool is always named pip, regardless of the Python version.These packages do the following:
django- Installs the Django framework and librariesgunicorn- A tool for deploying Django with a WSGIdj-database-url- A Django tool for parsing a database URLpsycopg2- A PostgreSQL adapter that allows Django to connect to a PostgreSQL database
Now that you have these packages installed, you will need to save these requirements and their dependencies so App Platform can install them later. You can do this using pip and saving the information to a requirements.txt file:
pip freeze > requirements.txt
You should now have all of the software needed to start a Django project. You are almost ready to deploy.
Step 2: Creating the Django Project
Create your project using the django-admin tool that was installed when you installed Django:
django-admin startproject django_app
At this point, your current directory (django_app in your case) will have the following content:
manage.py: A Django project management script.django_app/: The Django project package. This should contain the__init__.py,settings.py,urls.py,asgi.py, andwsgi.pyfiles.
This directory is the root directory of your project and will be what we upload to GitHub. Navigate into this directory with the command:
cd django_app
Let’s adjust some settings before deployment.
Adjusting the Project Settings
Now that you’ve created a Django project, you’ll need to modify the settings to ensure it will run properly in App Platform. Open the settings file in your text editor:
nano django_app/settings.py
Let’s examine our configuration one step at a time.
Reading Environment Variables
First, you need to add the os import statement to be able to read environment variables:
[label django_app/settings.py]
import os
Setting the Secret Key
Next, you need to modify the SECRET_KEY directive. This is set by Django on the initial project creation and will have a randomly generated default value. It is unsafe to keep this hardcoded value in the code once it’s pushed to GitHub, so you should either read this from an environment variable or generate it when the application is started. To do this, add the following import statement at the top of the settings file:
[label django_app/settings.py]
from django.core.management.utils import get_random_secret_key
Now modify the SECRET_KEY directive to read in the value from the environment variable DJANGO_SECRET_KEY or generate the key if it does not find said environment variable:
[label django_app/settings.py]
SECRET_KEY = os.getenv("DJANGO_SECRET_KEY", get_random_secret_key())
Setting Allowed Hosts
Now locate the ALLOWED_HOSTS directive. This defines a list of the server’s addresses or domain names that may be used to connect to the Django instance. Any incoming request with a Host header that is not in this list will raise an exception. Django requires that you set this to prevent a certain class of security vulnerability.
In the square brackets, list the IP addresses or domain names that are associated with your Django server. Each item should be listed in quotations with entries separated by a comma. If you wish requests for an entire domain and any subdomains, prepend a period to the beginning of the entry.
App Platform supplies you with a custom URL as a default and then allows you to set a custom domain after you have deployed the application. Since you won’t know this custom URL until you have deployed the application, you should attempt to read the ALLOWED_HOSTS from an environment variable, so App Platform can inject this into your app when it launches.
We’ll cover this process more in-depth in a later section. But for now, modify your ALLOWED_HOSTS directive to attempt to read the hosts from an environment variable. The environment variable can be set to either a single host or a comma-delimited list:
[label django_app/settings.py]
ALLOWED_HOSTS = os.getenv("DJANGO_ALLOWED_HOSTS", "127.0.0.1,localhost").split(",")
Setting the Debug Directive
Next you should modify the DEBUG directive so that you can toggle this by setting an environment variable:
[label django_app/settings.py]
DEBUG = os.getenv("DEBUG", "False") == "True"
Here you used the getenv method to check for an environment variable named DEBUG. If this variable isn’t found, we should default to False for safety. Since environment variables will be read in as strings from App Platform, be sure to make a comparison to ensure that your variable is evaluated correctly.
Setting the Development Mode
Now create a new directive named DEVELOPMENT_MODE that will also be set as an environment variable. This is a helper variable that you will use to determine when to connect to your Postgres database and when to connect to a local SQLite database for testing. You’ll use this variable later when setting up the database connection:
[label django_app/settings.py]
DEVELOPMENT_MODE = os.getenv("DEVELOPMENT_MODE", "False") == "True"
Configuring Database Access
Next, find the section that configures database access. It will start with DATABASES. The configuration in the file is for a SQLite database. App Platform allows you to create a PostgreSQL database for our project, so you need to adjust the settings to be able to connect to it.
Change the settings with your PostgreSQL database information. You’ll read in the database connection information and credentials from an environment variable, DATABASE_URL, that will be provided by App Platform. Use the psycopg2 adaptor we installed with pip to have Django access a PostgreSQL database. You’ll use the dj-database-url package that was installed to get all of the necessary information from the database connection URL.
To facilitate with development of your application locally, you’ll also use an if statement here to determine if DEVELOPMENT_MODE is set to True and which database should be accessed. By default, this will be set to False, and it will attempt to connect to a PostgreSQL database. You also don’t want Django attempting to make a database connection to the PostgreSQL database when attempting to collect the static files, so you’ll write an if statement to examine the command that was executed and not connect to a database if you determine that the command given was collectstatic. App Platform will automatically collect static files when the app is deployed.
First, install the sys library so you can determine the command that was passed to manage.py and the dj_database_url library to be able to parse the URL passed in:
[label django_app/settings.py]
. . .
import os
import sys
import dj_database_url
Next remove the current DATABASE directive block and replace it with this:
[label django_app/settings.py]
if DEVELOPMENT_MODE is True:
    DATABASES = {
        "default": {
            "ENGINE": "django.db.backends.sqlite3",
            "NAME": os.path.join(BASE_DIR, "db.sqlite3"),
        }
    }
elif len(sys.argv) > 0 and sys.argv[1] != 'collectstatic':
    if os.getenv("DATABASE_URL", None) is None:
        raise Exception("DATABASE_URL environment variable not defined")
    DATABASES = {
        "default": dj_database_url.parse(os.environ.get("DATABASE_URL")),
    }
Next, move down to the bottom of the file and add a setting indicating where the static files should be placed. When your Django app is deployed to App Platform, python manage.py collectstatic will be run automatically. Set the route to match the STATIC_URL directive in the settings file:
[label django_app/settings.py]
. . .
STATIC_URL = "/static/"
STATIC_ROOT = os.path.join(BASE_DIR, "staticfiles")
If you plan on storing static files in other locations outside of your individual Django-app static files, you will need to add an additional directive to your settings file. This directive will specify where to find these files. Be aware that these directories cannot share the same name as your STATIC_ROOT. If you do not have extra static files do not include this setting.:
[label django_app/settings.py]
. . .
STATIC_URL = "/static/"
STATIC_ROOT = os.path.join(BASE_DIR, "staticfiles")
STATICFILES_DIRS = (os.path.join(BASE_DIR, "static"),)
Reviewing the Completed settings.py File
Your completed file will look like this:
from django.core.management.utils import get_random_secret_key
from pathlib import Path
import os
import sys
import dj_database_url

# Build paths inside the project like this: BASE_DIR / 'subdir'.
BASE_DIR = Path(__file__).resolve().parent.parent


# Quick-start development settings - unsuitable for production
# See https://docs.djangoproject.com/en/3.1/howto/deployment/checklist/

# SECURITY WARNING: keep the secret key used in production secret!
SECRET_KEY = os.getenv("DJANGO_SECRET_KEY", get_random_secret_key())

# SECURITY WARNING: don't run with debug turned on in production!
DEBUG = os.getenv("DEBUG", "False") == "True"

ALLOWED_HOSTS = os.getenv("DJANGO_ALLOWED_HOSTS", "127.0.0.1,localhost").split(",")


# Application definition

INSTALLED_APPS = [
    'django.contrib.admin',
    'django.contrib.auth',
    'django.contrib.contenttypes',
    'django.contrib.sessions',
    'django.contrib.messages',
    'django.contrib.staticfiles',
]

MIDDLEWARE = [
    'django.middleware.security.SecurityMiddleware',
    'django.contrib.sessions.middleware.SessionMiddleware',
    'django.middleware.common.CommonMiddleware',
    'django.middleware.csrf.CsrfViewMiddleware',
    'django.contrib.auth.middleware.AuthenticationMiddleware',
    'django.contrib.messages.middleware.MessageMiddleware',
    'django.middleware.clickjacking.XFrameOptionsMiddleware',
]

ROOT_URLCONF = 'django_app.urls'

TEMPLATES = [
    {
        'BACKEND': 'django.template.backends.django.DjangoTemplates',
        'DIRS': [],
        'APP_DIRS': True,
        'OPTIONS': {
            'context_processors': [
                'django.template.context_processors.debug',
                'django.template.context_processors.request',
                'django.contrib.auth.context_processors.auth',
                'django.contrib.messages.context_processors.messages',
            ],
        },
    },
]

WSGI_APPLICATION = 'django_app.wsgi.application'


# Database
# https://docs.djangoproject.com/en/3.1/ref/settings/#databases
DEVELOPMENT_MODE = os.getenv("DEVELOPMENT_MODE", "False") == "True"

if DEVELOPMENT_MODE is True:
    DATABASES = {
        "default": {
            "ENGINE": "django.db.backends.sqlite3",
            "NAME": os.path.join(BASE_DIR, "db.sqlite3"),
        }
    }
elif len(sys.argv) > 0 and sys.argv[1] != 'collectstatic':
    if os.getenv("DATABASE_URL", None) is None:
        raise Exception("DATABASE_URL environment variable not defined")
    DATABASES = {
        "default": dj_database_url.parse(os.environ.get("DATABASE_URL")),
    }


# Password validation
# https://docs.djangoproject.com/en/3.1/ref/settings/#auth-password-validators

AUTH_PASSWORD_VALIDATORS = [
    {
        'NAME': 'django.contrib.auth.password_validation.UserAttributeSimilarityValidator',
    },
    {
        'NAME': 'django.contrib.auth.password_validation.MinimumLengthValidator',
    },
    {
        'NAME': 'django.contrib.auth.password_validation.CommonPasswordValidator',
    },
    {
        'NAME': 'django.contrib.auth.password_validation.NumericPasswordValidator',
    },
]


# Internationalization
# https://docs.djangoproject.com/en/3.1/topics/i18n/

LANGUAGE_CODE = 'en-us'

TIME_ZONE = 'UTC'

USE_I18N = True

USE_L10N = True

USE_TZ = True


# Static files (CSS, JavaScript, Images)
# https://docs.djangoproject.com/en/3.1/howto/static-files/

STATIC_URL = "/static/"
STATIC_ROOT = os.path.join(BASE_DIR, "staticfiles")

# Uncomment if you have extra static files and a directory in your GitHub repo.
# If you don't have this directory and have this uncommented your build will fail
# STATICFILES_DIRS = (os.path.join(BASE_DIR, "static"),)
settings.py that are specific to your project (such as WSGI_APPLICATION and ROOT_URLCONF) that are generated when you first setup your app. If you named your app something other than django_app and are going to copy and paste this code directly be sure to modify these settings to match your project. They will have been set correctly in the settings.py that was generated for you.Save and close settings.py.
You’ve now finished configuring your Django app to run on App Platform. Next, you’ll push the app to GitHub and deploy it to App Platform.
Step 3: Pushing the Site to GitHub
DigitalOcean App Platform deploys your code from GitHub repositories, so the first thing you’ll need to do is get your site in a git repository and then push that repository to GitHub.
First, initialize your Django project as a git repository:
git init
When you work on your Django app locally, certain files get added that are unnecessary for deployment. Let’s exclude that directory by adding it to Git’s ignore list. Create a new file called .gitignore:
nano .gitignore
Now add the following code to the file:
[label .gitignore]
db.sqlite3
*.pyc
Save and close the file.
Now execute the following command to add files to your repository:
git add django_app/ manage.py requirements.txt static/
Make your initial commit:
git commit -m "Initial Django App"
Your files will commit:
[secondary_label Output]
[master (root-commit) eda5d36] Initial Django App
 8 files changed, 238 insertions(+)
 create mode 100644 django_app/__init__.py
 create mode 100644 django_app/asgi.py
 create mode 100644 django_app/settings.py
 create mode 100644 django_app/urls.py
 create mode 100644 django_app/wsgi.py
 create mode 100644 manage.py
 create mode 100644 requirements.txt
 create mode 100644 static/README.md
Open your browser and navigate to GitHub, log in with your profile, and create a new repository called django-app. Create an empty repository without a README or license file.
Once you’ve created the repository, return to the command line to push your local files to GitHub.
First, add GitHub as a remote repository:
git remote add origin https://github.com/your_username/django-app
Next, rename the default branch main, to match what GitHub expects:
git branch -M main
Finally, push your main branch to GitHub’s main branch:
git push -u origin main
Your files will transfer:
[secondary_label Output]
Enumerating objects: 12, done.
Counting objects: 100% (12/12), done.
Delta compression using up to 8 threads
Compressing objects: 100% (9/9), done.
Writing objects: 100% (12/12), 3.98 KiB | 150.00 KiB/s, done.
Total 12 (delta 1), reused 0 (delta 0)
remote: Resolving deltas: 100% (1/1), done.
To github.com:yourUsername/django-app.git
 * [new branch]      main -> main
Branch 'main' set up to track remote branch 'main' from 'origin'.
Enter your GitHub credentials when prompted to push your code.
Your code is now on GitHub and accessible through a web browser. Now you will deploy your site to DigitalOcean’s App Platform.
Step 4: Deploying to DigitalOcean with App Platform
Once the code is pushed, visit https://cloud.digitalocean.com/apps and click Create App.
You’ll be prompted to connect your GitHub account. Connect your account and allow DigitalOcean to access your repositories. You can then choose to let DigitalOcean have access to all of your repositories or just to the ones you wish to deploy.
Click Install and Authorize to return to your DigitalOcean dashboard and continue creating your app.
Under the Repository section, select the your_account/django-app repository from the dropdown menu. Select your branch name and source directory. Choose whether to enable autoscaling. Then, click Next.
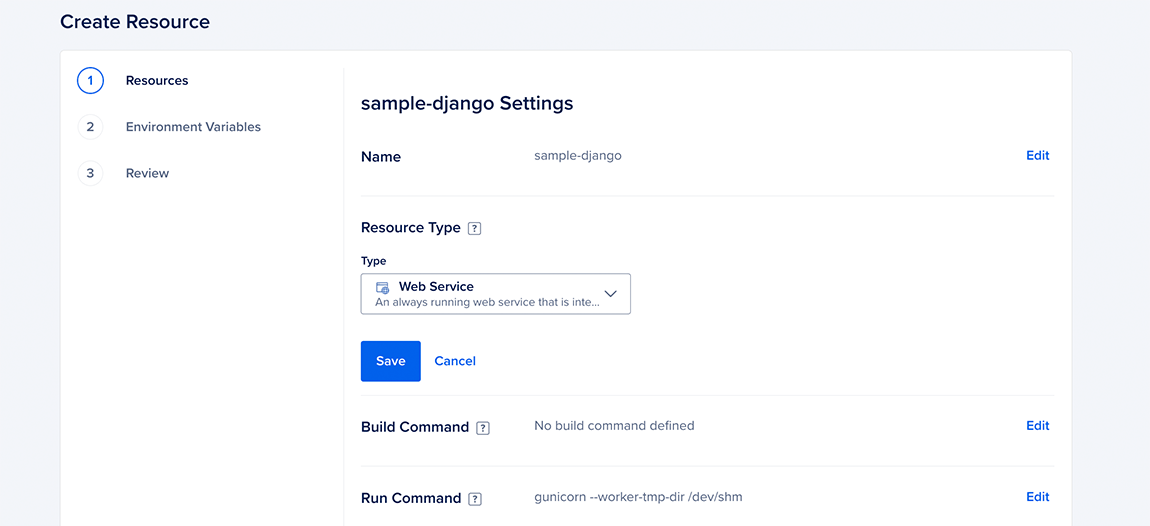
DigitalOcean detects that your project is a Python app and automatically populates a partial run command.
Click the Edit pencil icon next to the app. Then, click Edit to the right of the Run Command section. Your completed run command needs to reference your project’s WSGI file. In this example, this is at django_app.wsgi. So, your completed run command should be gunicorn --worker-tmp-dir /dev/shm django_app.wsgi.
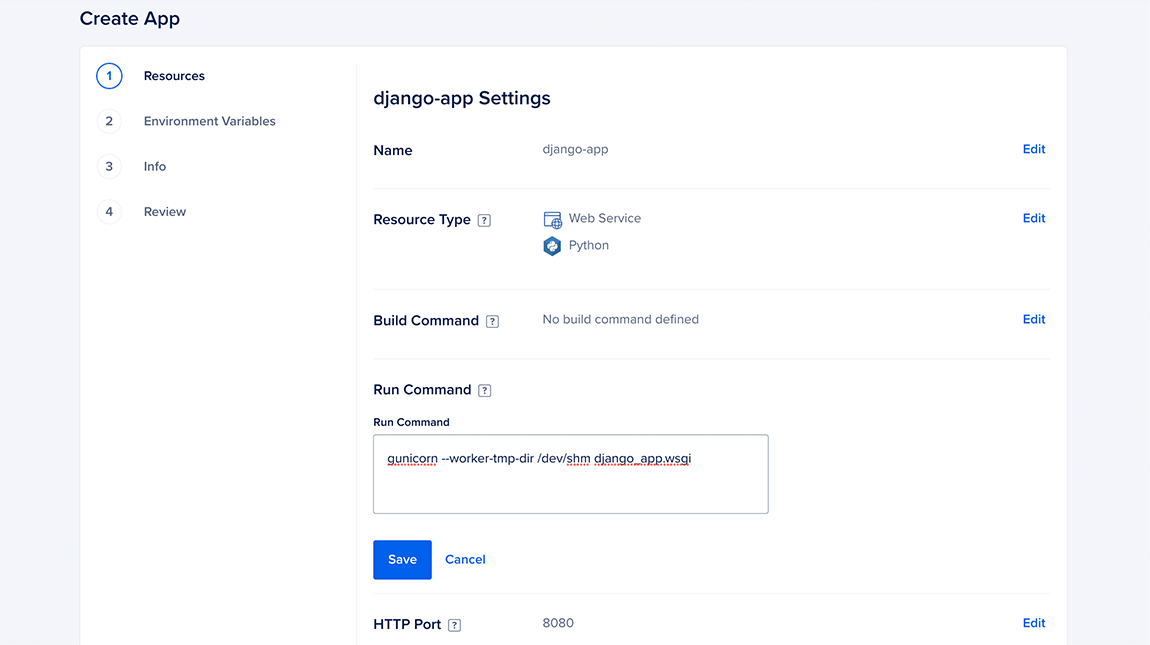
Click Save to confirm the change, then click Back at the bottom of the page to return to the Resources page.
Here, you can click Edit Plan to select the appropriate plan to fit your needs, whether in Basic App or Professional App.
To set up your database, click the Add Resource button, then select Database and click Add. You will be presented with the option of creating a new development database or using a previously-created DigitalOcean database. For this deployment, select the development database and name it db. Then, click the Create and Attach button.
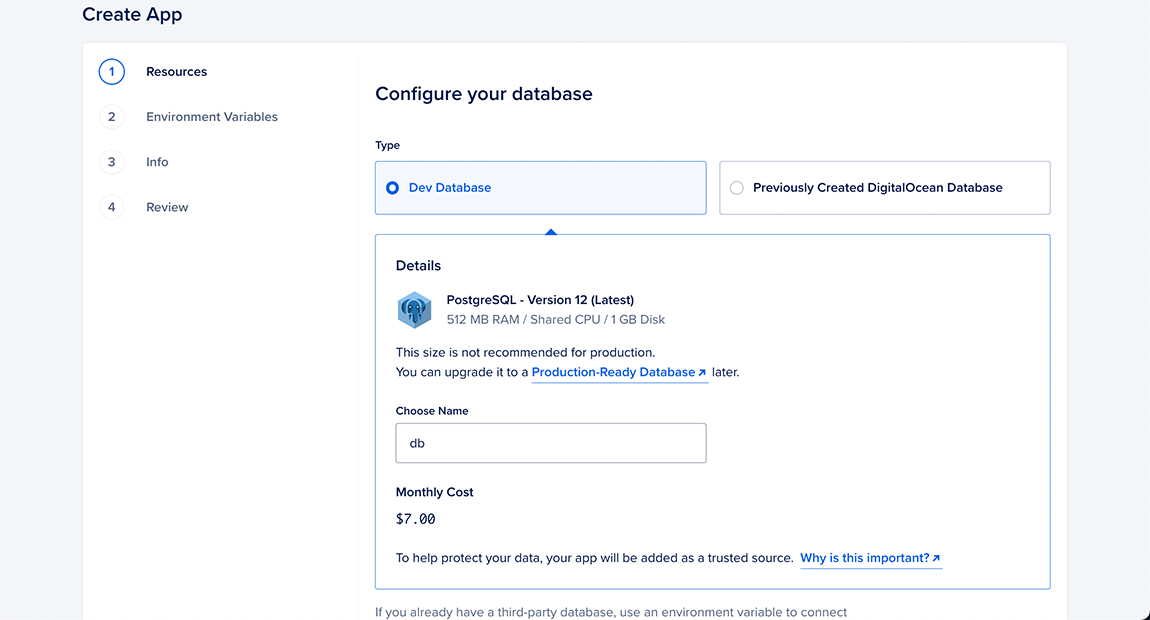
Finally, click Next to proceed.
Next, you need to define the environment variables you declared in your project’s settings. App Platform has a concept of App-Wide Variables, which are environment variables that are provided by App Platform, such as APP_URL and APP_DOMAIN. The platform also maintains Component-Specific Variables, which are variables that are exported from your components. These will be useful for determining your APP_DOMAIN beforehand so you can properly set DJANGO_ALLOWED_HOSTS. You will also use these variables to copy configuration settings from your database.
To read more about these different variables, consult the App Platform Environment Variable Documetation.
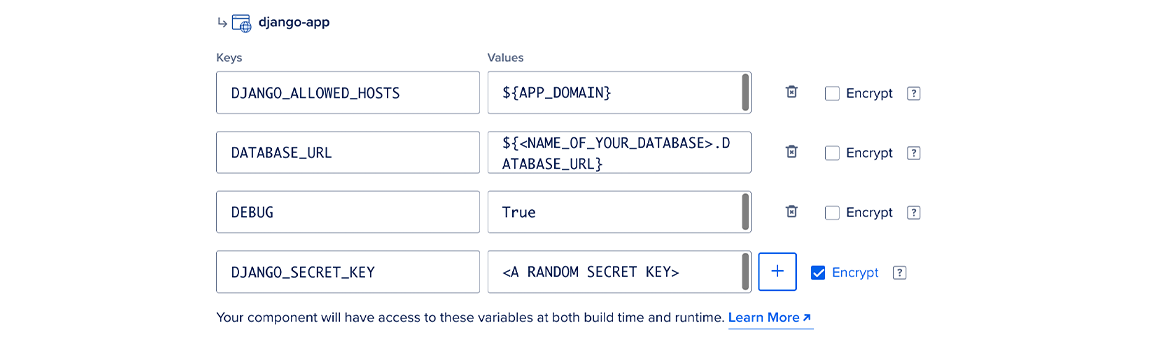
For your Django app to function, you need to set the following environment variables like so:
DJANGO_ALLOWED_HOSTS->${APP_DOMAIN}- This allows us to know the randomly generated URL that App Platform provides and provide it to our app.
DATABASE_URL->${<NAME_OF_YOUR_DATABASE>.DATABASE_URL}- In this case, we named our database db in the previous step, so this should be
${db.DATABASE_URL}
- In this case, we named our database db in the previous step, so this should be
DEBUG->True- Set this to
Truefor now to verify your app is functioning and set toFalsewhen it’s time for this app to be in production.
- Set this to
DJANGO_SECRET_KEY-><A RANDOM SECRET KEY>- You can either allow your app to generate this at every launch or pick a strong password with at least 32 characters to use as this key. Using a secure password generator is a good option for this.
- Don’t forget to click the Encrypt check box to ensure that your credentials are encrypted for safety.
Click Save.
Click Next until you reach the Review page. Review your app’s configuration and click Create Resources at the bottom of the page.
Once the build process completes, the interface will show you a healthy site. Now you need to access your app’s console through the Console tab and perform the Django first launch tasks by running the following commands:
python manage.py migrate- This will perform your initial database migrations.python manage.py createsuperuser- This will prompt you for some information to create an administrative user.

Once you are done with that, click on the link to your app provided by App Platform.
This link should take you to the standard initial Django page.
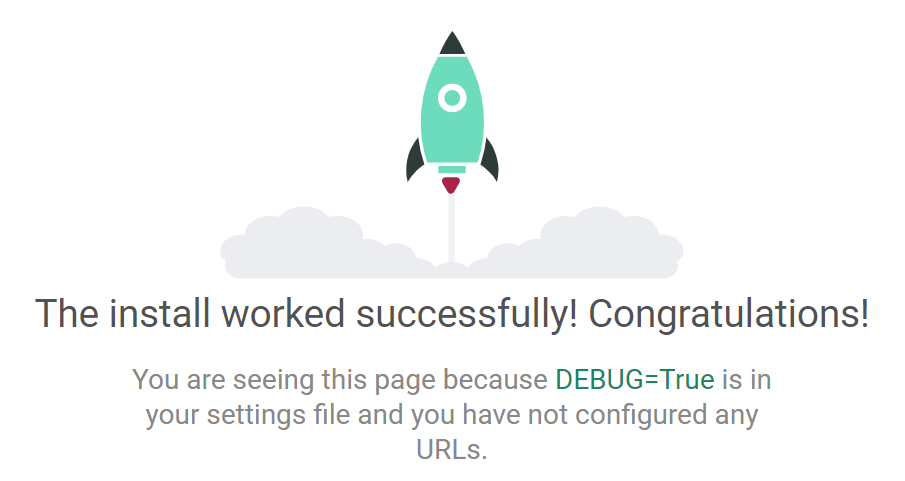
And now you have a Django app deployed to App Platform. Any changes that you make and push to GitHub will be automatically deployed.
Step 5: Deploying Your Static Files
Now that you’ve deployed your app, you may notice that your static files aren’t being loaded if you have DEBUG set to False. Django doesn’t serve static files in production and instead wants you to deploy them using a web server or CDN. Luckily, App Platform can do just that. App Platform provides free static asset serving if you are running a service alongside it, as you are doing with your app. So you’re going to deploy your same Django app but as a static site this time.
Once your app is deployed, click the Create button and choose Create Resources From Source Code to add a static site component.

Select the same GitHub repository as your deployed Django service. Click Next to continue.
Next, ensure that the main branch and Autodeploy are selected. Click Next to continue.
Click the Edit pencil icon next to the app. Then, click Edit to the right of the Resource Type section. Select Static Site from the dropdown menu, then click Save to confirm your change.
Click Edit to the right of the Output Directory section and set it to staticfiles. Your static files will then be collected into Output Directory of your app to match its STATIC_ROOT setting in settings.py. Click Save to confirm your change.
Then, click Edit to the right of the HTTP Request Routes section, then enter /static in the Routes field. Essentially we’ll have Django gather our static files and serve them. Set the route to what you set your STATIC_URL directive in your settings file. Click Save to confirm your change.
Click Back at the bottom of the page to return to the Resources page, then click Next until you finalize creation. When static files are paired with a service, it is free, so you won’t see any change in your bill. Now, if you have Debug set to False, you’ll see your static files properly displayed.
Summary
In this tutorial, you:
- Set up a Django project.
- Configured the Django project to connect to a database.
- Deployed the app and its static files onto App Platform.
Any changes you commit and push to your repository will be re-deployed, so you can now expand your application. You can find the example code for this tutorial in the DigitalOcean Sample Images Repository.
The example in this tutorial is a minimal Django project. Your app might have more applications and features, but the deployment process will be the same.
What’s Next?
Once you have deployed the app and used it, you can delete the application or deploy other sample applications.