
Secure Remote Access to DigitalOcean with Netmaker
Overview
DigitalOcean makes it easy to set up and manage your cloud infrastructure, with regions across the globe. Features like 1-Click Apps, Managed Databases, and Kubernetes make it even easier.
If you manage a team who relies on DigitalOcean, you may want to provide secure, remote access to resources like droplets, databases, and entire regions on DigitalOcean, without making those resources publicly accessible.
This article will show you how to provide secure remote access to DigitalOcean for your team using Netmaker.
Architecture Configurations and Options
There are several considerations while setting up your Netmaker network.
Consideration One: Egress Gateway
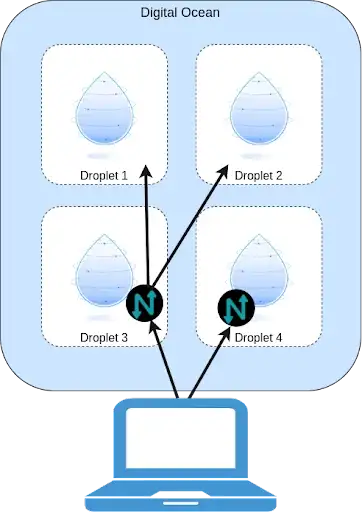
The first is, do you want to provide direct access to specific resources (Droplets), or do you want to provide access to a whole region at once? By deploying the Netclient (Netmaker’s client-side agent) on target devices, they become directly accessible.
Alternatively, you can deploy a single Netclient in a region and make it an Egress Gateway. An Egress Gateway will route traffic to a whole subnet, allowing you to make a whole region accessible via a single droplet.
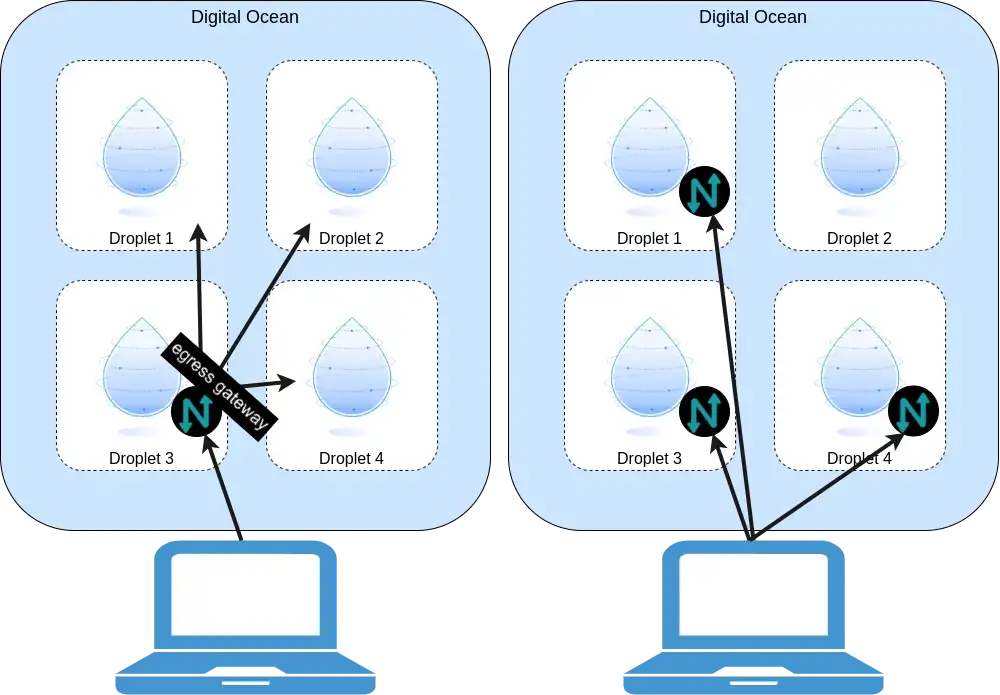
There are pros and cons to each. With the egress gateway, you only need the netclient on a single device in the region. However, it is slower, since traffic needs to make two hops.
Without the egress gateway, access is faster, and you have more advanced configuration options like access control lists and private DNS. However, the downside is that every machine in DigitalOcean which you would like to access will need the netclient running in order to be accessible.
There are pros and cons to each, and you can also combine the two, creating Egress Gateways to reach things like managed databases and certain regions, while making other droplets accessible over the peer-to-peer mesh network.
Consideration Two: Ingress Gateway
The Ingress Gateway allows you to provide generic WireGuard config files to your users to access the network. The advantage here is it’s much easier to install and maintain, as opposed to the Netclient.
The advantage of the Netclient is, again, that you can control access at a finer level. You can also provide an SSO login to your VPN. Finally, to get peer-to-peer access, you have to use the netclient. The disadvantage of the netclient is, your organization may limit what software can run on your users devices. Direct, peer-to-peer access to machines is also a disadvantage in some scenarios.
The advantage of pure WireGuard is, most devices support WireGuard, and it is very simple to install and configure. The Netclient does not run on some devices, like phones, so in these cases, you must use the Ingress Gateway. Some users also like having a gateway between their users and the Netmaker network, which this provides.
The main disadvantages are, the Ingress Gateway clients cannot be automatically reconfigured, they have limited access controls, and you lose a broad ability to manage the devices’ network settings.
Recommendation
For this tutorial, we recommend using Egress Gateways to access Regions, and Ingress Gateways to provide access to your users. The combination simplifies management substantially. It’s the easiest User Experience for you and your team. However, as we go through the tutorial, keep in mind these considerations, and your use case may require a different configuration. With that, let’s move on to installing Netmaker.
Install Netmaker
-
Create a Netmaker account by logging into https://dashboard.license.netmaker.io. You will need this for a free Netmaker license.
-
[Recommended] Prepare a dedicated subdomain for Netmaker, such as “nm.yourcompany.com.” We will use a wildcard from this subdomain for Netmaker.
-
Create a Netmaker Droplet
Recommended Settings: if desired, Netmaker can run with 1GB RAM, but we recommend 2GB or larger for production
-
Setup DNS: point the wildcard domain from the prerequisites (e.g. *.nm.yourdomain.com) to the IP of the 1-Click Droplet.
-
Log into your Netmaker Droplet
-
Upon login, you will be prompted with a series of steps to install Netmaker. You can use either Community or Enterprise, but we recommend Enterprise, since it has extra features and a generous free tier.
-
Once everything looks right and you’ve hit confirm, the install script will run. This will take about 5 minutes.
-
Log into the Netmaker dashboard at http://dashboard.yourdomain.com and create a username and password for the Netmaker server.
Set Up Egress Gateways
In each Region which should be accessed via Netmaker, deploy (or use an existing) Droplet which will act as the Egress Gateway.
Join Network
-
Use the steps to install Netclient. For instance, on Debian distros:
curl -sL 'https://apt.netmaker.org/gpg.key' | sudo tee /etc/apt/trusted.gpg.d/netclient.asc curl -sL 'https://apt.netmaker.org/debian.deb.txt' | sudo tee /etc/apt/sources.list.d/netclient.list sudo apt update sudo apt -y install netclient -
Next, join the network. In Netmaker, go to the “Access Keys” section, click on the access key, and copy the “Join” command. It should look like this:
netclient join -t anvkr48twsigahkguashleawjieg
Create Gateway
- From the DigitalOcean console, click on the Droplet
- Click on the “Networking” section
- Record the VPC IP Range, for instance 10.124.0.0/20
- Determine the interface used for the VPC IP RANGE: ip route get < private address>. Typically, this is eth1 on DigitalOcean.
- Go to your Nodes In the Netmaker dashboard
- Click “Create Egress Gateway” on the Egress Node
- For interface, enter the interface from above
- For Range, enter the VPC IP
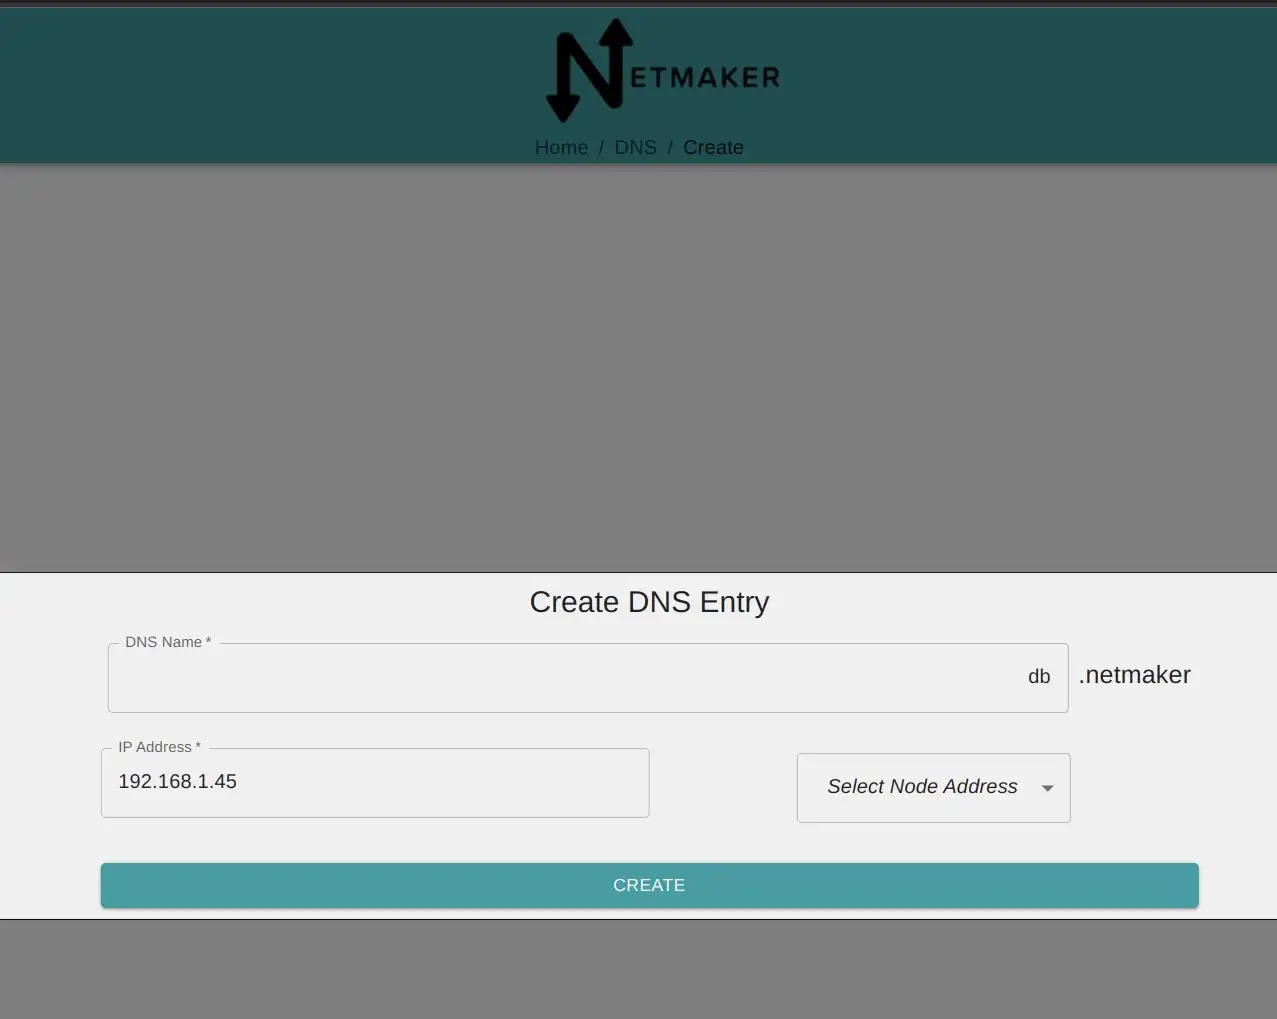
[Optional] Private DNS
If you want any addresses in the region to be available over Private DNS, rather than an IP address, go to the DNS tab of your Netmaker server, and add an entry, pointing it to the private IP address of the resource. For instance: db.netmaker.
Set Up Ingress Gateways
The easiest option here is to use the Netmaker Server as your Ingress Gateway, since it is already deployed. However, you may get better performance by using a dedicated machine. If you’d like to use a dedicated machine, join a droplet to the network as you did for the Egress Gateway before proceeding.
- Go to your Nodes In the Netmaker dashboard
- Click “Create Ingress Gateway” on the Ingress Node
- Go to the Ext Clients tab
You will now be able to generate config files for your users, which they can use with a standard WireGuard client to access the network.
Conclusion and Next Steps
Your DigitalOcean resources are now accessible over a private network!
For next steps, you may consider a few options:
- With an enterprise license (paid) you can add user management to your Netmaker server. This will allow you to provide individual logins to your team so that they can generate, download, and manage their own config files, and you don’t have to distribute them.
- You can use Egress Gateways to access Kubernetes resources as well, by deploying the gateway into your cluster and routing traffic to the Pod and Service networks
- You could add in non-DigitalOcean resources to Netmaker, and make it a true multi-cloud setup.
- You can add the Netclient to more machines, so they can access each other over a private network across regions.
Resources
Check out the following related articles: