
Onboarding: Working with DigitalOcean Droplets
Introduction
Welcome to DigitalOcean! We’re excited to have you on board. DigitalOcean offers a variety of products and services. From our simple-to-use Droplets to our managed Kubernetes services, you can run a blog, a business, and everything between and beyond.
After creating a DigitalOcean account, you’ll enter the Control Panel. This is the central hub for all of your projects on the DigitalOcean platform. We’re here to help you get comfortable with the different menus and workflows that will become important to you as you begin your next project.
In this tutorial, you will learn about DigitalOcean’s Droplets, which are Linux-based virtual machines (VMs) that you can run on top of virtualized hardware. Each Droplet you create is a new server you can use, whether it’s standalone or part of a larger cloud-based infrastructure. You will learn how to create, manage, and connect to your DigitalOcean Droplet. You will also learn how to create a DigitalOcean Domain, Load Balancer, and Reserved IP.
Creating a Droplet on DigitalOcean
You can create a Droplet by following the process in this section. The tasks are detailed in the embedded video and the text that follows.
Droplets were the first product DigitalOcean offered when it was founded in 2011. A Droplet is a virtual machine that anyone can set up in seconds. If you’re interested in learning more, read about Droplet pricing.
You’ll use the DigitalOcean Control Panel to get started. Once you have logged in to your Control Panel, navigate to Projects and select which project you want to create a Droplet in. Then, press on the square labeled Spin up a Droplet. You can also create a Droplet by pressing on the Create button in the top-right and then selecting Droplets from the dropdown menu or from the left panel navigation menu where it says Droplets:

Next, you will be taken to the Create Droplets page, where you must select various choices for your Droplet.
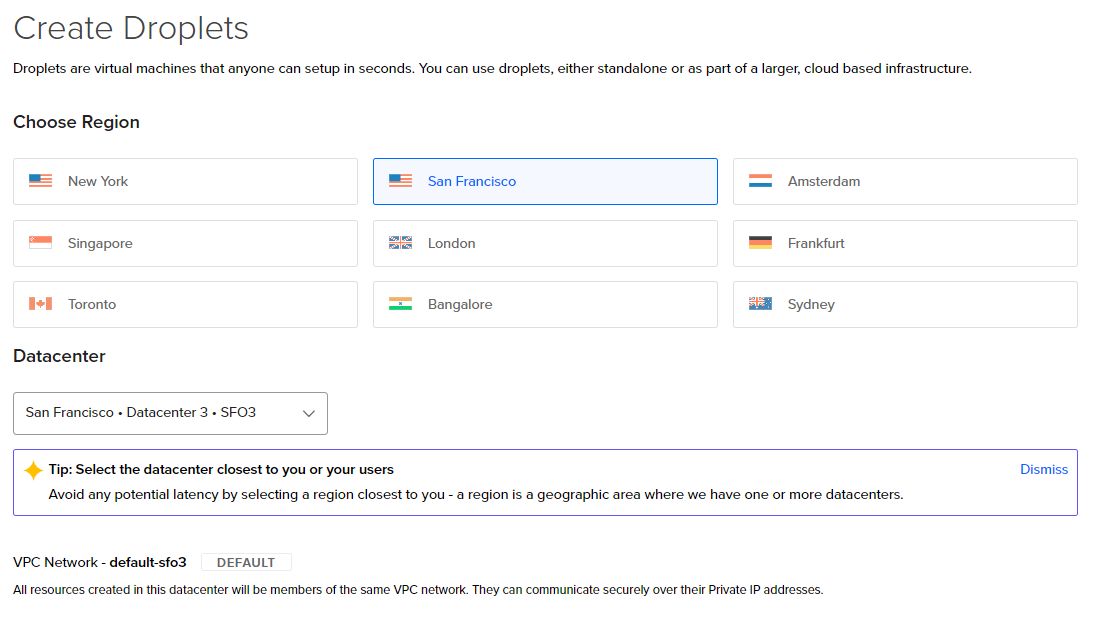
First, select which region for Choose Region. It’s recommended that you choose a region as close to your users as possible. You want your latency to be low to provide a faster experience for your users.
Then you will choose the Datacenter. Keep in mind that anything added to your Datacenter is also added to the VPC Network. As a result, all the resources in your VPC Network can communicate securely over their private IP addresses:
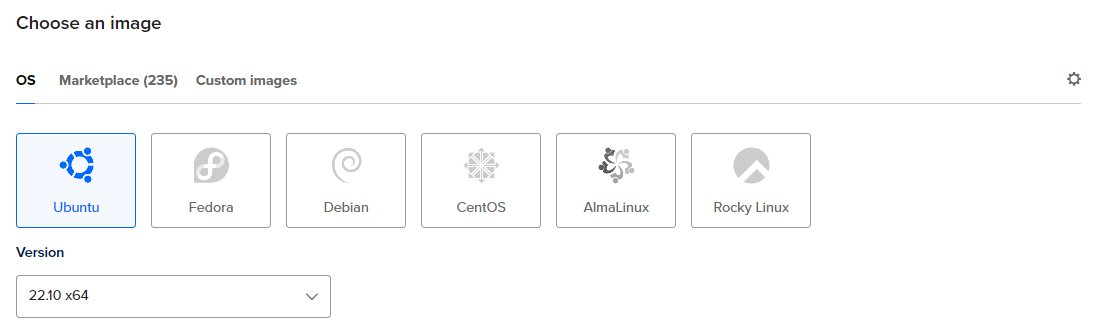
Next, Choose an image for your Droplet. You can either choose an OS (operating system) or toggle to the Marketplace tab to search for a pre-built image for your new Droplet:
For example, you can select the WordPress option from the Marketplace tab to install it right out of the box for you:

Once you’ve made your selection, continue to Choose Size. There are plenty of options available because there are many ways to create a Droplet for various applications. It depends on what you’re planning to build. You need to select the size for both the OS and Marketplace build options.
For example, if you’re building a hobby project, you may want to select the Regular option from the CPU options under the Shared CPU box in the Droplet Type, and then select the size and pricing that suits your needs. If you want to do something at a production level, you may want to select an option from the Dedicated CPU box in the Droplet Type menu, such as CPU-Optimized:

If you’re still uncertain, you can press on the Need help picking a plan? Help me choose option in the right-hand corner of the Choose Size section. This link will take you to our product documentation and provide additional information about Choosing the Right Droplet Plan.
When you review the information on Choosing the Right Droplet Plan, keep the section on Making a Data-Driven Decision in mind. This section will describe how to view your Droplet’s performance. You can access the graphs inside your dashboard and, for example, evaluate if the application is becoming too CPU-intensive and hitting your limits, which may signify a need to switch to a CPU-Optimized Droplet.
Once you’re finished making your selections on sizing, scroll to the next sections. You have the option to configure Additional Storage if you prefer. You can also select from the Choose Authentication Method to connect your SSH Key to your Droplet after it’s created. The SSH Key method is more secure than the Password method. If you don’t have an SSH Key already available, press the Add SSH Key link on the right for a step-by-step guide. You can learn more from our tutorials on How To Set Up SSH Keys:

Additionally, other add-ons are available under the We recommend these options heading. If, for example, you want to have a production-level Droplet, you can add a Managed Database with the Add a Database button, so then you have your database and Droplet all-in-one. If you’d like to learn more, read our tutorial about creating, managing, and connecting your Managed Database. You can also Enable Monitoring or Enable Backups, as needed. Select the options that work best for you. You can always add on these options later if you prefer:

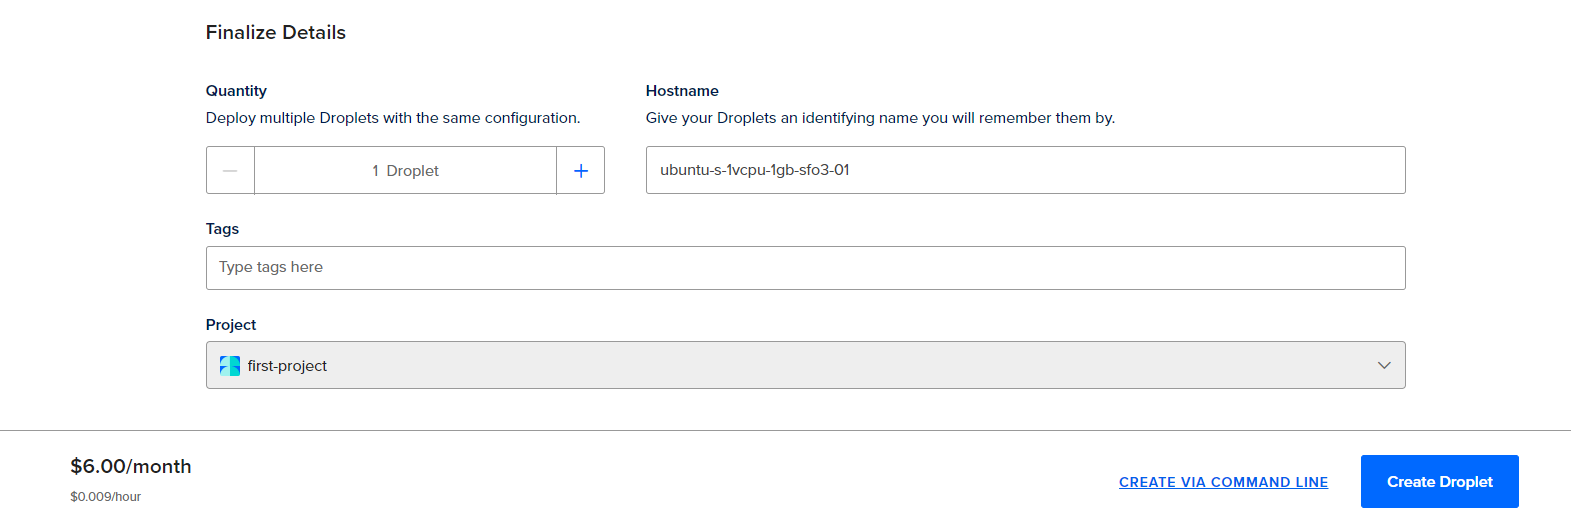
Next, go to the Finalize Details heading. You can change the Hostname, Tags, move the Droplet to a different Project, and review the estimated cost per month:
Once you’re done making your selections, press on the Create Droplet button.
Now your Droplet is ready to go. It may take a few minutes to get set up before you can log in to your remote server.
You can press the Droplet box for an expanded overview of your Droplet, including information about your datacenter region, image, and more:

If you press on the name of the Droplet, you are taken to a page with even more information about your Droplet:

You have now successfully created a Droplet. You can connect to it, manage it, add your applications to it, and continue building with other Marketplace add-ons.
Managing Your DigitalOcean Droplet
Now that you’ve created your Droplet, next you’ll learn how to manage it. You can manage a Droplet by following the process in this section. The tasks are detailed in the embedded video and the text that follows.
At DigitalOcean, we pride ourselves on having a simple dashboard available to you. You can access this dashboard by pressing on the link to your Droplet to access additional information:
There are different options for accessing information, which are listed on the left side, including graphs, volumes, networking, recovery, and more.
In the Graphs section, there are details about usage statistics that you can use for monitoring, as well as stats for your CPU usage, load usage, memory usage, and disk usage. You can view the bandwidth if you scroll to the end of the page. This information is valuable for managing your Droplet because if, for example, you notice an increase in one of these usage graphs, then you may need to resize your Droplet or choose a different style of Droplet.
If you want to resize your Droplet, select Resize from the left navigation menu within the specific Droplet. There are many options when resizing your Droplet, particularly in CPU and RAM only. For example, you can update it to use 2 vCPUs, which is selected in the following image:
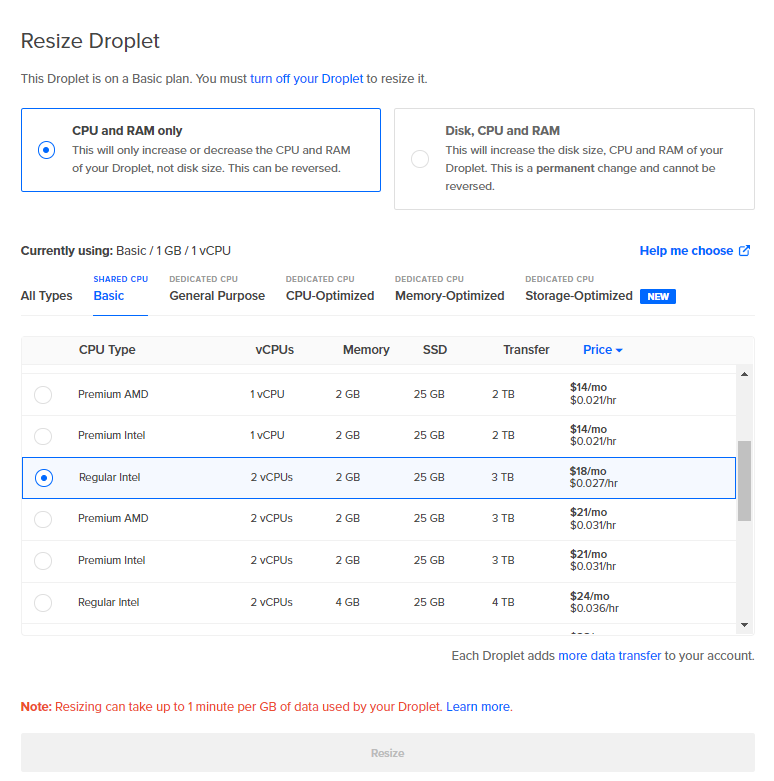
If you want to get your application ready for production, you may want to toggle to the Dedicated CPU Memory-Optimized tab within CPU and RAM only. When you select an option, a note will load at the bottom of the list that states that resizing can take up to one minute per GB of data.
To resize your Droplet, you must first turn off the Droplet. If you try to press the Resize button without doing so, it will be grayed out. Hovering over the nonfunctional button will load a tip that reads You must turn off Droplet before resizing:

This means you must turn off your Droplet before resizing it. , You can press on the turn off your Droplet link under the Resize Droplet header:

Alternatively, navigate to Power from the list on the left-hand side.
In both the Power menu and from selecting the turn off your Droplet link, you will access a prompt asking you to confirm that you want to turn off your Droplet. The prompt will include additional information regarding what happens when you turn off your Droplet.
To continue, press the Turn off button:

Now that your Droplet has been turned off, make your preferred selection for resizing in the Resize menu and then press the Resize button. Resizing can take some time to process.
Once the resizing process has finished, your newly resized Droplet will be reflected where your Droplet information appears at the top of the Control Panel. In this example, we chose the 2vCPU option with 25GB. If you have not already, make sure to turn your Droplet back on by toggling the button from Off to On:

Other valuable features include Backups and Snapshots to back up your data safely and securely.
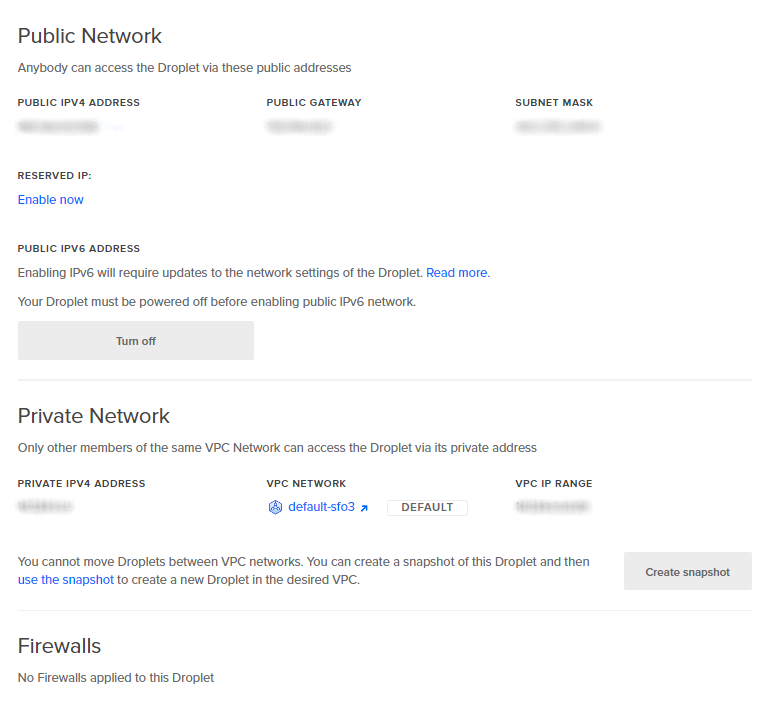
From the Networking page, you can take actions like adding a Reserved IP address and modifying any other networking needs you might have:
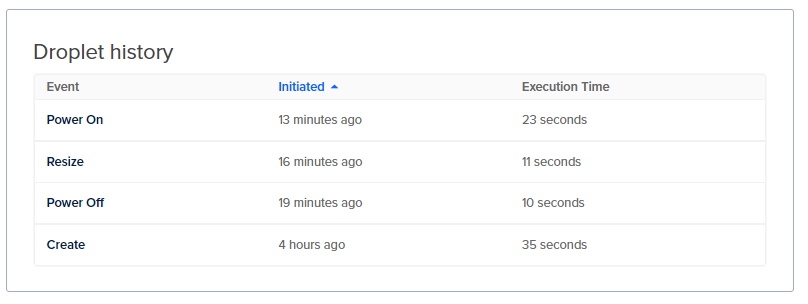
If you navigate to the History section, you can access a list of what has happened on your Droplet, such as when it was created, powered off, powered on, and more, as well as how long it took to perform that action:
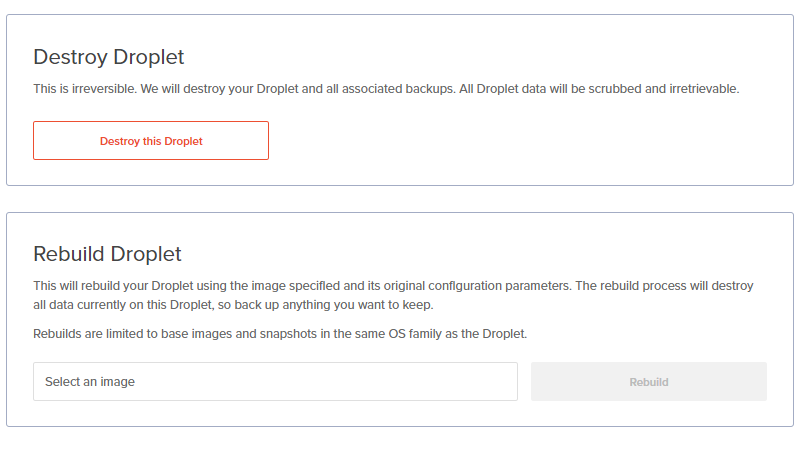
When you’re done working with your Droplet and no longer need it, you can select the Destroy option from the Droplet’s navigation list. From the Destroy page, press the Destroy this Droplet button. If you’re having issues with your Droplet, you can also Rebuild Droplet by choosing a new image. Both options are available from the Destroy page:
These are some ways you can manage your Droplet. We recommend exploring the other options available to you and continuing to monitor your Graphs so you’re up-to-date on what is going on with your Droplet. Once you have set up your Droplet, you can connect to it to manage your server settings.
Connecting To Your DigitalOcean Droplet
The next step for your newly created Droplet is to access it. You can connect to your Droplet by following the process in this section. The tasks are detailed in the embedded video and the text that follows.
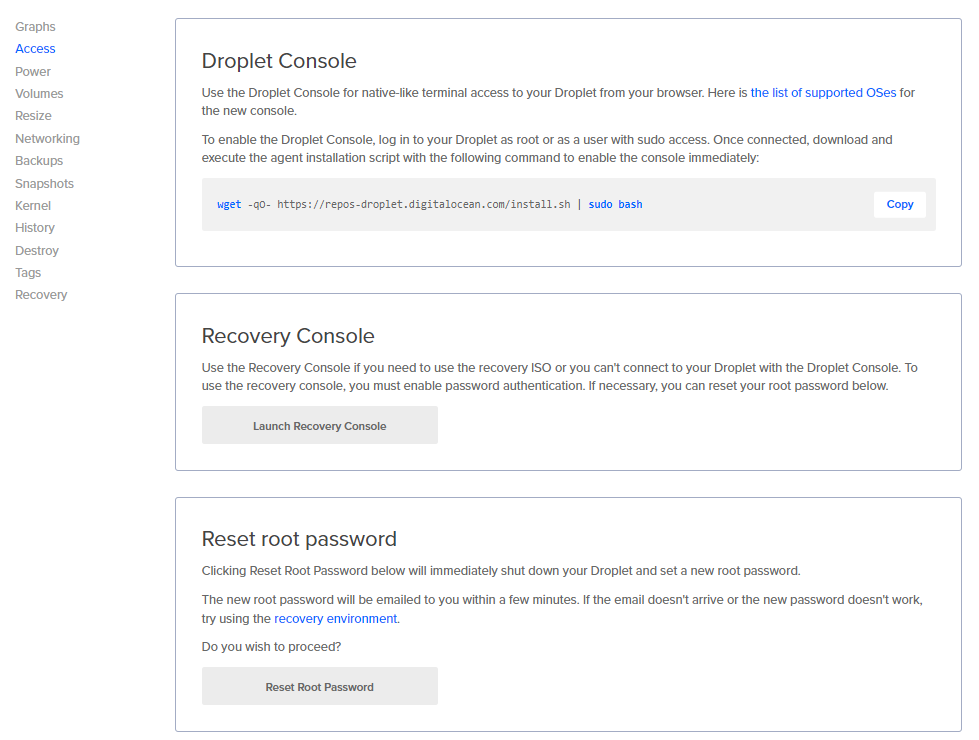
To get started, press on the link to your Droplet to navigate to your Droplet’s information dashboard. Then,select the Access option from the left navigation menu:
From there, you can launch the Droplet Console by logging in to your Droplet as the root user or as a sudo-enabled user. The Droplet Console will load a command-line interface that you can use to run commands on your Droplet.
Once logged in, you can download and execute the agent installation with the wget command provided on the *Access page in your Droplet’s dashboard:
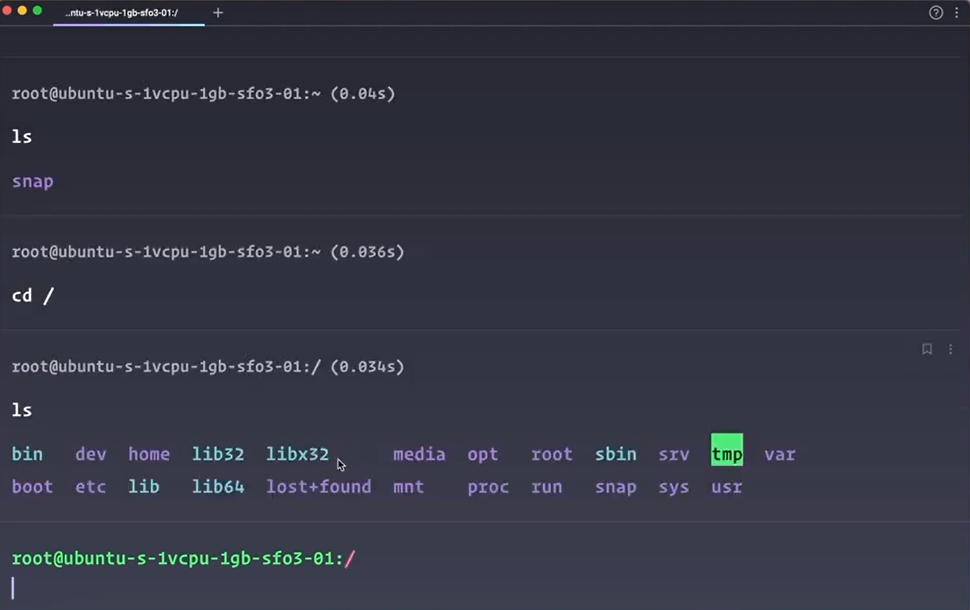
Once your Droplet has been set up, you can test it out by running commands. For example, you might run ls to view your directory or cd to go to the home directory. You can run these commands and more via the Droplet Console from your browser.
Another way to connect your Droplet is through your local terminal. In the following terminal interface example, we added SSH keys when creating the Droplet, which stores our current computer’s SSH key information. If you have that set up as well, then you can SSH into your Droplet from your local terminal. You can test the same commands in your local terminal as you did with the Droplet Console:
These are the ways you can connect to your Droplet. Once you have your SSH keys set up, you can use a number of applications. For example, you could use an SFTP client or connect to the databases in your Droplet. As long as you have your SSH keys added to your Droplet, there are plenty of ways to connect to it.
Connecting to your Droplet is one of many things you might wish to accomplish. Another thing you might do is to create a domain that points to your Droplet.
Creating a DigitalOcean Domain
Using DigitalOcean, you have the ability to manage your own Domain Name System (DNS). You can create a domain for your Droplet by following the process in this section. The tasks are detailed in the embedded video and the text that follows.
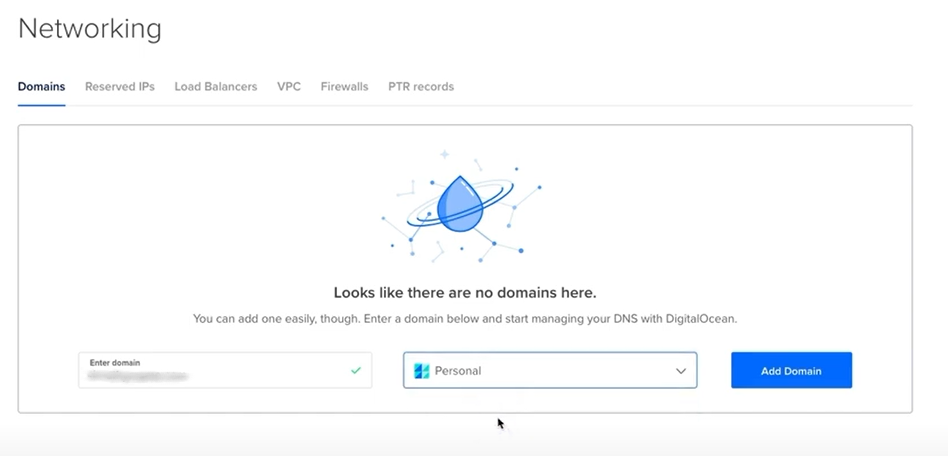
To get started, select the Networking option from the left panel, which will route you to the overview page with various tabs. If you’re not already on the Domains tab, toggle there for the next steps.
Insert your domain into the Enter domain text box. Then select the project that this domain will be associated with. Once you’re done, press the Add Domain button:
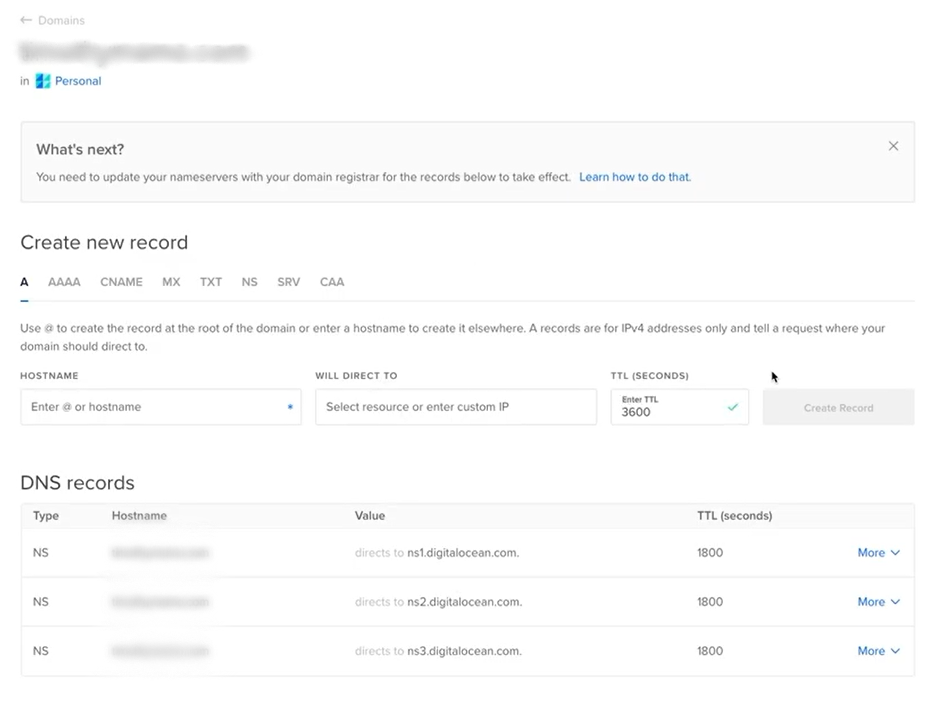
After you’ve added your domain, the page will refresh to display your domain information and the DNS records, as in the following example:
Since DigitalOcean is not a domain registrar, you’ll need to configure your nameservers with the registration you purchased for your domain. You can learn more about how to do this by referencing our DNS Registrars documentation for an extensive list of registrars and instructions on setting it up.
After successfully configuring your nameserver, you can add the necessary DNS records.
Note: Each DNS record has its own values and settings, although they all have time to live (TTL) in common. TTL determines how long a record can remain cached before it expires, which means higher TTL values will provide visitors with faster performance, and lower TTL values ensure DNS changes are implemented quickly. DigitalOceans have a minimum requirement for TTL value of 30 seconds for DNS records. You can learn more about supported record types in our Domains and DNS documentation
You can create one or multiple records, which can be applied to the root domain, a sub-domain, or a wildcard.
As an example, set up an A record that points to the root domain by adding the @ symbol in the Hostname field. Then select a resource from the dropdown list that loads in the Will direct to box. You can direct this record to an individual Droplet, a Load Balancer, or a Reserved IP. In the example shown in the following image, we are directing a new record to a Load Balancer with a highly available system. You can also set your TTL in seconds, but the example below maintains the default of one hour (or 3600 seconds). Once you’ve added all of this information, press Create Record:

If you prefer, you can also toggle to the other tabs in the Networking options for different functionalities. For example, you can set an AAAA record for IPv6 addresses or use CNAME to direct a hostname to another hostname. You can also use TXT records when you want to verify your own domain. Other records include MX, NS, SRV, and CAA. For more information, read all the supported record types in our Domains and DNS documentation.
Your domain and DNS records are now added, configured, and ready to go. When using domains, it is common to include a load balancing system for traffic management.
Creating a DigitalOcean Load Balancer
DigitalOcean’s fully-managed Load Balancers enable you to scale your applications to a highly available, secure, and performative system. Load balancers distribute traffic to groups of Droplets to decouple the overall health of a backend service from the single server’s health, ensuring your services stay online.
You can create a DigitalOcean Load Balancer by following the process in this section. The tasks are detailed in the embedded video and the text that follows.
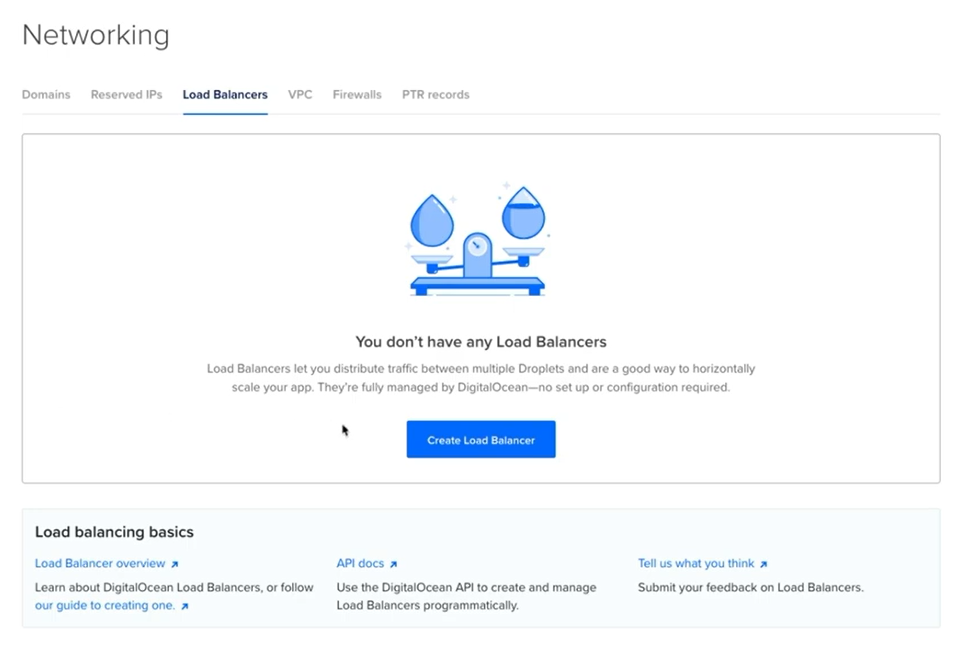
To get started, navigate to the Networking section on the left panel and toggle to the Load Balancers tab. Once there, press the Create Load Balancer button:
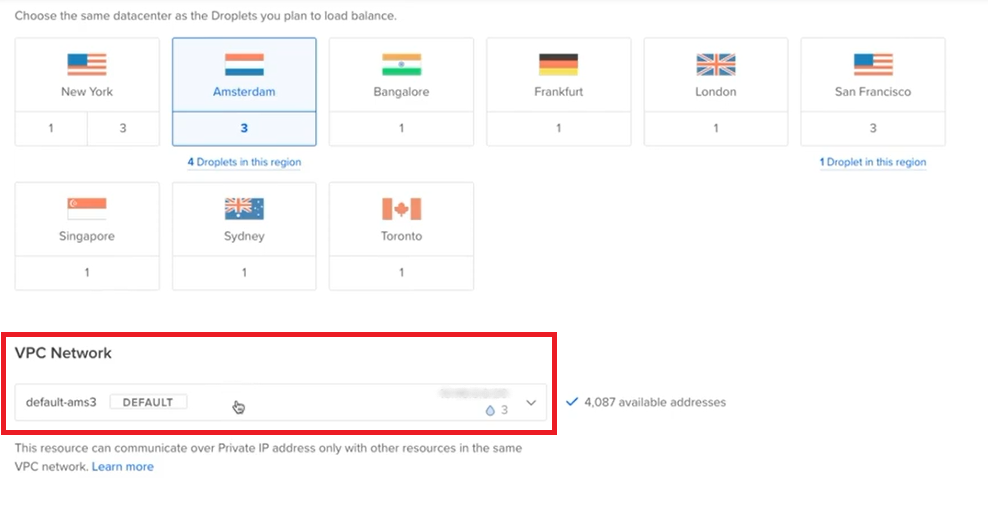
To create your Load Balancer, you need to make several selections. First, you willChoose a datacenter region for where to create the Load Balancer. You can view the resources you’ve already created for a given region by hovering on the Droplets in this region message that can appear below the region box. It’s recommended you choose the region closest to you, though you might also wish to create your Load Balancer in the same region as the Droplets it will support.
Next, select the VPC Network, which is what your Load Balancer is being created for. VPC or Virtual Private Cloud, is a private network interface used for DigitalOcean resources. A VPC network provides secure connections between resources so that the network cannot be accessed publicly on the internet or other VPC networks. You can read more in our VPC documentation. In the following example, we’ve selected the default VPC network, where there are currently three Droplets. When making your selection, keep in mind that the Load Balancer needs to exist in the same VPC network as the resources that it will support. If you have followed along with the selections we have made thus far, you will see a dashboard similar to this:
Next, scroll to the Scaling configuration heading, where you will select the Number of nodes that your Load Balancer will have, according to your expected numbers of Simultaneous connections, Requests per second, and SSL connections per second. In the example shown below, we’ve selected one node, but you can always increase the number of nodes after creating the Load Balancer:

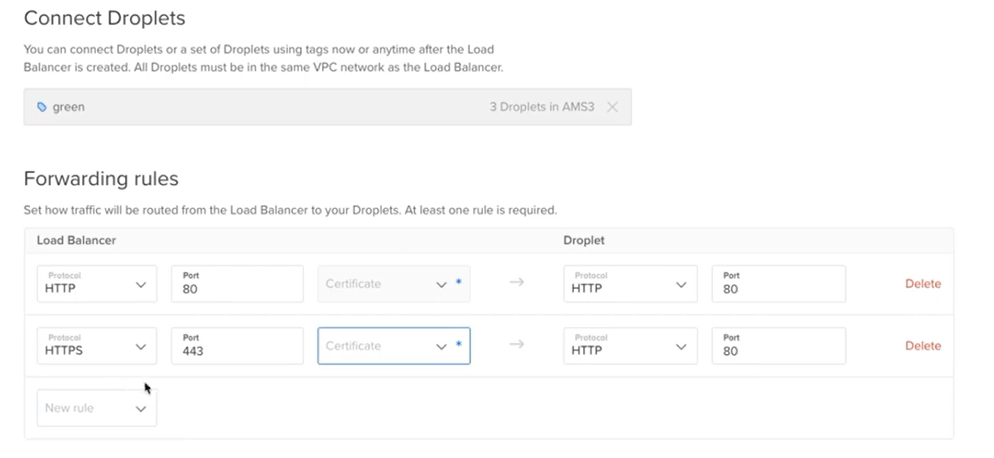
Then select the resources to be connected with the Load Balancer in the Connect Droplets section. You can connect to individual Droplets by the resource name or multiple resources by searching for a specified tag. It’s recommended to choose the one that will provide a highly available system.
Once you’ve selected what resources will be connected, you can configure any Forwarding rules required. For example, you might set HTTPS rules, which will redirect port 443 on the Load Balancer to port 80 on the Droplet:
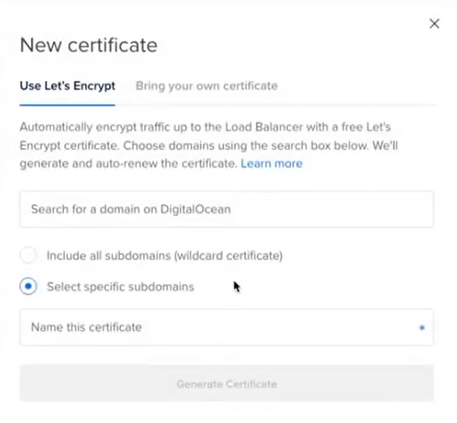
If you decide to set up HTTPS forwarding, you must also add a certificate by accessing the Certificate dropdown menu and choosing + New certificateu. A prompt will appear, which enables you to generate a certificate automatically by using the free Let’s Encrypt service or a wildcard certificate. You can add the certificate by searching for your domain name on DigitalOcean, which can also be done for a specific subdomain:
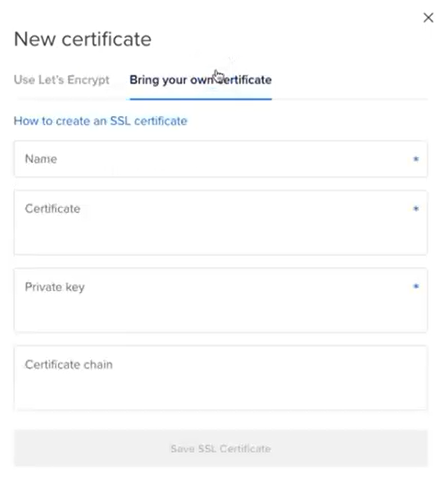
You can also select the second tab to Bring your own certificate, which allows you to add an existing certificate. You can learn more in our documentation on How to Manage SSL Certificates:
For the purposes of this tutorial, we will only keep the default HTTP rule. Press the Delete button to delete the HTTPS rule in the Forwarding rules section.
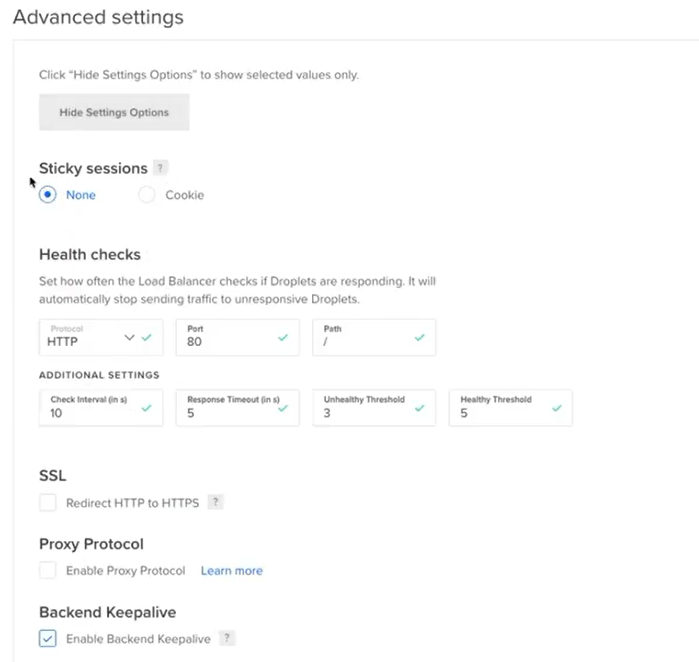
Continue on the page until you find the Advanced settings option, and then press Edit Advanced Settings. Several options will appear as advanced settings for your Load Balancer. You can enable Sticky sessions, modify Health checks, enable SSL forwarding, and more. Keep in mind that you can modify these settings even after the Load Balancer has been created:
Next, give your Load Balancer a unique name with Choose a name, select the project that you would like to hold your Load Balancer with Select project, and press the Create Load Balancer button:

It may take some time to provision your new Load Balancer. After a few minutes, your Load Balancer will be up and running.
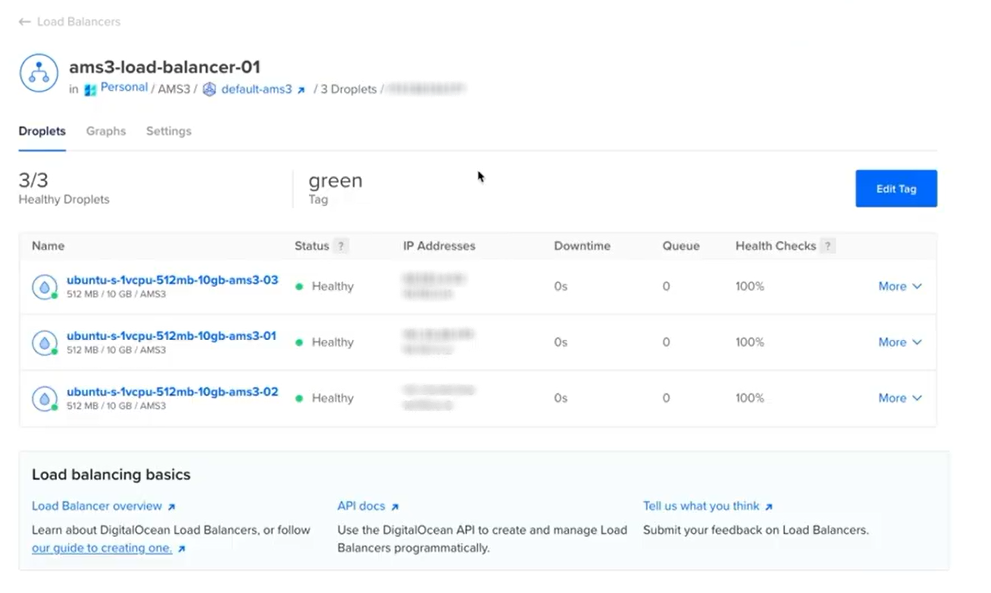
You can access the status of your connected Droplets and their health on the overview page. This overview page will provide additional information about your Load Balancer:
You’ve successfully created a Load Balancer with DigitalOcean,next you’ll learn how to create a Reserved IP for your DigitalOcean Droplet.
Creating a DigitalOcean Reserved IP
DigitalOcean’s Reserved IP allows you to create an IP address that is publicly accessible. This can point to an existing Droplet you have or be reassigned. This is useful when you want to update your system to a different or newer version, ensuring little-to-no downtime. For more information on Reserved IPs, peruse our Reserved IPs documentation.
You can create a DigitalOcean Reserved IP by following the process in this section. The tasks are detailed in the embedded video and the text that follows.
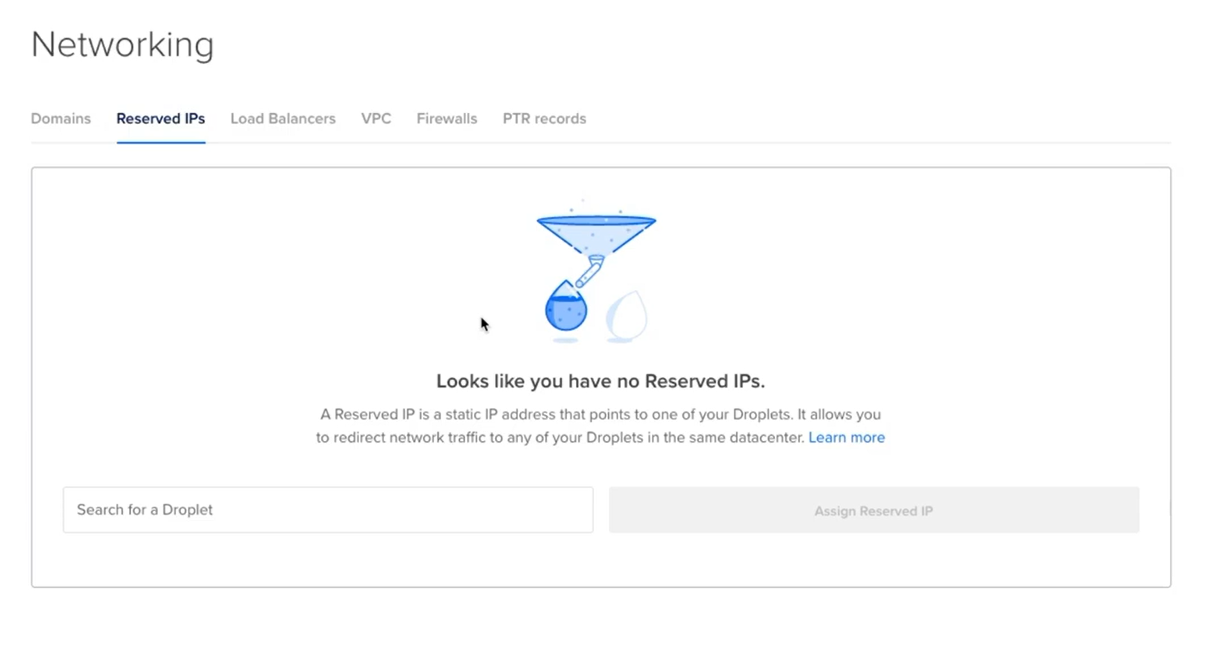
First, navigate to Networking on the left panel and toggle to the Reserved IPs tab. Once there, you can use the Search for a Droplet field to load a list of Droplets to which you can attach a static IP. To find a specific Droplet more quickly, you can narrow the search parameters by adding specific text to the field to find the appropriate Droplet. Then, press the Assign Reserved IP button on the right:
After a few seconds, the Reserved IP will be listed next to the assigned Droplet you selected, as in the following example:

If you want to reassign your Reserved IP, press the More button to access a dropdown menu and select Reassign from the list of options. You can also press the Assigned To field to select from Droplets and reassign there. Your newly assigned Droplet has to live within the same datacenter region as the current one in order to use the Reserved IP as each datacenter region holds specific Reserved IP resources.
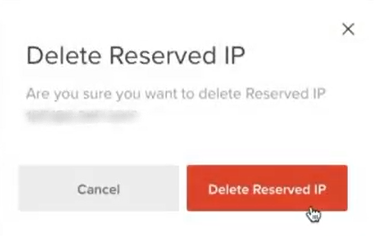
If you want to delete your Reserved IP, navigate to the same More dropdown menu and select Delete from the list of options. Note that deleting a Reserved IP will unassign and permanently remove it from your account:

After selecting Delete from the dropdown list, you will need to confirm deletion. If you want to make this choice, press the Delete Reserved IP button:
You have successfully created, reassigned, and deleted a Reserved IP with DigitalOcean.
Conclusion
In this tutorial, you learned how to create, manage, and connect your DigitalOcean Droplet. You also learned about additional features for your Droplet, such as DigitalOcean Domains, Load Balancers, and Reserved IPs. We encourage you to explore all the tools available to you and calculate your savings against other virtual machine services by signing up for a DigitalOcean Cloud account to start building your DigitalOcean Droplet today.
Check out this DigitalOcean Onboarding Series video playlist with even more guidance on how to optimize your DigitalOcean products and services.